Spring is the season of metamorphosis, making the butterfly the ultimate symbol for refreshing your home decor.
Incorporating whimsical butterfly crafts into your interior design doesn’t just add a touch of nature; it introduces movement, vibrant color palettes, and a sense of lightheartedness that heavy winter decor lacks.
Whether you are looking for sophisticated gallery wall additions or playful accents for a sunroom, these 15 curated DIY projects offer a range of techniques from paper-cutting and upcycling to textile art.
1. 3D Cardstock Butterfly Wall Installation
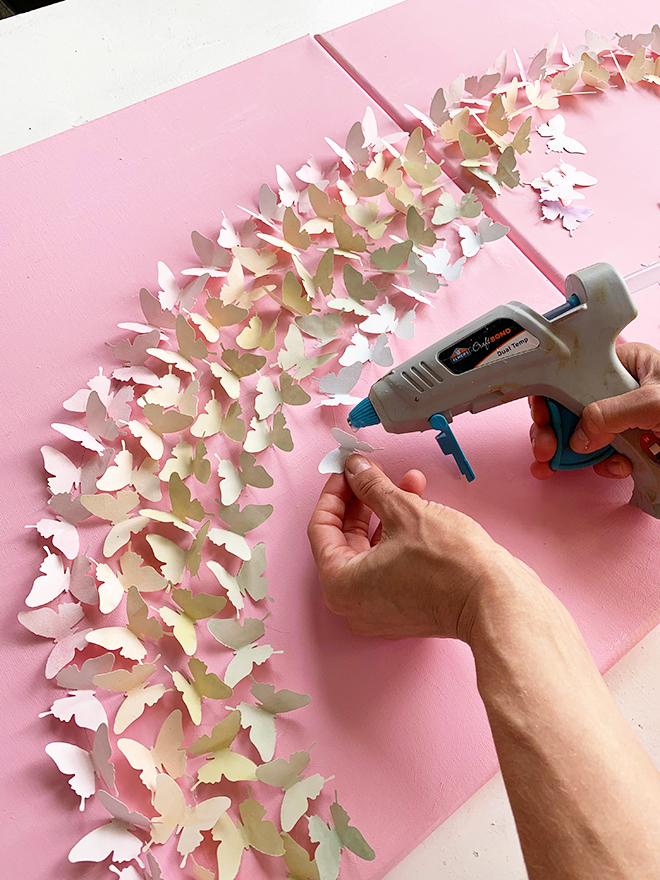
A 3D butterfly installation creates the illusion of a migrating swarm moving across your wall. This project is high-impact but low-cost, requiring only high-quality cardstock and adhesive.
- ✦Materials: 65lb cardstock (in gradients of one color or a rainbow mix), sharp scissors or a cutting machine (Cricut/Silhouette), and double-sided foam tape.
- ✦The Process: Cut butterflies in three different sizes to create depth. Fold the wings upward at the body to create the 3D effect. Start with a dense cluster near a corner or piece of furniture and “scatter” them outward, placing them further apart as the swarm ascends.
- ✦Pro Tip: Use varying shades of the same color (e.g., navy to sky blue) for a sophisticated ombré effect.
2. Upcycled Tin Can Butterfly Planters
Give your herb garden a whimsical upgrade by turning discarded tin cans into textured butterfly vessels. This upcycling project combines metalwork with bright outdoor paints.
- ✦Materials: Clean tin cans, aluminum soda cans (for the butterflies), metal snips, outdoor acrylic paint, and industrial glue (E6000).
- ✦The Process: Paint your main tin cans in pastel spring shades. Using metal snips, cut butterfly shapes out of flattened soda cans. Emboss the metal wings using a blunt stylus to add texture. Glue the metal butterflies to the front of the cans, slightly bending the wings so they appear to have just landed.
- ✦Safety Note: Always wear gloves when cutting metal to avoid sharp edges.
3. Pressed Flower Butterfly Specimen Art
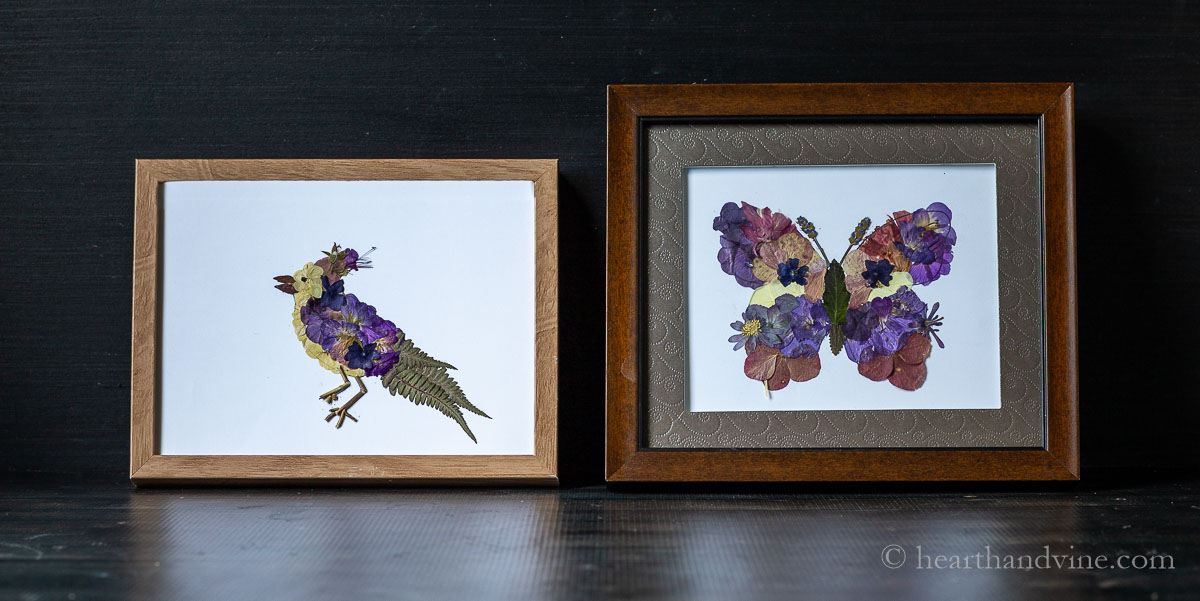
This project mimics the look of traditional entomology displays but uses botanical elements instead of real insects. It is a beautiful way to preserve early spring blooms.
- ✦Materials: Pressed pansies or violas, tweezers, acid-free glue, and a deep shadow box frame.
- ✦The Process: Use two elongated flower petals for the top wings and two rounded petals for the bottom. Arrange them on a piece of high-quality watercolor paper. Use a thin twig or a sliver of dried leaf for the body and antennae. Secure everything with a tiny dot of glue and frame it behind glass.
4. Monofilament Floating Butterfly Mobile
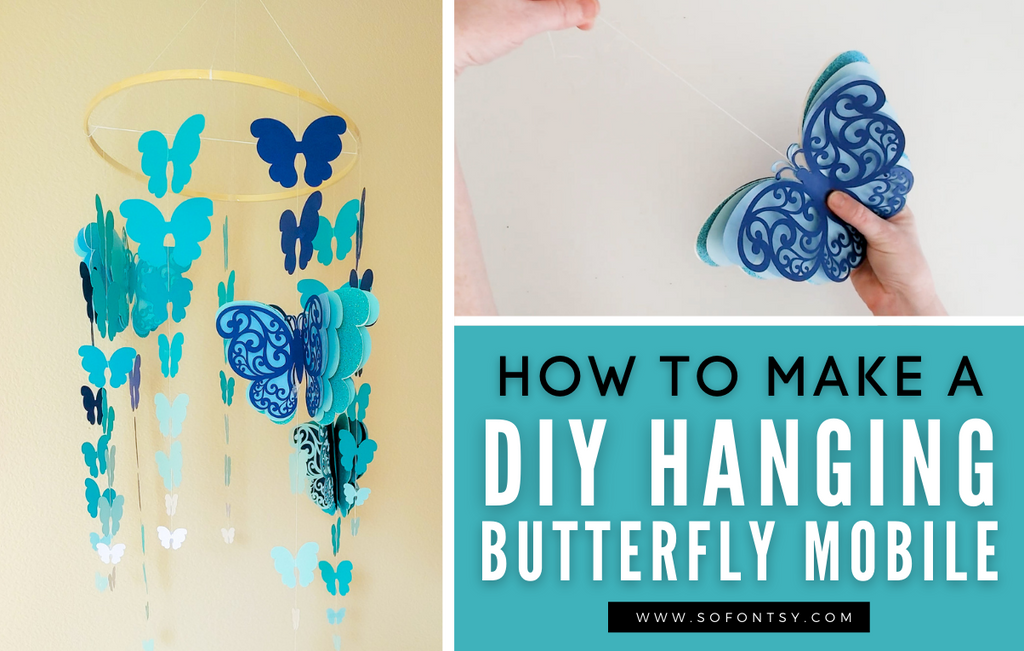
Create a sense of magic in a nursery or a breezy hallway with a mobile that moves with the slightest air current.
- ✦Materials: A metal hoop or a sturdy embroidery hoop, monofilament (fishing line), translucent vellum paper, and crimp beads.
- ✦The Process: Cut butterflies from vellum; the translucency allows light to pass through beautifully. String them onto varying lengths of monofilament. Tie the lines to the hoop at different intervals. When hung near a window, the vellum catches the light and the butterflies appear to be floating mid-air.
5. Watercolor Bunting with Feathered Edges
Watercolor provides the soft, bleeding edges that perfectly mimic the natural patterns of a butterfly’s wings.
- ✦Materials: Watercolor paper, liquid watercolors, twine, and mini clothespins.
- ✦The Process: Paint large washes of color onto watercolor paper using the “wet-on-wet” technique. Once dry, cut out butterfly shapes. The random distribution of pigment ensures no two butterflies are the same. Clip them to a length of twine to drape across a mantel or window frame.
6. Beaded Wire Garden Stakes
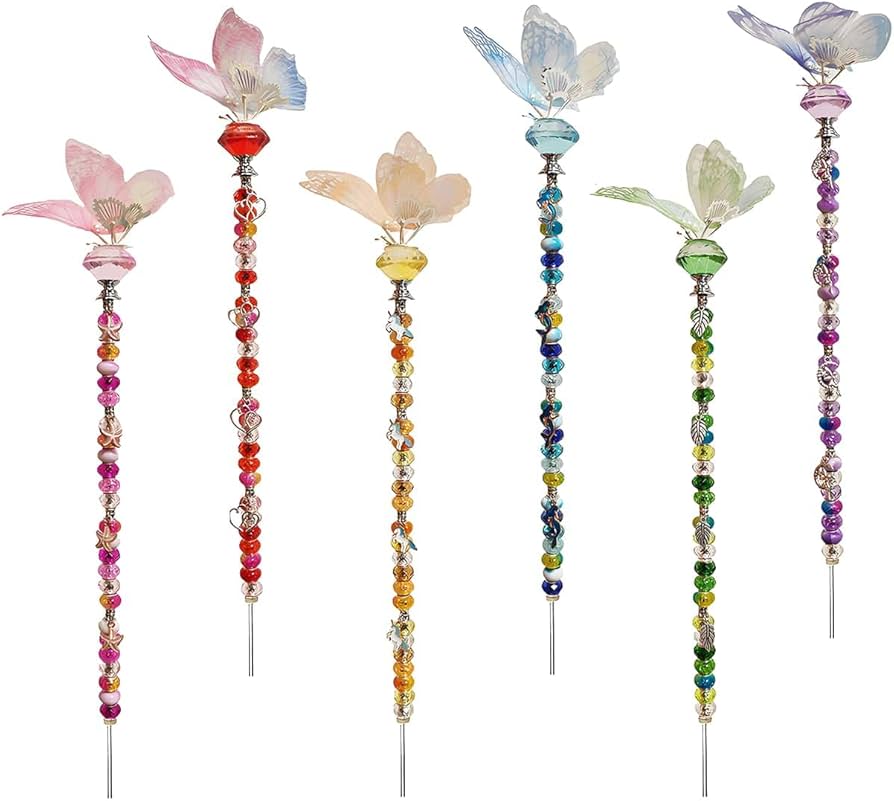
Add permanent “pollinators” to your indoor potted plants or outdoor flower beds with shimmering wire and glass beads.
- ✦Materials: 18-gauge copper or silver wire, assorted glass beads, and needle-nose pliers.
- ✦The Process: Create a figure-eight loop with the wire to form the wing frames. Thread colorful beads onto the wire before closing the loops. Twist the center to form the body and leave a long “tail” of wire to serve as the stake that goes into the soil.
7. Vintage Book Page Decoupage Terrarium
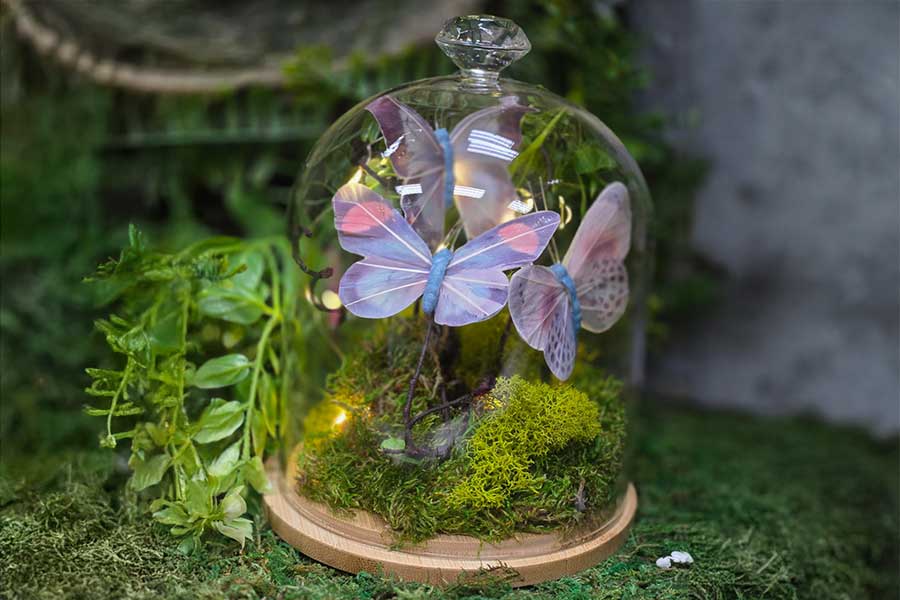
For a dark-academia or vintage aesthetic, use old book pages or sheet music to create “specimens” housed in glass cloches.
- ✦Materials: A glass cloche or large jar, old book pages, wire, and moss.
- ✦The Process: Cut butterfly shapes from the text-heavy pages. Glue a thin wire to the back of each butterfly. Anchor the other end of the wire into a base of floral foam hidden under a layer of preserved green moss. Place the cloche over the top for an instant Victorian-style centerpiece.
8. Embroidered Linen Butterfly Hoops
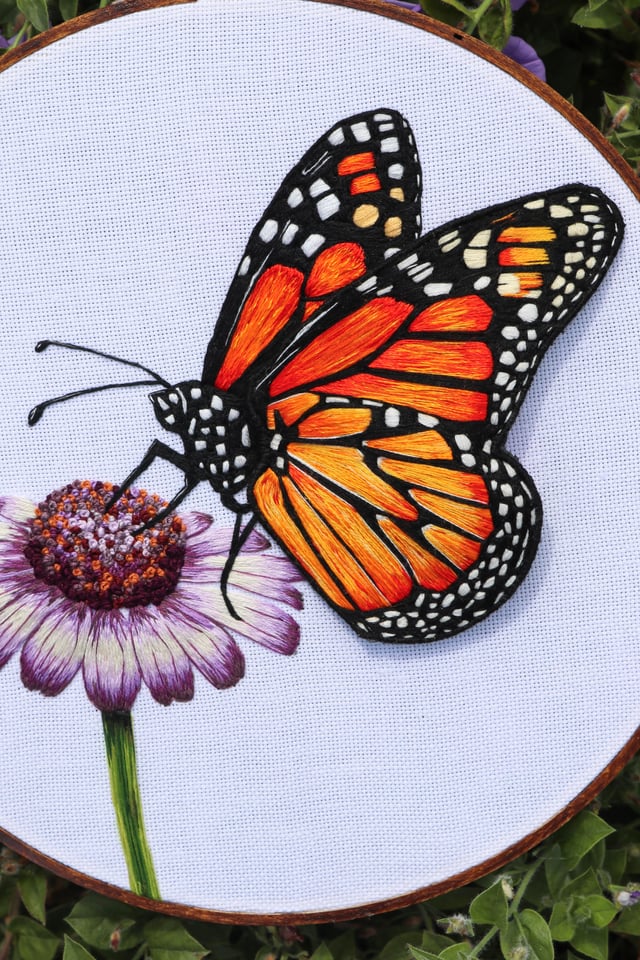
Textile lovers can bring spring indoors through the tactile beauty of embroidery.
- ✦Materials: Linen fabric, embroidery hoop, embroidery floss, and a water-soluble fabric pen.
- ✦The Process: Trace a butterfly silhouette onto the linen. Use a variety of stitches—satin stitch for the wing panels, backstitch for the veins, and French knots for the wing spots. Leave the fabric in the hoop for a ready-to-hang piece of wall art.
9. Recycled Plastic Sun Catchers
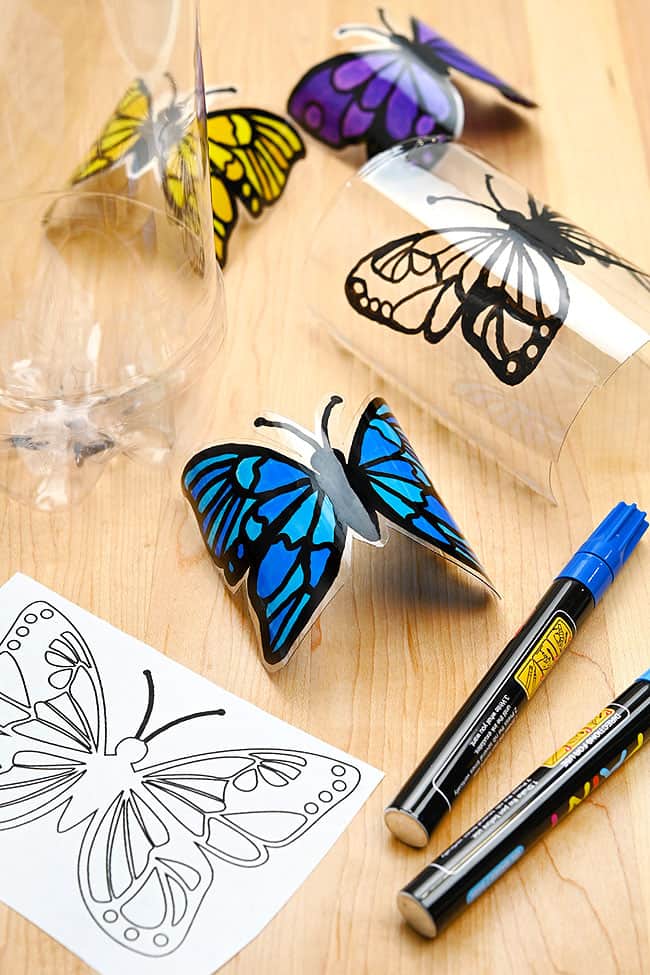
This eco-friendly project is perfect for kids and adults alike, turning plastic waste into stained-glass-style decor.
- ✦Materials: Clear plastic bottles (smooth sides), permanent markers (Sharpies), and scissors.
- ✦The Process: Cut a flat section from a plastic bottle. Draw a butterfly design using black permanent marker for the “lead” lines. Fill in the sections with vibrant colors. When hung in a sunny window, the plastic glows like expensive glass.
10. Faux Taxidermy Shadow Box

Create a professional-looking “collection” using realistic printed cardstock and entomology pins.
- ✦Materials: Realistic butterfly printables, foam board, a shadow box, and sewing pins with black heads.
- ✦The Process: Cut out highly detailed butterfly images. Pin them through the center into a piece of foam board covered in white linen. Use small spacers to lift some wings higher than others, giving the display a lifelike, museum-quality feel.
11. Stenciled Butterfly Welcome Mat
Extend your spring theme to the porch with a customized coir doormat.
- ✦Materials: Plain coir mat, butterfly stencil, and outdoor acrylic paint or spray paint.
- ✦The Process: Tape the stencil firmly to the mat. Use a stiff-bristled brush to “pounce” the paint into the fibers. For a whimsical look, have the butterflies “flying” off the edge of the mat.
12. Origami Butterfly Table Runner
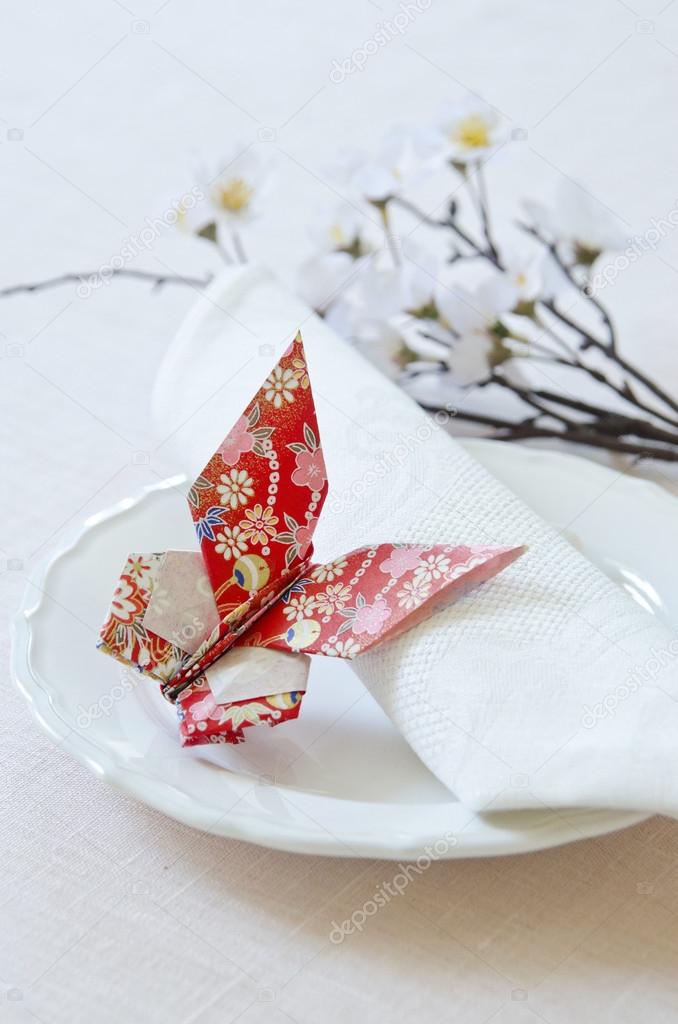
Elevate your Easter or spring brunch table with a delicate trail of folded paper butterflies.
- ✦Materials: Square origami paper or patterned scrapbooking paper.
- ✦The Process: Use the classic “Akira Yoshizawa” butterfly fold. Create 20–30 butterflies in various sizes and scatter them down the center of your dining table, interspersed with eucalyptus sprigs or fresh flowers.
13. Driftwood and Wire Wall Sculpture
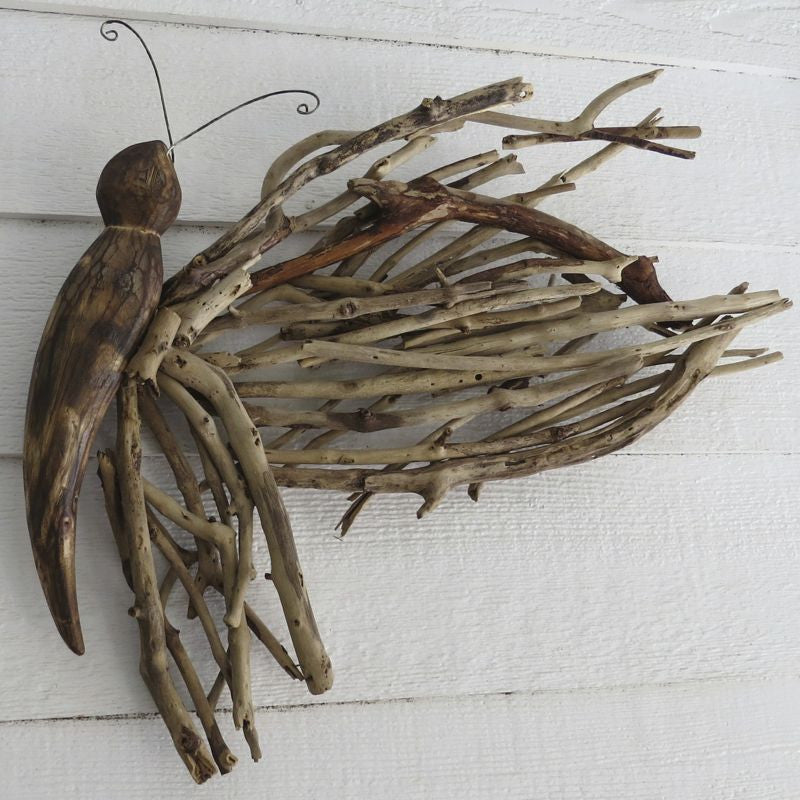
For a coastal or rustic home, combine the organic texture of driftwood with the industrial feel of wire.
- ✦Materials: A piece of interesting driftwood, thin gauge wire, and pliers.
- ✦The Process: Twist wire into minimalist butterfly outlines. Drill tiny holes into the driftwood and insert the “antennae” or wire legs of the butterflies so they appear to be resting on the wood. This creates a beautiful 3D sculptural piece for a bathroom or entryway.
14. Butterfly Silhouette Mason Jar Lanterns
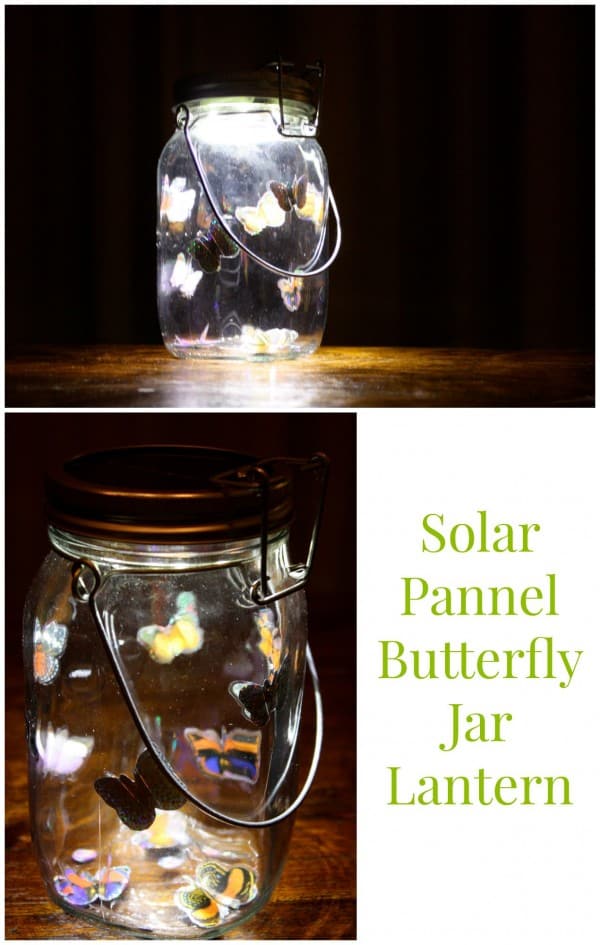
Create an atmospheric glow for spring evenings using simple mason jars and paper cutouts.
- ✦Materials: Mason jars, black construction paper, and battery-operated tea lights.
- ✦The Process: Cut small butterfly silhouettes from the black paper. Glue them to the *inside* of the jar. When the candle is lit, the butterflies appear as dark shadows against the glowing glass, mimicking a jar full of fireflies and moths.
15. Fabric Scrap Butterfly Wreath
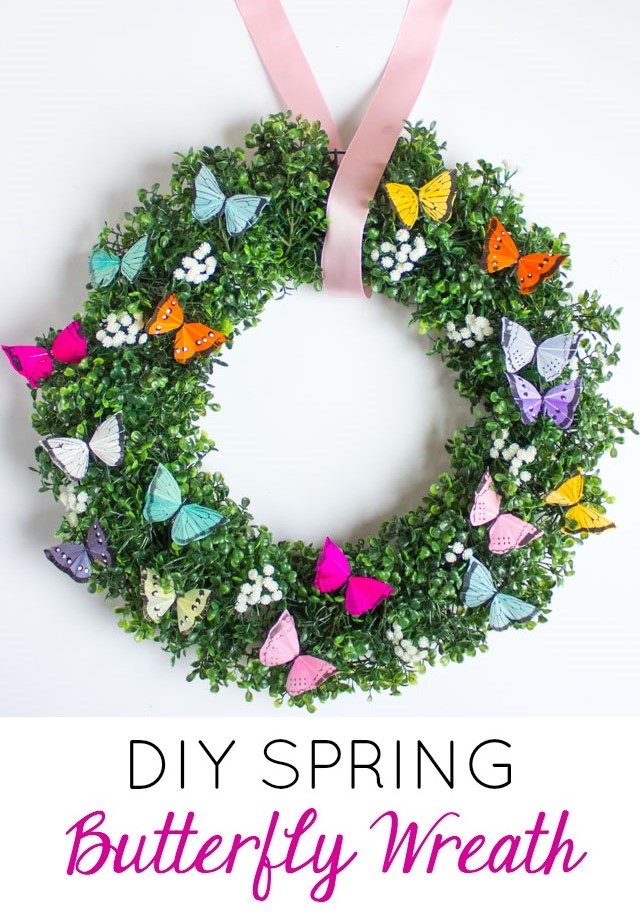
Don’t let your fabric remnants go to waste. A butterfly wreath is a colorful alternative to traditional floral wreaths.
- ✦Materials: Wire wreath form, fabric scraps, and pipe cleaners.
- ✦The Process: Pinch rectangular fabric scraps in the center and wrap a pipe cleaner around them to create the “body” and “wings.” Twist the pipe cleaners onto the wreath form until it is completely covered in a flurry of textile butterflies.
Comparison of Butterfly Craft Techniques
| Project Style | Difficulty Level | Primary Material | Best Placement |
|---|---|---|---|
| Wall Installation | Easy | Cardstock | Living Room / Bedroom |
| Specimen Art | Medium | Pressed Flowers | Gallery Wall |
| Garden Stakes | Medium | Wire & Beads | Potted Plants |
| Sun Catchers | Easy | Recycled Plastic | Windows |
| Embroidered Hoops | Hard | Fabric & Thread | Reading Nook |
Essential Tips for Professional-Looking Butterfly Crafts
- ✦Vary the Sizes: In nature, butterflies are rarely the same size. When creating a display, use at least three different scales to make the arrangement look organic and dynamic.
- ✦Focus on Symmetry: While nature isn’t always perfect, the human eye perceives beauty in the symmetrical patterns of butterfly wings. Use templates to ensure your wing shapes match on both sides.
- ✦Mix Textures: Combine hard materials (like wire or glass) with soft materials (like vellum or fabric) to add visual interest to your spring decor.
- ✦Consider Light: Butterflies are associated with brightness. Place your crafts near natural light sources—windows, mirrors, or under lamps—to highlight their colors and shapes.
Frequently Asked Questions
What is the best paper for making 3D butterflies?
For wall art, a 65lb (176 gsm) cardstock is ideal. It is heavy enough to hold its shape when folded but light enough to stay attached to the wall with simple adhesives. For hanging mobiles, vellum or parchment paper is better due to its light-filtering properties.
How do I make my DIY butterflies look more realistic?
To achieve a realistic look, focus on the “veining” of the wings. You can use a fine-liner pen to draw veins or use an embossing tool to create physical ridges. Also, slightly offsetting the wings so they aren’t perfectly flat makes them look like they are in mid-flight.
Can I use these crafts outdoors?
Projects like the Tin Can Planters and Beaded Garden Stakes are designed for outdoor use. However, paper and fabric-based crafts should remain indoors or on a well-protected porch to prevent wilting or fading from moisture and UV rays.
How do I hang paper butterflies without damaging my paint?
Use “museum putty” or high-quality double-sided foam squares designed for easy removal. Always test a small, inconspicuous area of your wall first.
Conclusion
Whimsical butterfly crafts offer a versatile and budget-friendly way to usher in the spirit of spring.
From the sophisticated look of pressed flower specimen art to the eco-friendly charm of recycled plastic sun catchers, there is a project to suit every skill level and interior style.
By focusing on movement, light, and color, you can transform your living space into a vibrant sanctuary that celebrates the beauty of transformation. Pick one of these 15 ideas today and let your creativity take flight!
Leave a Reply