Spring is a season of renewal, but for parents of toddlers, it often means being stuck indoors during those inevitable April showers.
Keeping a two-year-old or three-year-old entertained without relying solely on screen time requires a bit of creativity and a stash of simple supplies.
The key to successful toddler crafting isn’t the final product—it’s the sensory experience, the development of fine motor skills, and the joy of making a mess in a controlled environment.
By focusing on process-based art, you can turn a gloomy afternoon into a vibrant learning session that celebrates the return of flowers, bugs, and sunshine.
Before diving into the specific projects, it is helpful to have a Rainy Day Craft Kit ready to go.
Having these items on hand prevents the frustration of realizing you’re out of glue mid-project.
Essential Toddler Craft Supply List
| Item | Use in Spring Crafts |
|---|---|
| Washable Paint | Fingerpainting rain, stamping flowers, and decorating rocks. |
| Construction Paper | The base for almost every paper-based craft. |
| Coffee Filters | Perfect for “bleeding” marker art and butterfly wings. |
| Glue Sticks/School Glue | Developing “dot-dot-not-a-lot” skills. |
| Safety Scissors | Practicing snips (with heavy supervision). |
| Recyclables | Egg cartons, toilet paper rolls, and cardboard boxes. |
| Nature Items | Twigs, dried leaves, or stones collected on dry days. |
1. Vibrant Coffee Filter Butterflies
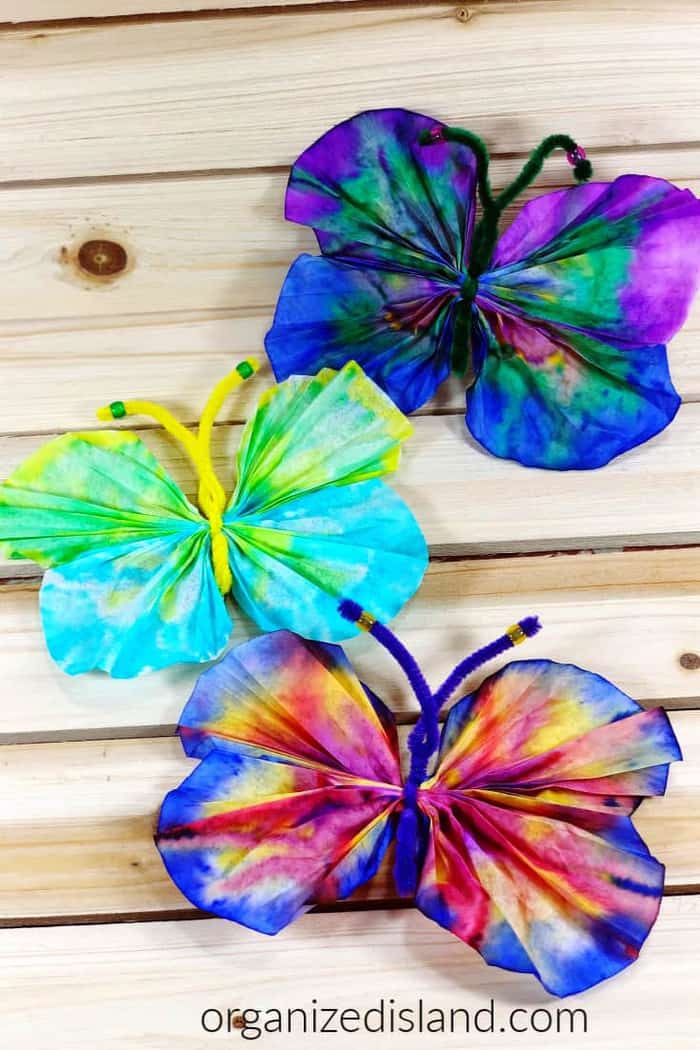
This is a classic for a reason. It combines science (chromatography) with art.
Toddlers love watching the colors spread and blend together as if by magic.
Materials Needed:
- ⬤White coffee filters
- ⬤Washable markers
- ⬤Spray bottle with water
- ⬤Pipe cleaners
- ⬤Clothespins (optional)
How to Make It:
- ⬤Color the Filter: Let your toddler scribble all over a flattened coffee filter with various bright colors. The more ink, the better the result.
- ⬤The Magic Step: Give your child a spray bottle filled with water. Let them lightly mist the filter and watch as the colors run and blend together.
- ⬤Dry: Set the filters aside on a paper towel to dry completely.
- ⬤Assemble: Once dry, scrunch the filter in the middle. Wrap a pipe cleaner around the center to create the body and antennae. If you want a sturdier butterfly, clip a clothespin over the center and decorate the pin with googly eyes.
2. Paper Plate Sunflowers
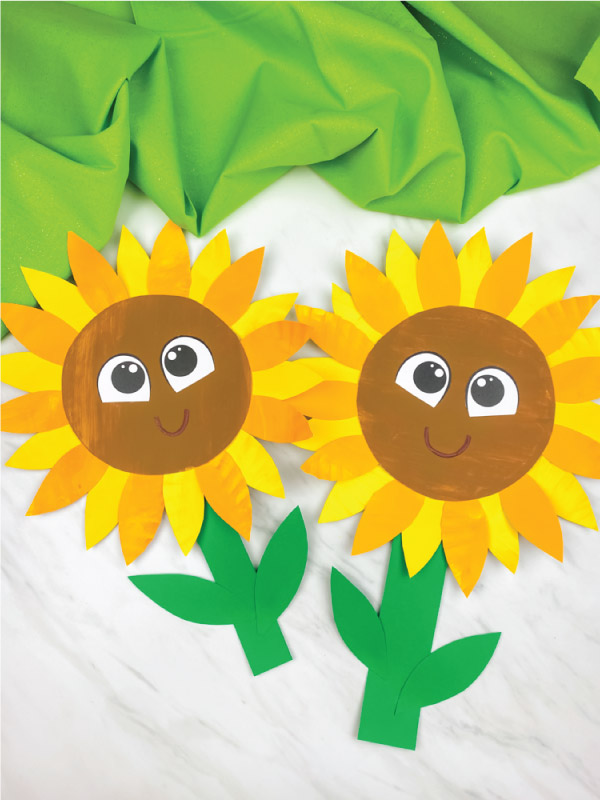
Sunflowers are the epitome of spring and summer.
This craft helps toddlers practice their “pincer grasp” by picking up small seeds or paper bits to place in the center.
Materials Needed:
- ⬤Paper plates
- ⬤Yellow paint or yellow construction paper
- ⬤Brown paint, real sunflower seeds, or dried black beans
- ⬤Glue
How to Make It:
- ⬤Paint the Petals: Have your toddler paint the outer rim of the paper plate bright yellow.
- ⬤Create Texture: Once the paint is dry, apply a generous amount of glue to the center of the plate.
- ⬤Seed Placement: Let your toddler sprinkle sunflower seeds or beans into the glue. This is excellent for fine motor development.
- ⬤Alternative: If you don’t want to use real seeds, they can finger-paint brown dots in the center.
3. Upcycled Egg Carton Flowers
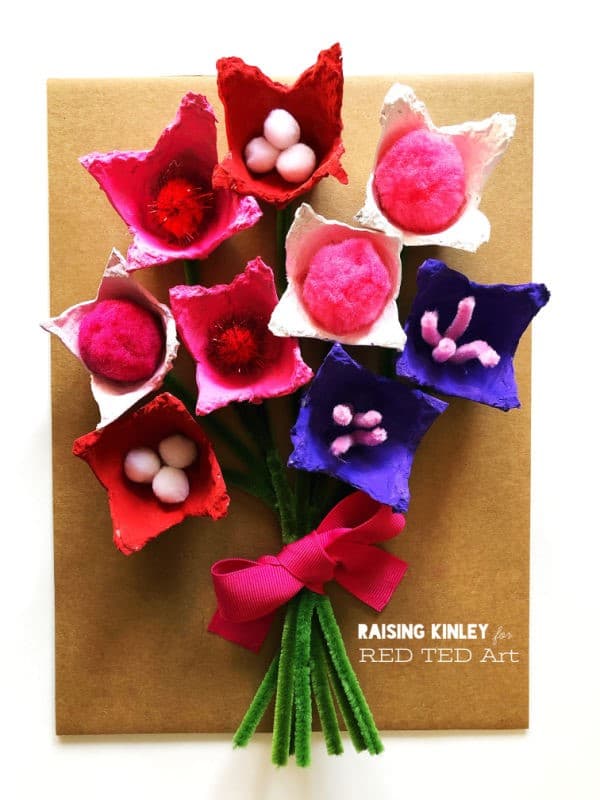
Upcycling is a great way to teach children about reusing materials.
Egg cartons make the perfect “petals” for 3D spring blooms.
Materials Needed:
- ⬤Cardboard egg carton
- ⬤Washable paint
- ⬤Green pipe cleaners or popsicle sticks
- ⬤Glue
How to Make It:
- ⬤Prep the Cups: An adult should cut the individual cups out of the egg carton.
- ⬤Paint: Let the toddler paint each cup a different spring color—pink, purple, or yellow.
- ⬤Add the Stem: Poke a small hole in the bottom of the cup and help the toddler thread a green pipe cleaner through, or glue a green popsicle stick to the back.
- ⬤Display: These look adorable “planted” in a jar or a play-dough base.
4. Fingerprint Rain Clouds
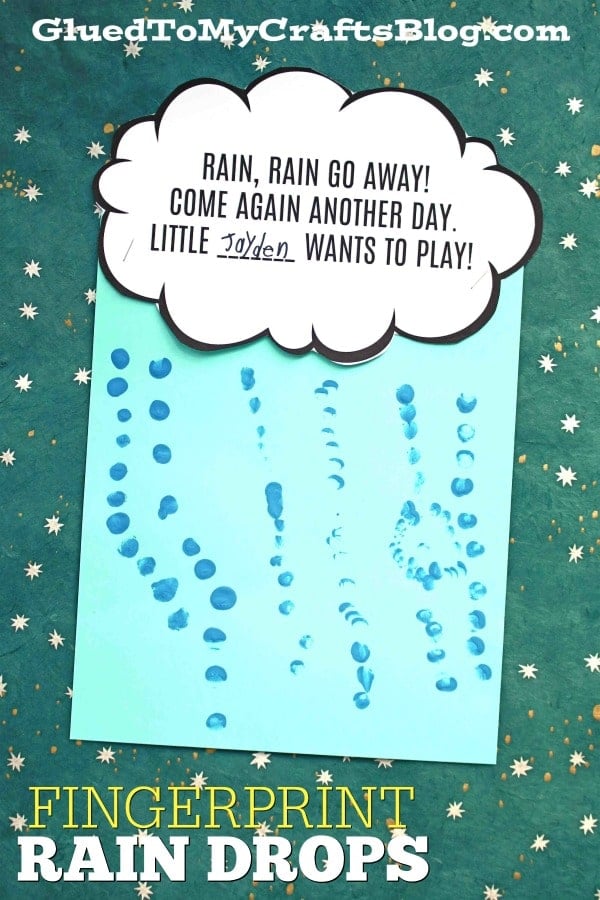
Embrace the rainy weather outside by recreating it on paper.
This is a sensory-heavy craft that toddlers usually find very satisfying.
Materials Needed:
- ⬤Blue and white construction paper
- ⬤Blue washable paint
- ⬤Cotton balls
- ⬤Glue
How to Make It:
- ⬤Make the Cloud: Have the toddler glue cotton balls onto the top half of a piece of blue paper to create a fluffy “rain cloud.”
- ⬤Fingerprint Rain: Pour a small amount of blue paint onto a palette. Show your child how to dip their index finger in and make “raindrops” falling from the cloud.
- ⬤Count the Drops: This is a great opportunity to practice counting: “One drop, two drops, three drops!”
5. Toilet Paper Roll Binoculars
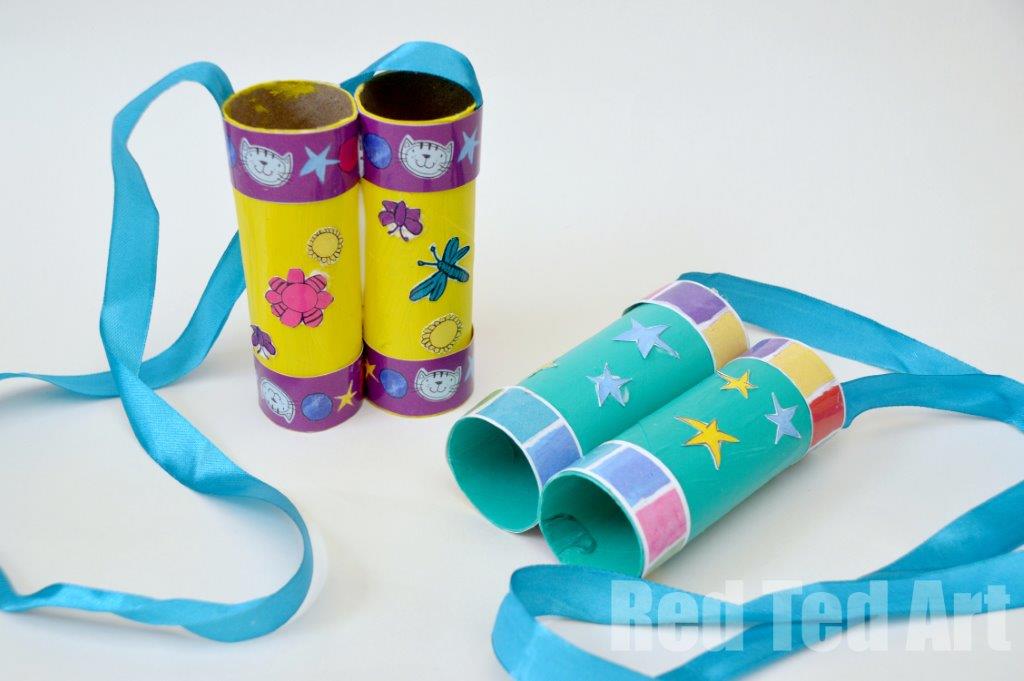
Once the rain stops, your toddler will want to go on a “nature hunt.”
These binoculars are the perfect accessory for indoor or outdoor exploration.
Materials Needed:
- ⬤Two toilet paper rolls
- ⬤Masking tape or glue
- ⬤String or yarn
- ⬤Stickers or markers for decorating
How to Make It:
- ⬤Connect the Rolls: Tape or glue two toilet paper rolls together side-by-side.
- ⬤Decorate: Let the toddler go wild with stickers, crayons, or markers.
- ⬤Add the Strap: Punch a hole on the outer side of each roll and tie a piece of yarn through. (Ensure the string is short enough to be safe and always supervise the child while wearing them).
- ⬤The Hunt: Use them to look for “birds” (stuffed animals) hidden around the living room.
6. Handprint Lilies
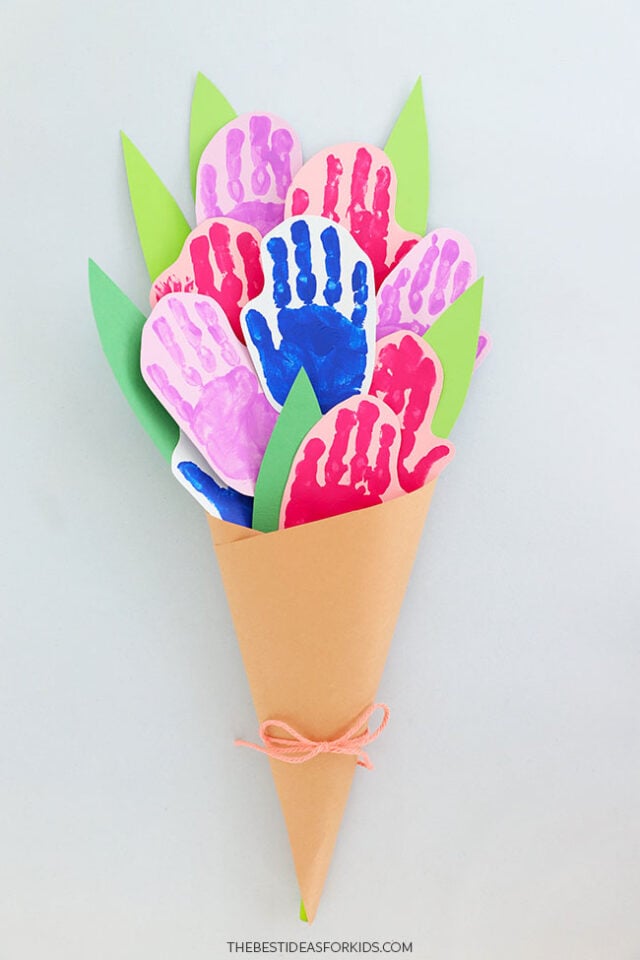
Handprint crafts are wonderful keepsakes.
This specific version mimics the shape of a lily or a tulip.
Materials Needed:
- ⬤Brightly colored construction paper
- ⬤Pencil (for tracing)
- ⬤Safety scissors
- ⬤Green pipe cleaners
How to Make It:
- ⬤Trace: Trace your toddler’s hand onto a piece of colored paper.
- ⬤Cut: Cut out the handprint (toddlers can try, but you’ll likely need to do the finishing touches).
- ⬤Curl: Gently curl the fingers of the handprint outward using a pencil to give it a “blooming” look.
- ⬤Assemble: Roll the base of the palm into a cone shape and tape it to a green pipe cleaner.
7. Bubble Wrap Rain Prints
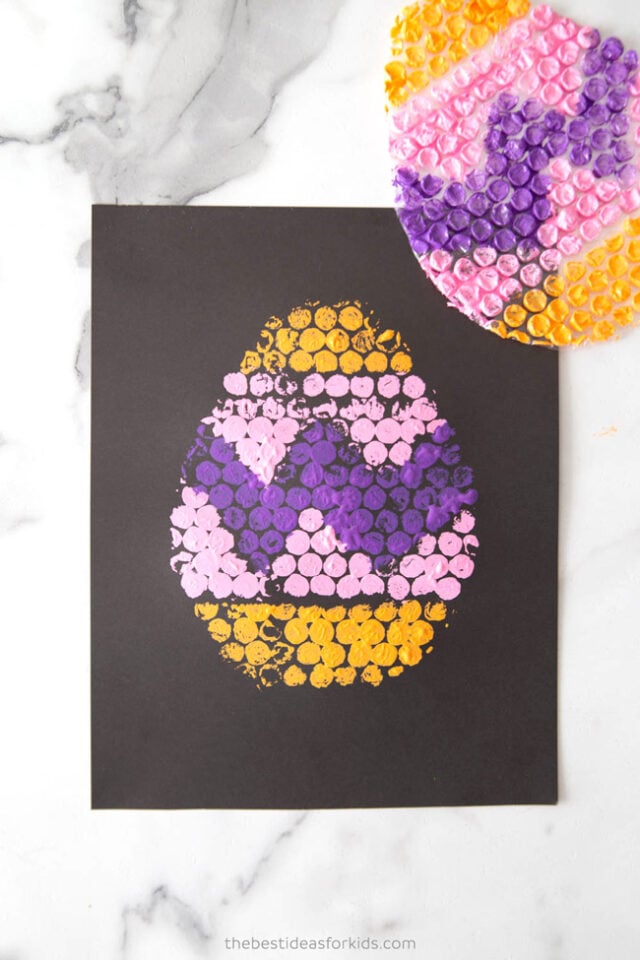
If you have leftover bubble wrap from a delivery, don’t throw it away!
It creates a fantastic textured print that looks like falling rain or honeycomb.
Materials Needed:
- ⬤Bubble wrap
- ⬤Blue and white paint
- ⬤Paper
- ⬤Paintbrush or roller
How to Make It:
- ⬤Paint the Wrap: Let the toddler paint directly onto the “bubbly” side of the wrap.
- ⬤Press and Print: Flip the bubble wrap over onto a piece of paper and have the child press down firmly with their hands.
- ⬤Lift: Peel the wrap back to reveal a cool, repetitive circular pattern.
8. Fork-Painted Tulips
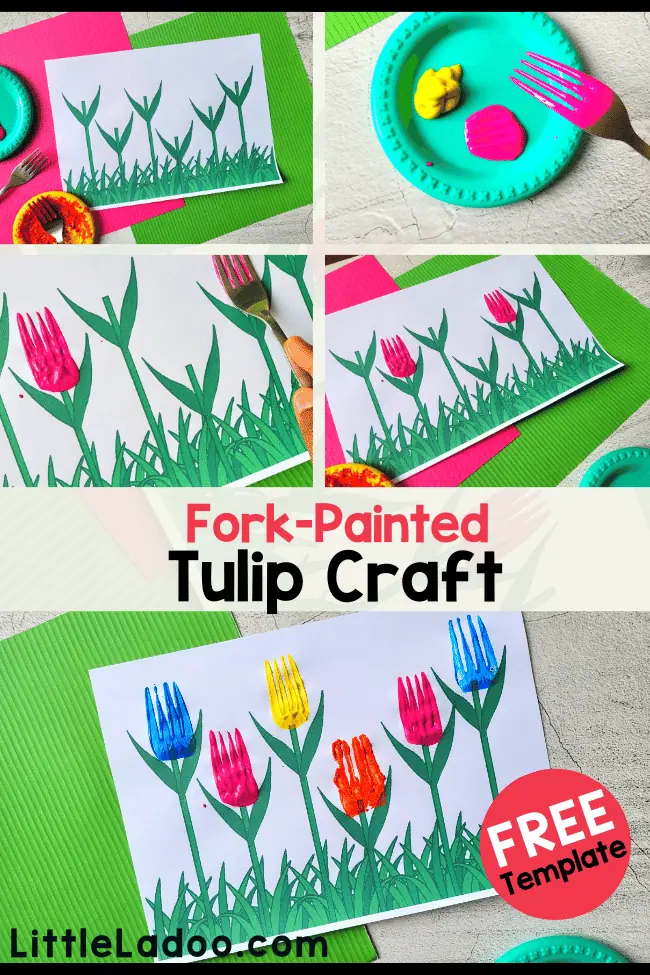
Who says you need a paintbrush?
Using a plastic fork creates a unique texture that perfectly mimics the petals of a tulip.
Materials Needed:
- ⬤Plastic forks
- ⬤Washable paint (red, yellow, purple)
- ⬤Green markers or paint for stems
- ⬤Paper
How to Make It:
- ⬤Dip the Fork: Dip the back of the fork tines into the paint.
- ⬤Stamp: Press the fork flat onto the paper. The tines create the jagged top of the tulip.
- ⬤Add Stems: Once the “flower” is stamped, help the toddler draw a green line down for the stem.
9. Tissue Paper Suncatchers
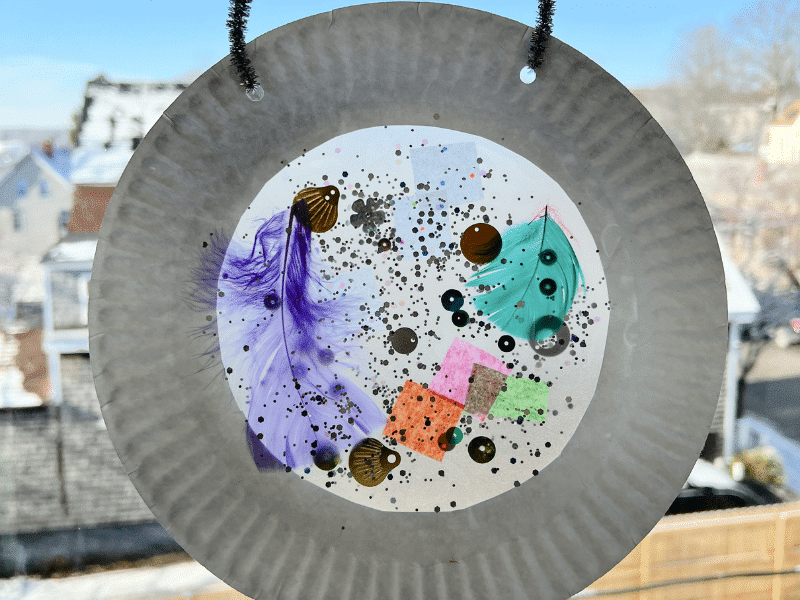
When the sun finally peeks through the clouds, these suncatchers will brighten up any room.
They are excellent for teaching color recognition.
Materials Needed:
- ⬤Clear contact paper (sticky back plastic)
- ⬤Pre-cut squares of colorful tissue paper
- ⬤Black construction paper (for a border)
How to Make It:
- ⬤Prep the Base: Peel the backing off a piece of contact paper and lay it sticky-side up on the table.
- ⬤Collage: Let the toddler place tissue paper squares all over the sticky surface. Overlapping is encouraged!
- ⬤Seal: Place another piece of contact paper on top to seal the “sandwich.”
- ⬤Frame: Cut it into a flower or butterfly shape and tape it to a window.
10. Ladybug Painted Rocks
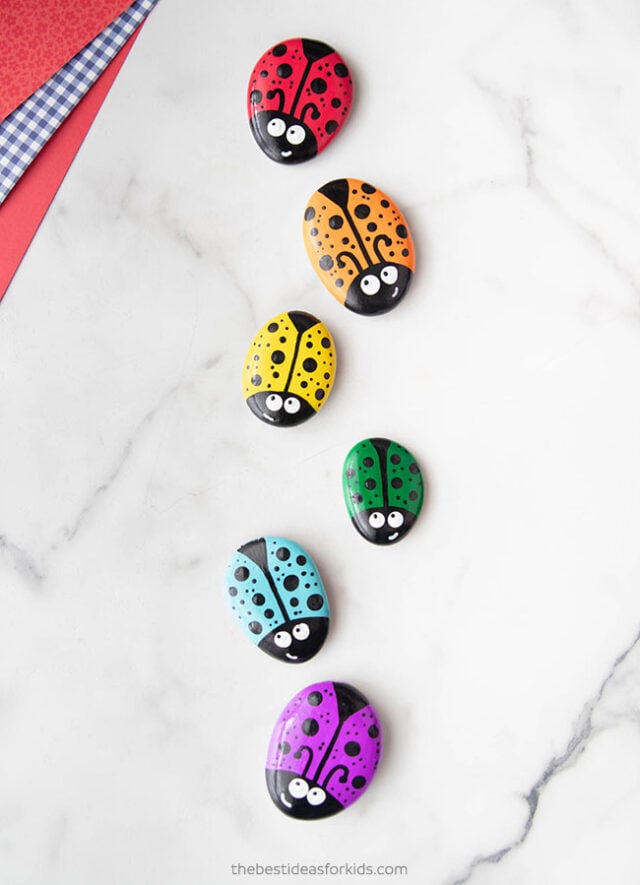
If you can take a quick dash outside to grab some smooth stones, rock painting is a high-engagement activity that lasts a long time.
Materials Needed:
- ⬤Smooth stones
- ⬤Red and black paint
- ⬤Googly eyes (optional)
How to Make It:
- ⬤Base Coat: Have the toddler paint the entire rock red. (This might take two coats).
- ⬤Add Details: Once dry, let them use their finger or a Q-tip to add black spots and a black line down the center.
- ⬤Face: Add two googly eyes or two white dots for eyes.
11. Paper Chain Caterpillars
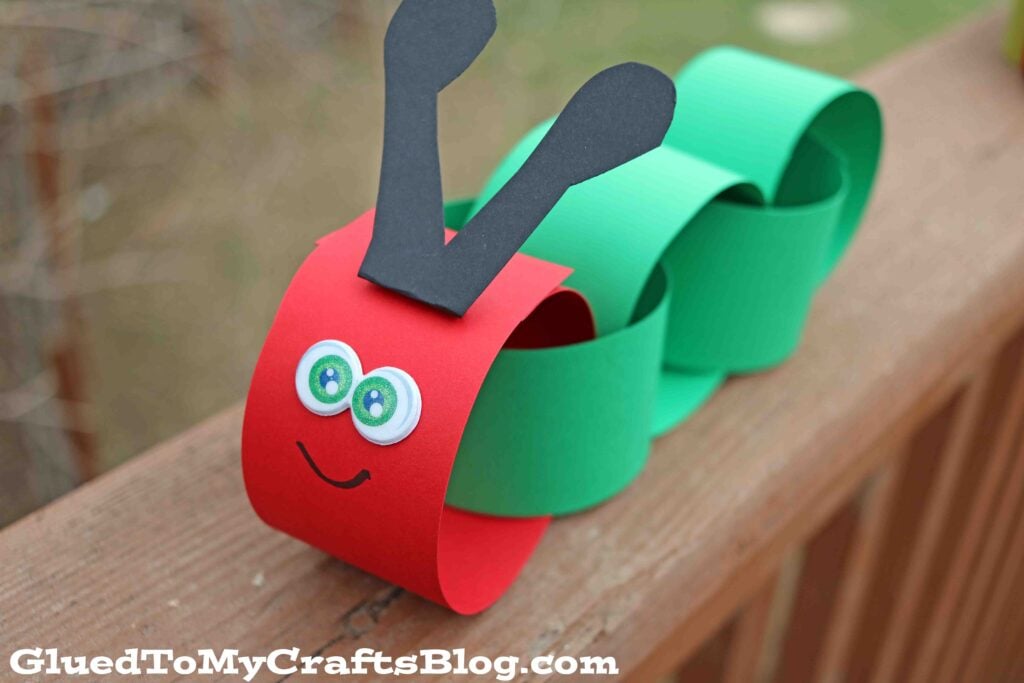
This craft is great for older toddlers who are starting to understand sequences and patterns.
Materials Needed:
- ⬤Strips of green and red construction paper
- ⬤Glue stick or tape
- ⬤Markers
How to Make It:
- ⬤Looping: Show the toddler how to make a circle with a paper strip and glue the ends.
- ⬤Chaining: Thread the next strip through the first circle before gluing.
- ⬤The Head: Use a red strip for the head and draw a face on it.
- ⬤Length: See how long they can make their caterpillar!
12. Cotton Ball Sheep
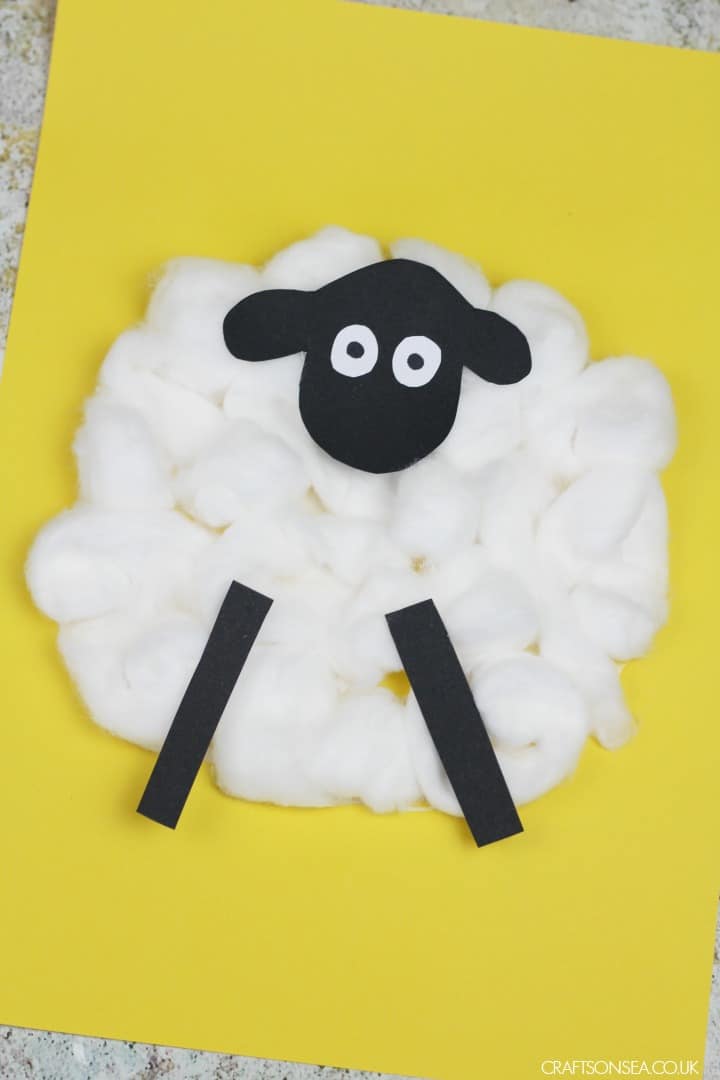
Spring is the time for baby animals.
This tactile craft is very soothing for toddlers who enjoy soft textures.
Materials Needed:
- ⬤Black construction paper (cut into an oval for the body)
- ⬤Cotton balls
- ⬤Glue
- ⬤Googly eyes
How to Make It:
- ⬤Glue Galore: Let the toddler spread glue all over the black paper oval.
- ⬤Stick the Wool: Have them press cotton balls onto the glue until the sheep is nice and fluffy.
- ⬤Finish: Add a small black circle for the head and glue on eyes.
13. Cupcake Liner Flowers
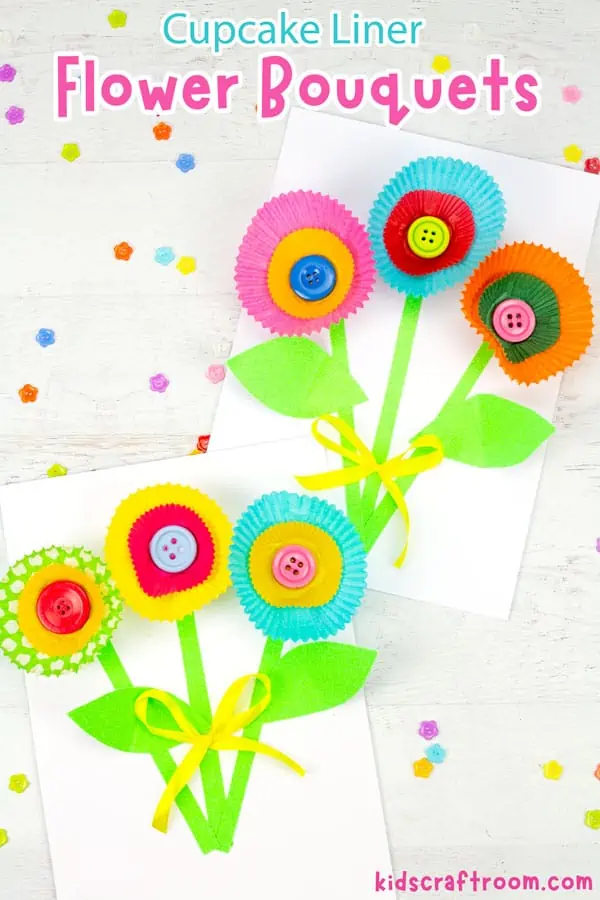
Cupcake liners come in so many colors and patterns, making them an instant “flower” with very little effort.
Materials Needed:
- ⬤Colorful cupcake liners (standard and mini sizes)
- ⬤Buttons or sequins
- ⬤Glue
- ⬤Paper
How to Make It:
- ⬤Flatten: Let the toddler flatten the cupcake liners.
- ⬤Layer: Glue a smaller liner inside a larger one for a 3D effect.
- ⬤Centerpiece: Glue a button or a large sequin in the very center.
- ⬤Stem: Draw or glue a stem to complete the garden.
14. Pasta Bird Nests
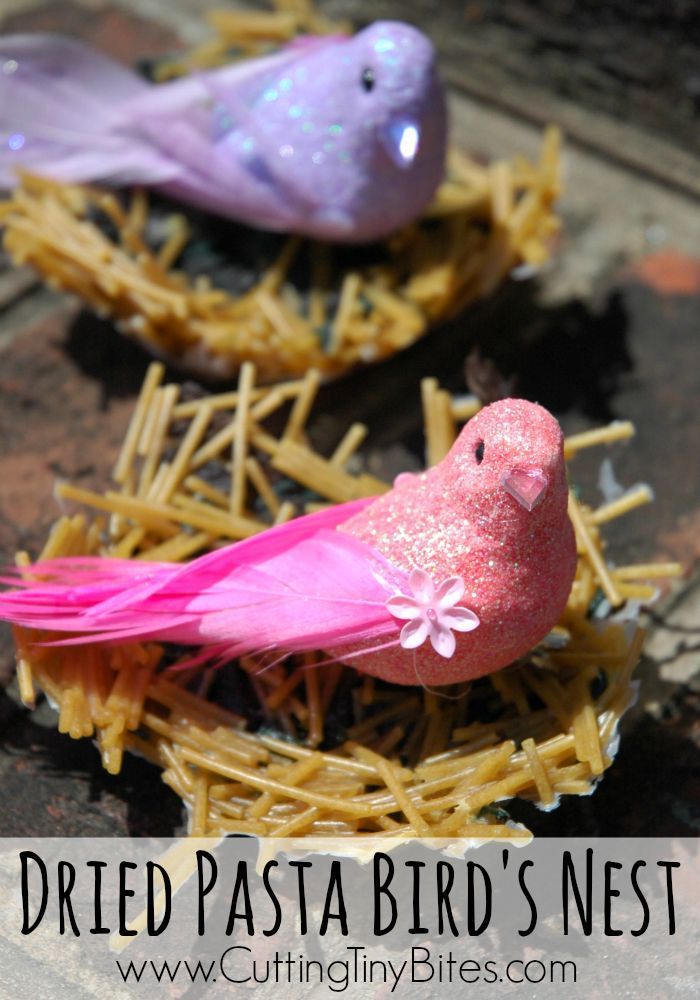
Using dry pasta adds a 3D element to art that toddlers find fascinating.
It also introduces them to the concept of how birds build homes in the spring.
Materials Needed:
- ⬤Shredded brown paper or dry spaghetti/chow mein noodles
- ⬤Paper plates
- ⬤Blue pom-poms (for “eggs”)
- ⬤Glue
How to Make It:
- ⬤Build the Nest: Apply glue to the bottom half of a paper plate. Have the toddler press the “twigs” (pasta or shredded paper) into the glue.
- ⬤Add Eggs: Glue 2 or 3 blue pom-poms into the center of the nest.
- ⬤Talk about it: Discuss how birds find small sticks outside to make their homes.
15. Cardboard Box Indoor Garden
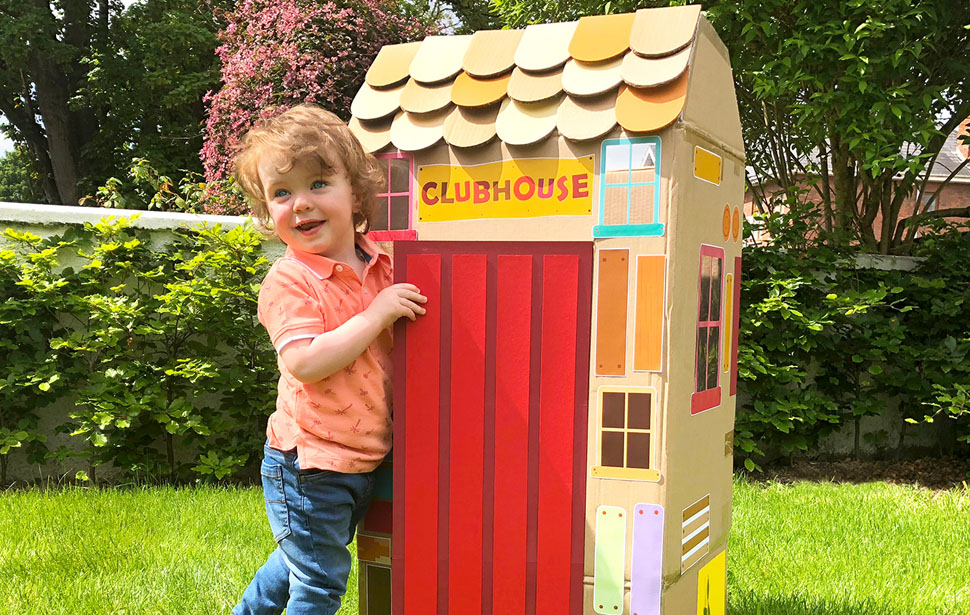
If you have a large delivery box, this can become an afternoon-long project.
It combines crafting with imaginative play.
Materials Needed:
- ⬤A large, shallow cardboard box
- ⬤Green paint or paper
- ⬤Any of the flowers made in the previous steps
How to Make It:
- ⬤The Grass: Have the toddler paint the inside “floor” of the box green.
- ⬤Planting: Use tape or play-dough to “plant” the egg carton flowers or cupcake liner flowers inside the box.
- ⬤Play: Add toy bugs, plastic shovels, or watering cans. This creates a “garden” they can play with indoors while the rain falls outside.
Tips for Stress-Free Toddler Crafting
Crafting with toddlers is about the journey, not the destination.
To keep your sanity while they explore their artistic side, consider these tips:
- ⬤Contain the Mess: Use a cheap plastic tablecloth or an old shower curtain liner under the crafting area.
- ⬤Dress for Success: Put the toddler in an old t-shirt or a dedicated “art smock.”
- ⬤Keep Wipes Handy: Have wet wipes or a damp washcloth on the table to catch spills and blue fingers before they touch the sofa.
- ⬤Follow Their Lead: If your toddler wants to paint the butterfly purple instead of rainbow, let them! Autonomy builds confidence.
- ⬤Set a Time Limit: Toddlers have short attention spans. If they lose interest after 10 minutes, that’s okay. Save the materials for later.
Frequently Asked Questions
What are the best mess-free crafts for toddlers?
If you want to avoid paint, stick to “sticky paper” crafts (using contact paper and tissue paper) or sticker art.
Water-reveal pads (like Water Wow) are also great for rainy days without the cleanup.
How can I make crafting educational for my 2-year-old?
Focus on colors, shapes, and textures.
Ask questions like, “How does the cotton ball feel?” or “Can you find the yellow paper?” This builds vocabulary and sensory processing.
What should I do with all the finished crafts?
Create a “Gallery Wall” using a string and clothespins.
Rotate the art weekly. For keepsakes (like handprints), date them on the back and store them in a dedicated portfolio.
Conclusion
Rainy spring days don’t have to be synonymous with boredom or “cabin fever.”
By keeping a few basic supplies on hand and focusing on simple, nature-inspired themes, you can provide your toddler with hours of engagement.
These 15 projects are designed to be low-stress for parents and high-reward for kids, fostering creativity and fine motor development while the clouds pass by.
So, grab the glue sticks, put on some music, and start creating your own indoor springtime oasis!
Leave a Reply