Transforming your home for the spring season doesn’t require a massive budget or a trip to a high-end boutique. By focusing on upcycling everyday household items—like glass jars, cardboard, and fabric scraps—you can create high-impact Easter decor that looks professionally styled.
The key to successful budget crafting is elevated upcycling, where simple materials are transformed through cohesive color palettes and textures like jute, matte paints, and natural greenery.
1. Twine-Wrapped Rustic Eggs
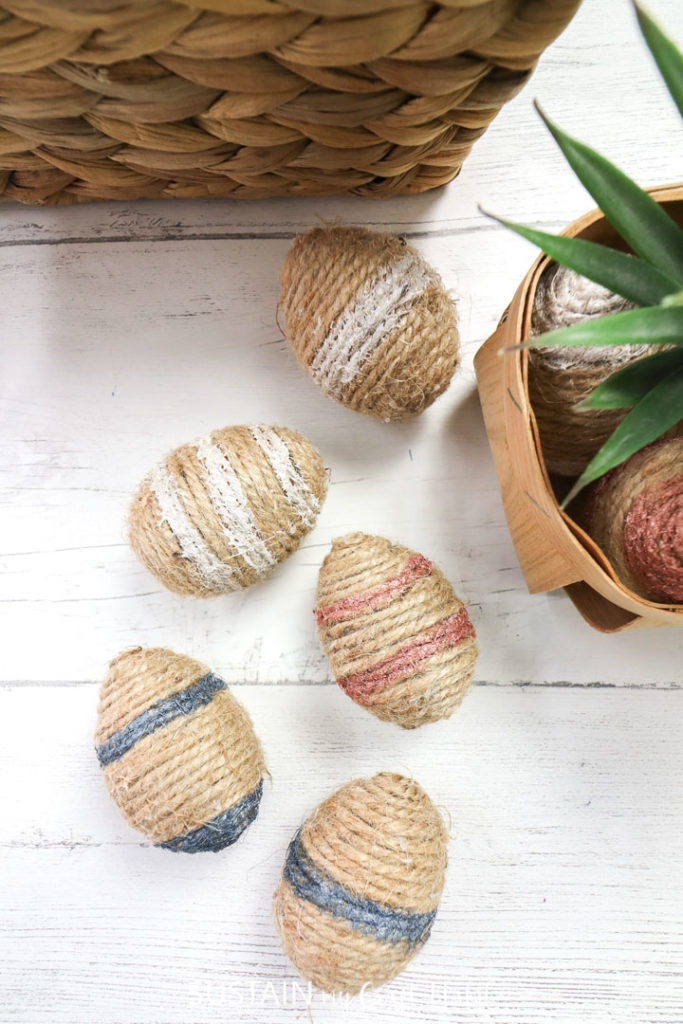
Twine-wrapped eggs are the quintessential farmhouse Easter craft. They add a tactile, organic element to your decor and are incredibly inexpensive to produce.
Instead of buying expensive decorative eggs, you can use those bright plastic eggs from previous years that no longer match your aesthetic.
- • Materials: Plastic eggs, jute twine, hot glue gun.
- • How to Make: Start at the wider base of the egg. Apply a small dot of hot glue and press the end of the twine into it. Slowly spiral the twine around the egg, applying thin lines of glue every few rotations. Ensure the twine sits tightly against the previous row to prevent the plastic color from peeking through.
- • Styling Tip: Place a dozen of these in a wooden dough bowl or a wire basket filled with dried moss for a sophisticated centerpiece.
2. Upcycled Mason Jar Bunny Candy Dishes
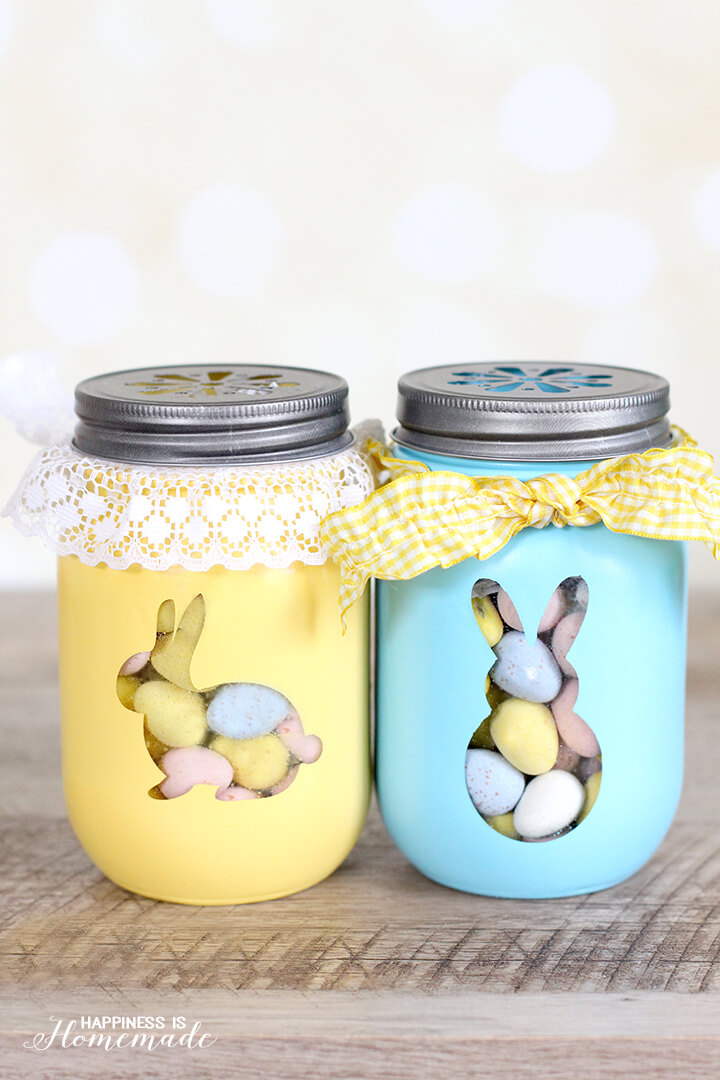
Mason jars are a staple in the upcycling world. This project turns empty sauce or jam jars into adorable bunny-themed containers perfect for holding jelly beans or chocolate eggs.
- • Materials: Clean glass jars, chalk paint (white or pastel), felt, pom-poms, and permanent markers.
- • How to Make: Paint the exterior of the jar with two coats of matte chalk paint. Once dry, cut two long ear shapes out of stiff white felt and two smaller inner ear shapes out of pink felt. Glue these to the inside of the jar lid. Draw a simple bunny face on the front of the jar using a fine-tip marker and glue a white pom-pom to the back as a tail.
- • Styling Tip: Line three jars of varying heights on a mantel for a balanced, playful display.
3. Brown Paper Bag Bird Nests
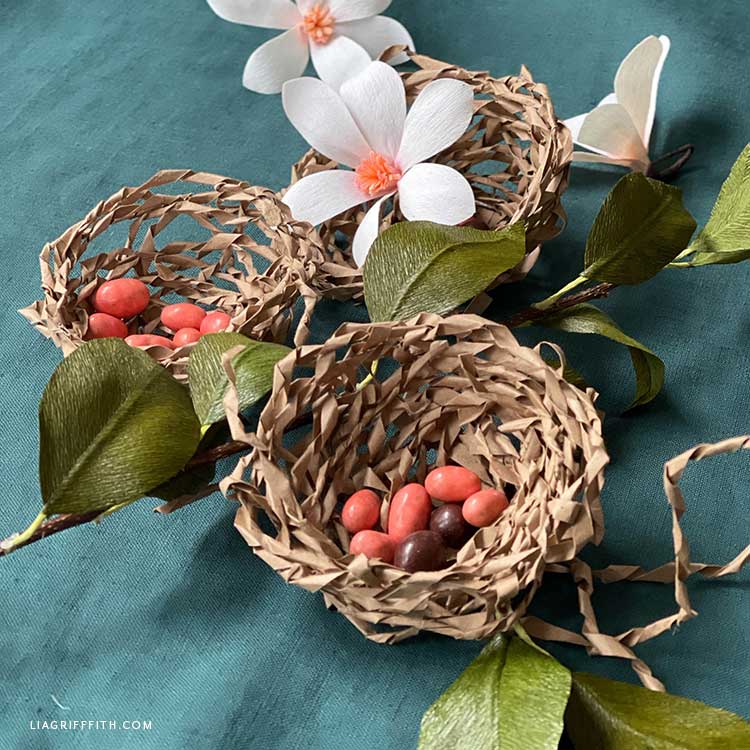
If you have a stack of grocery bags, you have the foundation for these rustic nests. This is a zero-cost project that brings a nature-inspired feel to your Easter table.
- • Materials: Brown paper bags, a bowl of water, and some craft glue.
- • How to Make: Tear the paper bags into long, thin strips. Dip the strips into a mixture of water and a little craft glue. Crumple them slightly and begin weaving them into a circular shape, building up the sides to create a nest look. Let them dry completely overnight; they will harden into a sturdy shape.
- • Styling Tip: Fill the nests with the twine-wrapped eggs from Project #1 or small speckled malted milk eggs.
4. Eggshell Succulent Planters
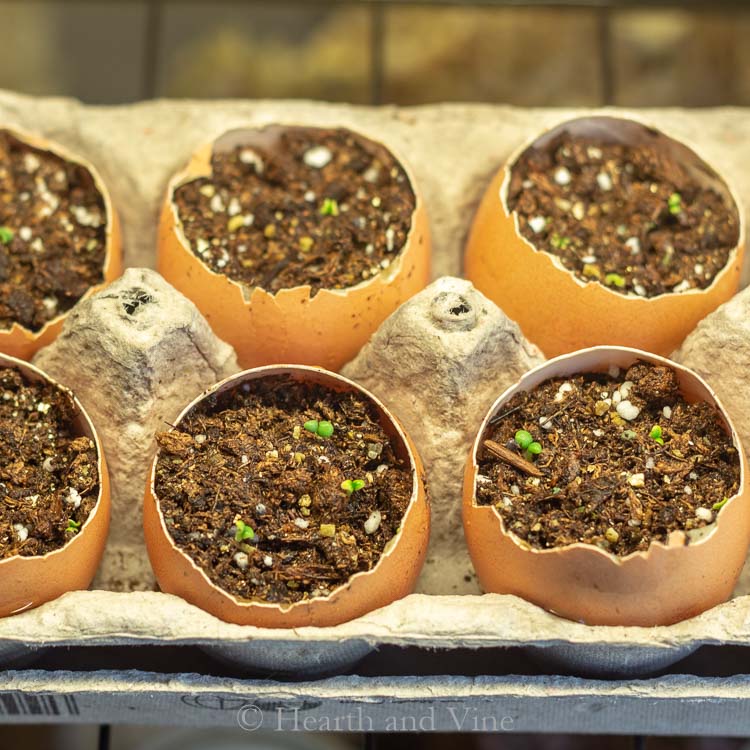
Real eggshells are delicate and beautiful. By carefully opening them, you create the perfect miniature vessels for tiny succulents or spring blooms.
- • Materials: Empty eggshells, potting soil, mini succulents, and an egg carton.
- • How to Make: Next time you cook, crack your eggs near the top and rinse the shells thoroughly. Gently boil them for a few minutes to sanitize. Once dry, fill with a spoonful of soil and a small succulent cutting.
- • Styling Tip: Keep them in the original cardboard egg carton, but paint the carton a soft sage green or lavender to elevate the look.
5. No-Sew Scrappy Fabric Carrots
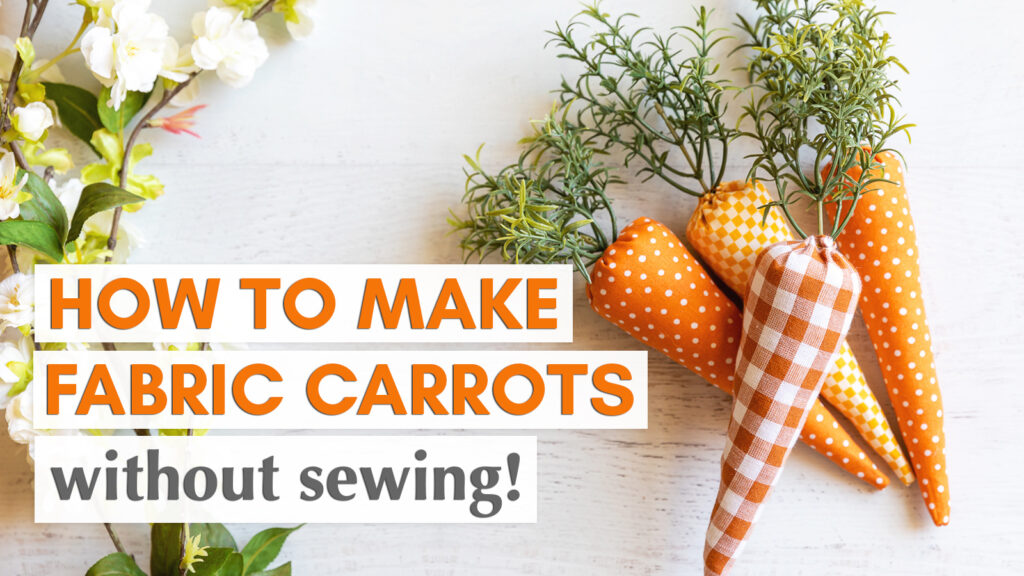
These fabric carrots are perfect for adding a pop of orange to your spring decor without needing a sewing machine. They utilize fabric scraps from old clothes or linens.
- • Materials: Orange fabric (cotton, linen, or felt), poly-fill or cotton balls, green twine or raffia, and hot glue.
- • How to Make: Cut a semi-circle out of your orange fabric. Roll it into a cone shape and secure the edge with hot glue. Fill the cone with stuffing. Gather the top and tie it tightly with green raffia or twine, leaving long carrot top ends.
- • Styling Tip: Bundle three or five carrots together with a piece of ribbon and place them inside a tiered tray.
6. Cardboard Box Bunny Garland
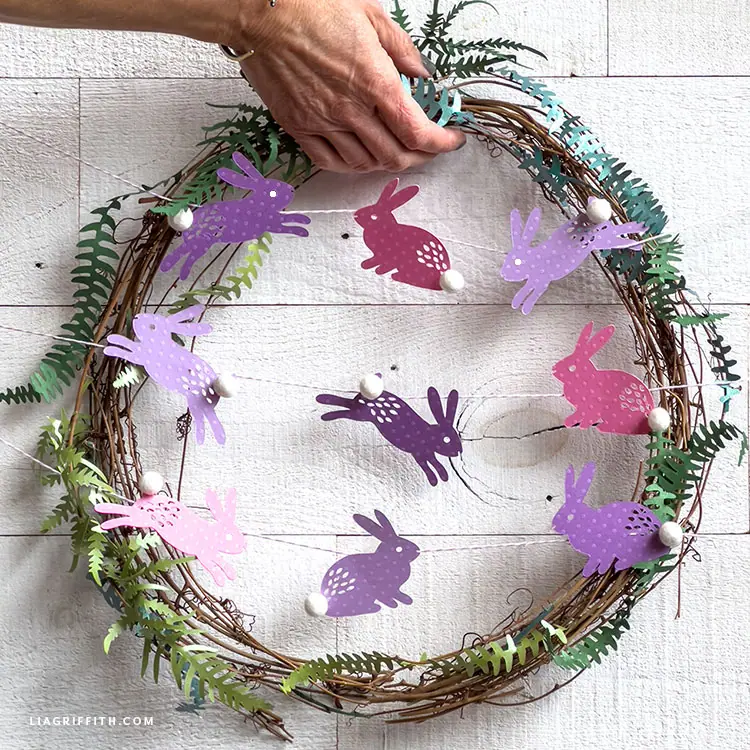
Don’t throw away your shipping boxes! Cardboard has a wonderful kraft look that fits perfectly with minimalist or rustic decor.
- • Materials: Corrugated cardboard, scissors, white paint, and twine.
- • How to Make: Create a bunny silhouette template on a piece of paper. Trace it onto your cardboard and cut out 8–10 bunnies. Use a white paint pen or a small brush to add a tail using a dot of white paint or a cotton ball. Punch small holes in the ears and thread the twine through.
- • Styling Tip: Drape this over a window frame or across a bookshelf for a subtle festive touch.
7. Coffee Filter Spring Flower Wreath
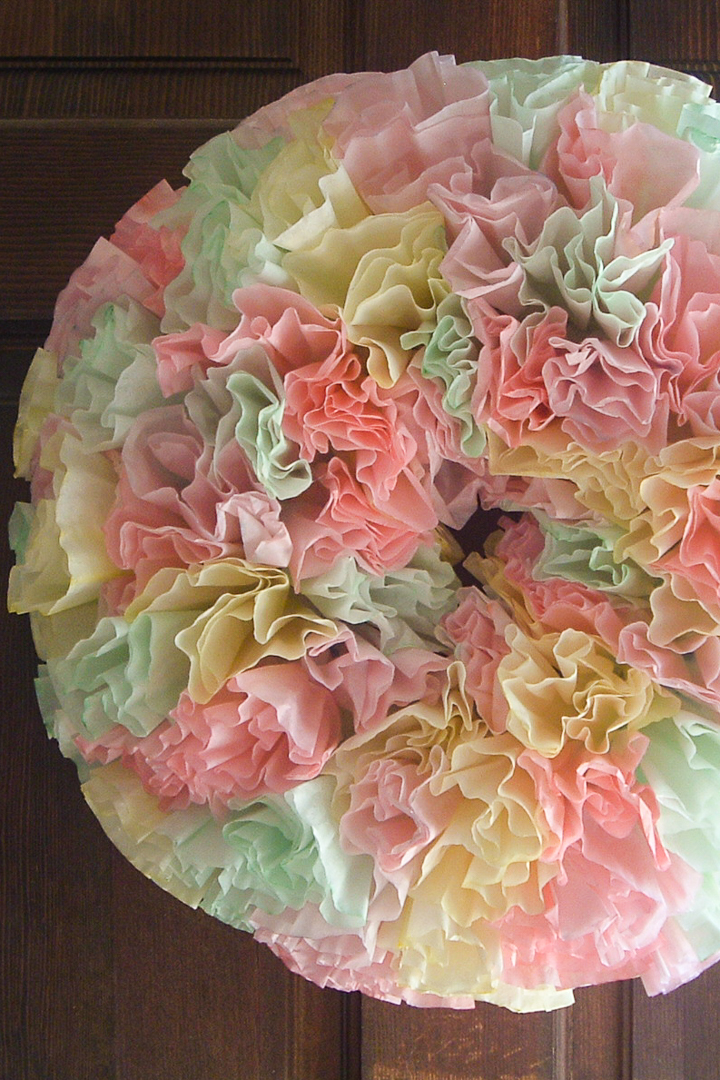
Coffee filters are an incredibly cheap medium for creating voluminous, realistic-looking flowers. This wreath looks like it’s covered in expensive peonies but costs only a few dollars.
- • Materials: White coffee filters, a cardboard wreath form, food coloring, and hot glue.
- • How to Make: Dip the edges of stacked coffee filters into water mixed with a drop of pink or yellow food coloring to create a gradient effect. Once dry, fold and scrunch 4-5 filters together, stapling the center to create a flower. Glue these closely together on your wreath form until it is completely covered.
- • Styling Tip: Hang this on an interior door or above a mirror to brighten up the room.
8. Wine Cork Chick Stamps for Stationery
If you enjoy sending Easter cards or making your own gift tags, wine corks make the perfect circular stamps for creating chicks.
- • Materials: Wine corks, yellow acrylic paint, and a black marker.
- • How to Make: Dip the flat end of a wine cork into yellow paint and press it onto cardstock. Once the yellow circles dry, use a marker to draw tiny orange beaks and black eyes.
- • Styling Tip: Use this technique to create custom place cards for your Easter brunch table.
9. Faux-Concrete Plastic Eggs
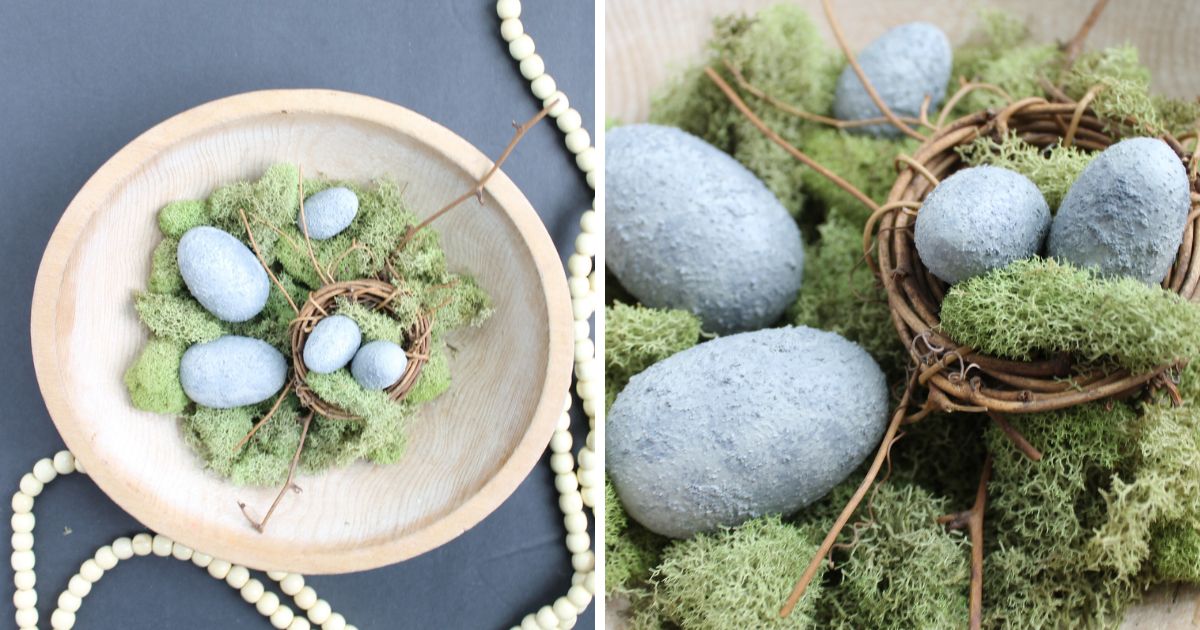
The industrial, concrete look is very popular in modern home decor. You can achieve this look on plastic eggs using a simple paint hack.
- • Materials: Plastic eggs, gray acrylic paint, baking soda, and a stiff brush.
- • How to Make: Mix a tablespoon of baking soda into your gray paint. This creates a thick, gritty texture. Apply it to the eggs in a stippling motion (dabbing). Once dry, flick a little dark brown or black paint onto them using an old toothbrush to create stone speckles.
- • Styling Tip: Display these in a sleek black bowl for a modern, sophisticated Easter accent.
10. Terra Cotta Pot Gumball Machines

Using small terra cotta pots and glass bowls, you can create whimsical candy dispensers that look like vintage gumball machines.
- • Materials: Small terra cotta pot and saucer, a small round glass vase (from the dollar store), and a wooden knob.
- • How to Make: Paint the pot and saucer a bright spring color. Invert the pot, glue the glass vase to the bottom, and use the saucer as a lid. Glue a wooden knob to the top of the saucer.
- • Styling Tip: Fill with pastel-colored candies and use as a centerpiece for a kids’ Easter table.
11. Salt Dough Keepsake Ornaments
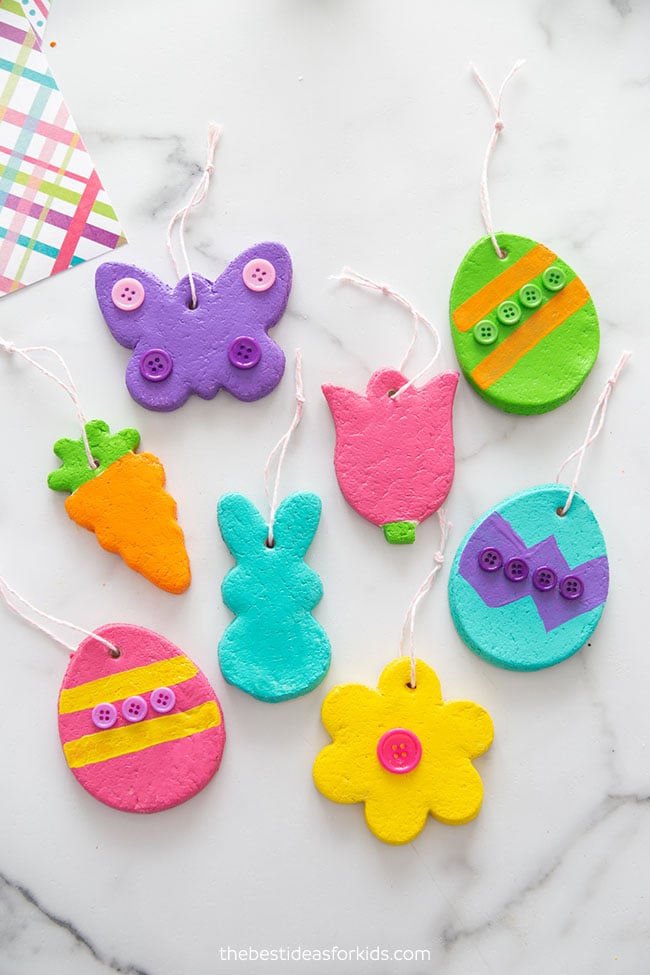
Salt dough is a classic craft that is durable and easy to customize. These can be hung on an Easter tree (branches in a vase).
- • Materials: 2 cups flour, 1 cup salt, 1 cup water.
- • How to Make: Mix the ingredients to form a dough. Roll it out and use bunny or egg-shaped cookie cutters. Bake at 200°F (95°C) for 2-3 hours until hard. Once cool, paint them with acrylics or leave them natural for a Scandi look.
- • Styling Tip: Use a stamp to press the year or a family member’s name into the dough before baking.
12. Boho Yarn-Wrapped Wooden Eggs
For a bohemian vibe, use leftover yarn in various textures (mohair, wool, cotton) to wrap wooden or plastic eggs.
- • Materials: Eggs, variegated yarn, and craft glue.
- • How to Make: Similar to the twine-wrapped eggs, but use colorful yarn. You can change colors halfway through for a striped effect. Add a small tassel to the bottom for extra flair.
- • Styling Tip: Hang these from a large pussy willow branch for a stunning Boho Easter tree.
13. Clothespin Easter Wreath

This project is great because it’s functional—you can use the clothespins to hold Easter cards or photos.
- • Materials: A wire wreath frame and 40–50 wooden clothespins.
- • How to Make: Paint the clothespins in alternating spring colors (mint, lemon, peach). Simply clip them onto the wire frame until the entire circle is filled.
- • Styling Tip: Clip small sprigs of faux lavender or eucalyptus between some of the clothespins.
14. Tin Can Pastel Vases
Empty vegetable cans have great ridges that look beautiful when painted. They make excellent, sturdy vases for heavy spring blooms like tulips.
- • Materials: Clean tin cans, pastel spray paint, and lace ribbon.
- • How to Make: Remove labels and sand any sharp edges. Spray paint the cans in matte pastel shades. Wrap a piece of white lace ribbon around the center and secure with glue.
- • Styling Tip: Group three cans together and tie them with a single large ribbon for a cohesive floral arrangement.
15. Egg Carton Floral Fairy Lights
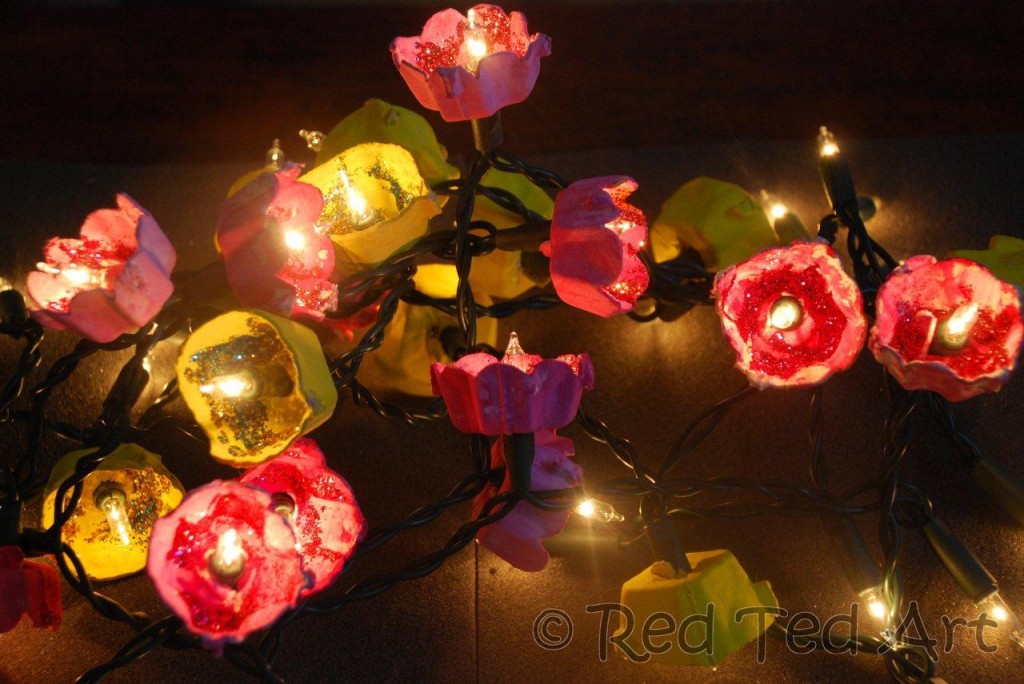
Turn a standard string of LED fairy lights into a floral garland using a cardboard egg carton.
- • Materials: Cardboard egg carton, scissors, paint, and LED string lights.
- • How to Make: Cut out the individual cups from the egg carton. Trim the edges into petal shapes. Paint them in floral colors. Poke a small hole in the bottom of each cup and slide it over an LED bulb on your light string.
- • Styling Tip: Drape these lights over a headboard or a buffet table for a soft, spring glow.
Summary of Projects and Difficulty
| Project Name | Primary Material | Difficulty Level | Time Estimate |
|---|---|---|---|
| Twine-Wrapped Eggs | Jute/Plastic Eggs | Easy | 15 mins |
| Mason Jar Bunnies | Glass Jars | Moderate | 45 mins |
| Paper Bag Nests | Grocery Bags | Easy | 30 mins + drying |
| Eggshell Planters | Real Eggshells | Delicate | 20 mins |
| Fabric Carrots | Fabric Scraps | Easy | 10 mins each |
| Tin Can Vases | Recycled Cans | Easy | 20 mins |
Frequently Asked Questions
What is the cheapest way to decorate for Easter?
The cheapest way is to use nature finds and kitchen scraps. Twigs from the yard can become an Easter tree, and brown paper bags or egg cartons can be transformed into high-end looking decor with just a bit of paint and creativity.
How can I make my DIY Easter crafts look professional?
Stick to a limited color palette. Instead of using every bright color available, pick three (e.g., cream, sage green, and soft gold). Using matte or chalk paints instead of glossy ones also provides a more sophisticated, boutique finish.
Are these crafts safe to do with children?
Most of these projects, like the Salt Dough Ornaments and the Wine Cork Stamps, are very kid-friendly. However, any project involving a hot glue gun or spray paint should be supervised or handled by an adult.
Where can I find cheap craft supplies?
Thrift stores are excellent for finding glass jars, baskets, and fabric. The dollar store is your best bet for floral wire, wreath forms, and basic acrylic paints.
Conclusion
Decorating for Easter doesn’t have to be a financial burden. By looking at your recycling bin with a creative eye, you can find the potential in cardboard, glass, and paper.
Whether you prefer the rustic charm of twine-wrapped eggs or the modern look of faux-concrete finishes, these 15 projects prove that style is more about creativity than cost. Start with one or two projects this weekend, and watch your home transform into a bright, welcoming spring sanctuary.
Leave a Reply