Upcycling everyday cardboard boxes into high-end drawer storage is one of the most rewarding DIY projects for home organizers. By combining basic structural reinforcement techniques with creative finishing touches like fabric, contact paper, or rope, you can transform waste into bespoke furniture pieces that rival expensive boutique storage solutions. This guide provides a comprehensive roadmap for creating durable, aesthetic, and functional drawer units from simple shipping containers.
The Fundamentals of Structural Cardboard Upcycling
Before diving into the aesthetics, you must understand the bones of your project. Not all cardboard is created equal.
For drawer units that will hold weight, look for double-walled corrugated cardboard. This type features two layers of ruffling between three flat sheets, providing significantly more crush resistance.
Selecting Your Base Materials
When sourcing boxes, consistency is key. If you are building a tiered drawer system, finding boxes of identical dimensions ensures a professional, uniform look.
Subscription boxes (like those from beauty or snack services) are often made of high-quality, sturdy cardboard with clean edges, making them ideal candidates for small desk organizers.
| Material Type | Best Use Case | Durability Rating |
|---|---|---|
| Single-Wall Corrugated | Small dividers, light stationery | Moderate |
| Double-Wall Corrugated | Heavy-duty drawers, base frames | High |
| Paperboard (Cereal boxes) | Decorative liners, small labels | Low |
| Kraft Paper Rolls | Exterior wrapping and smoothing | N/A |
Essential Tools for Professional Results
To move beyond a school project look, you need the right tools. Precision is the difference between a drawer that slides smoothly and one that catches on the frame.
- • Self-Healing Cutting Mat: Protects your surfaces and ensures clean cuts.
- • Heavy-Duty Utility Knife: A fresh blade is safer and more precise than a dull one.
- • Metal Ruler: Essential for straight lines and acting as a cutting guide.
- • Adhesives: Use a combination of high-temp hot glue for structural bonds and spray adhesive or Mod Podge for decorative coverings.
- • Reinforcement Tape: Kraft paper tape (water-activated) is superior to plastic tape because it can be painted or glued over easily.
1. The Fabric-Wrapped Nursery Bin
Fabric wrapping is the gold standard for creating soft, high-end storage. This style is perfect for nurseries or linen closets where you want a woven look without the scratchiness of wicker.
How to Achieve It: Start by measuring the height of your box and adding two inches for a fold-over margin. Use a spray adhesive to coat the exterior of the cardboard.
Lay the fabric flat and smooth it onto the box, starting from the center of each side to prevent air bubbles. For the corners, use a gift wrap fold technique to keep the bulk to a minimum.
Finish by lining the interior with a coordinating solid-colored fabric to hide the raw edges of the exterior wrap.
2. The Faux Wood Grain Office Organizer
You can mimic the look of expensive oak or walnut drawers using high-quality vinyl contact paper. This is ideal for home offices where you want a sophisticated, professional aesthetic.
How to Achieve It: The secret to working with contact paper on cardboard is surface preparation. If the box has a glossy finish, lightly sand it so the adhesive grips better.
Apply the vinyl slowly, using a plastic squeegee or a credit card to push out bubbles as you go. For the drawer pulls, use small wooden knobs or leather strips to complete the furniture illusion.
3. The Rope-Woven Coastal Drawer
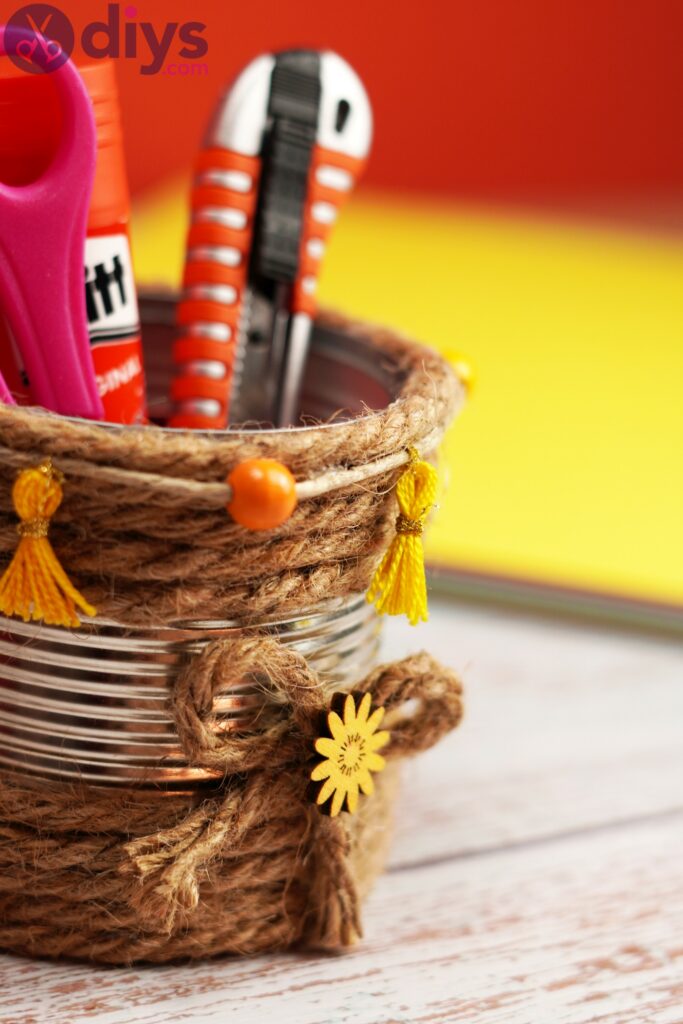
Transform a standard shipping box into a coastal-inspired basket. This style is incredibly durable because the rope adds a thick, protective layer to the cardboard.
How to Achieve It: Using a hot glue gun, start at the very bottom of the box. Glue the end of a spool of jute or cotton rope and begin wrapping it tightly around the perimeter.
Apply a bead of glue every few inches to ensure the rope doesn’t sag over time. Once you reach the top, tuck the end inside and glue it firmly.
Line the inside with a white canvas or muslin fabric to prevent the cardboard from showing through any small gaps in the rope.
4. The Decoupage Floral Storage Unit
Decoupage allows for intricate patterns and a vintage feel. Using decorative napkins or thin decoupage paper, you can create a drawer set that looks like hand-painted porcelain or antique wood.
How to Achieve It: Paint the box with a white primer first; this ensures the colors of your paper pop. Apply a thin layer of Mod Podge to a section of the box, lay the paper down, and smooth it with a soft brush.
Once dry, apply two more coats of Mod Podge over the top to create a wipeable, durable seal. This is particularly effective for vanity storage where makeup spills might occur.
5. The Industrial Metal-Look Bin
For a modern, loft-style aesthetic, you can make cardboard look like galvanized steel or brushed aluminum. This works exceptionally well for man cave organization or garage workshops.
How to Achieve It: Use metallic spray paint in silver or gunmetal gray. To add realism, use a sea sponge to dab on small amounts of black and burnt umber acrylic paint around the edges to simulate weathering or rust.
Attach metal label holders (available at most craft stores) to the front of the drawers using brads or small screws backed with a piece of scrap wood inside the box for stability.
6. The Minimalist Kraft Paper Aesthetic
Sometimes, the simplest look is the most elegant. Using brown kraft paper to cover your boxes creates a cohesive, Muji-style organization system that looks intentional and clean.
How to Achieve It: Wrap your boxes as you would a gift, but use a glue stick instead of tape for a seamless finish. The beauty of this style lies in the labeling.
Use a consistent font or high-quality chalkboard stickers to identify the contents. This style is perfect for pantry organization where you want the focus to be on the food, not the containers.
7. The Washi Tape Patterned Drawer
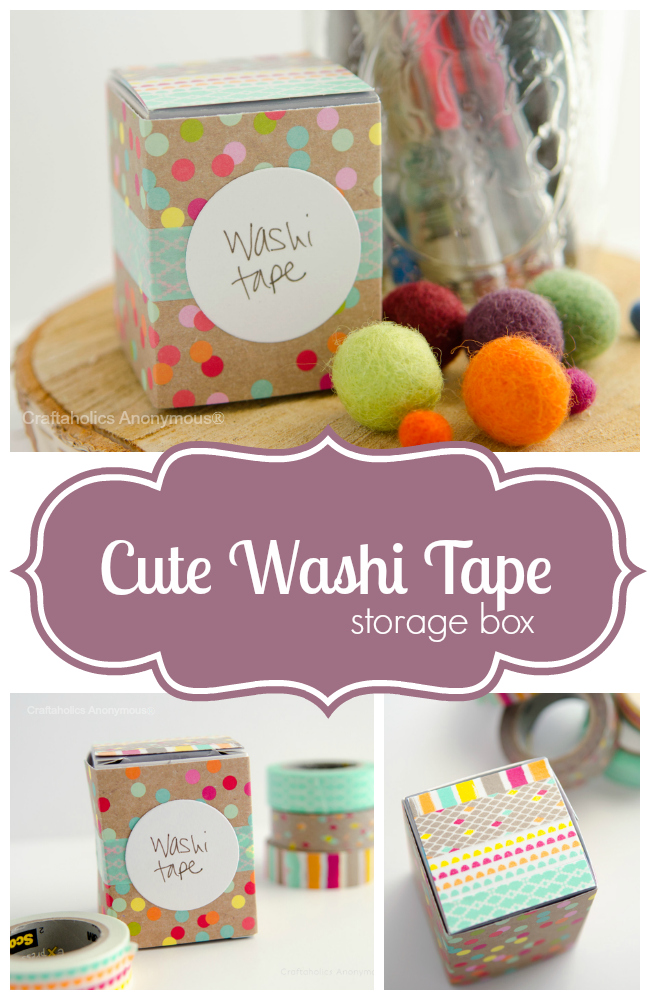
If you aren’t comfortable with large sheets of paper or fabric, washi tape is your best friend. It allows for geometric patterns and easy corrections.
How to Achieve It: Choose three or four coordinating rolls of washi tape. You can create stripes, chevrons, or a plaid effect by layering the tape.
Because washi tape is slightly translucent, it’s best to wrap the box in plain white paper first. Finish the project with a coat of clear acrylic sealer to prevent the edges of the tape from peeling over time.
8. The Chalkboard Label Cubby
Functional and stylish, chalkboard drawers are perfect for kids’ rooms or craft spaces where the contents of the drawers change frequently.
How to Achieve It: You can either use chalkboard spray paint directly on the cardboard or apply chalkboard adhesive sheets. If using paint, ensure you apply at least three thin coats, sanding lightly between each.
Once cured, season the surface by rubbing a piece of chalk sideways over the entire area and wiping it off. This prevents your first writing from being permanently ghosted onto the surface.
9. The Leather-Handle Luxury Box
Adding a high-end material like leather instantly elevates cardboard. This project focuses on the hardware as the primary design element.
How to Achieve It: Cover your box in a solid, neutral color (like matte black or deep navy). Cut strips of old leather belts or buy leather scraps.
Punch two holes in the front of your drawer and the leather strip. Use Chicago screws or upholstery tacks to secure the leather handle.
The contrast between the matte box and the textured leather creates a high-end, designer look.
10. The Geometric Stenciled Tiered Unit
Stenciling allows you to add complex patterns without the difficulty of wrapping large sheets of patterned paper perfectly.
How to Achieve It: Paint your base box a solid color. Once dry, secure a geometric stencil with painter’s tape.
Use a dry brush technique—dipping your brush in paint and then wiping most of it off on a paper towel—to dab the paint over the stencil. This prevents the paint from bleeding under the edges of the stencil, ensuring crisp, clean lines that look professionally printed.
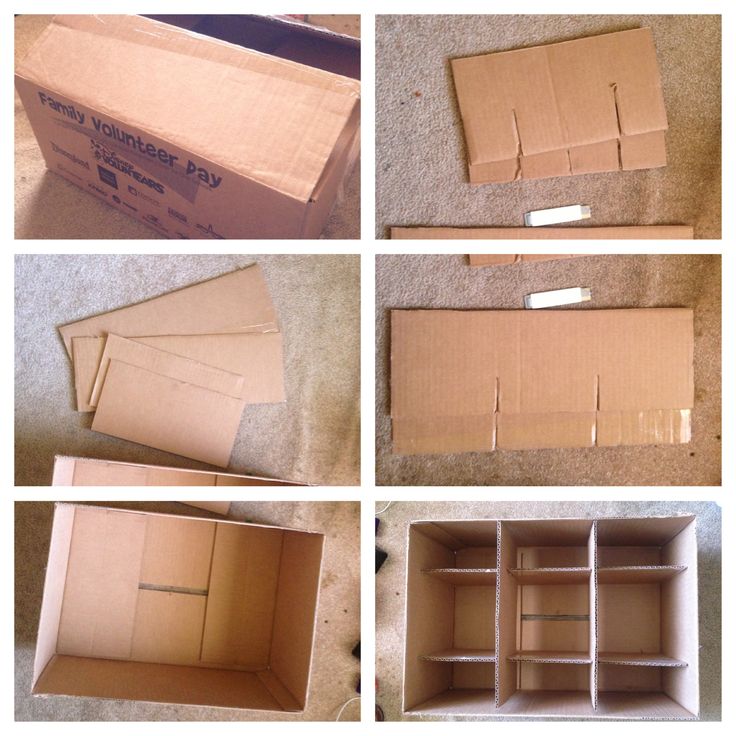
Step-by-Step: Constructing the Drawer Frame
While decorating individual boxes is easy, building a chest to hold them requires more precision.
- • Measure the Drawers: Measure the width, height, and depth of the boxes you intend to use as drawers.
- • Build the Outer Shell: Cut pieces of double-walled cardboard for the top, bottom, and sides. Add 1/4 inch to the width and height of the drawers to allow for clearance so they slide easily.
- • Reinforce the Joints: Use hot glue to assemble the shell. Once the glue is set, run a strip of reinforced kraft tape along every internal and external seam. This prevents the frame from racking (tilting) over time.
- • Add Internal Shelves: If you are stacking drawers, add a horizontal shelf between each one. This prevents the weight of the top drawer from crushing the bottom one.
- • The Slide Trick: Rub a bit of candle wax or a dry soap bar on the bottom edges of the drawers. This acts as a lubricant, making the cardboard-on-cardboard movement much smoother.
Maintenance and Durability Tips
To ensure your upcycled storage lasts for years, follow these maintenance guidelines:
- • Avoid Moisture: Cardboard is porous. Always seal your finished projects with a clear acrylic spray or Mod Podge to provide a moisture barrier.
- • Weight Distribution: Place heavier items at the bottom of the drawer unit to keep the center of gravity low and prevent tipping.
- • Corner Protection: The corners are the first place to show wear. Consider adding metal book corners (available at craft stores) to protect these high-impact areas.
Frequently Asked Questions
How do I stop the cardboard from smelling?
Old shipping boxes can sometimes have a musty smell. Before starting your project, place the boxes in a sealed bag with a bowl of baking soda or a few charcoal briquettes for 24 hours. This will neutralize any odors.
Can these drawers hold heavy items like tools?
If you use double-walled cardboard and reinforce the corners with wood glue and tape, they can hold a surprising amount of weight. However, for very heavy items, consider gluing two layers of cardboard together for the bottom of the drawer.
What is the best way to cut cardboard without it fraying?
Always use a sharp blade and make multiple light passes rather than trying to cut through the entire thickness in one go. This prevents the tearing of the internal corrugated fluting.
How do I clean my upcycled drawers?
If you have sealed them with an acrylic sealer or used vinyl contact paper, you can wipe them down with a slightly damp cloth. Avoid soaking the material, as any water that reaches the core will cause the cardboard to warp.
Conclusion
Upcycling cardboard boxes into pretty drawer storage is a masterclass in sustainable design. By focusing on structural integrity first and then applying high-quality finishes like fabric, rope, or metallic paints, you can create organizational tools that are both beautiful and functional.
Whether you are building a small desk organizer or a full-sized closet system, the key lies in the details: clean cuts, reinforced joints, and thoughtful hardware choices.
Start small with a single fabric-wrapped bin, and soon you’ll find yourself viewing every shipping box that arrives at your door as a potential piece of custom furniture.
Leave a Reply