Creating a miniature greenhouse from upcycled picture frames is one of the most rewarding DIY projects for indoor gardening enthusiasts and decor lovers alike.
By repurposing old frames—whether thrifted from a local shop or pulled from your own attic—you can construct a functional, glass-enclosed sanctuary for humidity-loving plants like ferns, fittonias, and orchids.
This project combines the charm of a Victorian Wardian case with the accessibility of modern upcycling, providing a controlled microclimate that protects delicate flora from dry indoor air while serving as a sophisticated centerpiece for your home.

Why Upcycle Picture Frames into a Miniature Greenhouse?
The Picture Frame Greenhouse has become a staple in the DIY community for good reason.
It solves the problem of keeping high-humidity plants alive in climate-controlled homes without the high cost of professional glass terrariums.
Beyond functionality, it is an eco-friendly project that breathes new life into discarded materials.
By choosing different frame styles—from ornate gilded wood to sleek black metal—you can customize the greenhouse to match any interior design theme, from rustic farmhouse to modern industrial.
Essential Materials and Tools
Before you begin, gather all your supplies.
The success of this project depends on the structural integrity of your adhesive and the uniformity of your frames.
While you can mix and match sizes for a whimsical look, using frames of the same dimensions for the walls makes the assembly process much smoother.
Materials Table

Step-by-Step Tutorial: Building Your Classic Frame Greenhouse
Step 1: Selecting and Preparing Your Frames
For a standard rectangular greenhouse, you will typically need eight frames of the same size (e.g., 5″x7″).
- 1 Remove the Backing: Take out the cardboard backing and the flexible metal tabs. You only want the outer frame and the glass.
- 2 Clean the Glass: It is much easier to clean the glass now than after the structure is built. Use a standard glass cleaner.
- 3 Secure the Glass: If the glass is loose, apply a tiny bead of clear silicone or a dot of hot glue in the corners of the frame’s inner lip to keep the glass from rattling or falling out during assembly.
Step 2: Constructing the Main Body
The body consists of four frames standing vertically to form a box.
- 1 Layout: Stand two frames up at a 90-degree angle.
- 2 Glue: Apply a line of E6000 (for long-term hold) and a few dots of hot glue (for immediate hold) along the edge where the frames meet.
- 3 Join: Press them together firmly. Use painter’s tape to hold them at a perfect right angle while the glue sets.
- 4 Repeat: Continue this process until you have a four-sided square or rectangle. Allow this base to cure for at least 2–4 hours before moving to the roof.
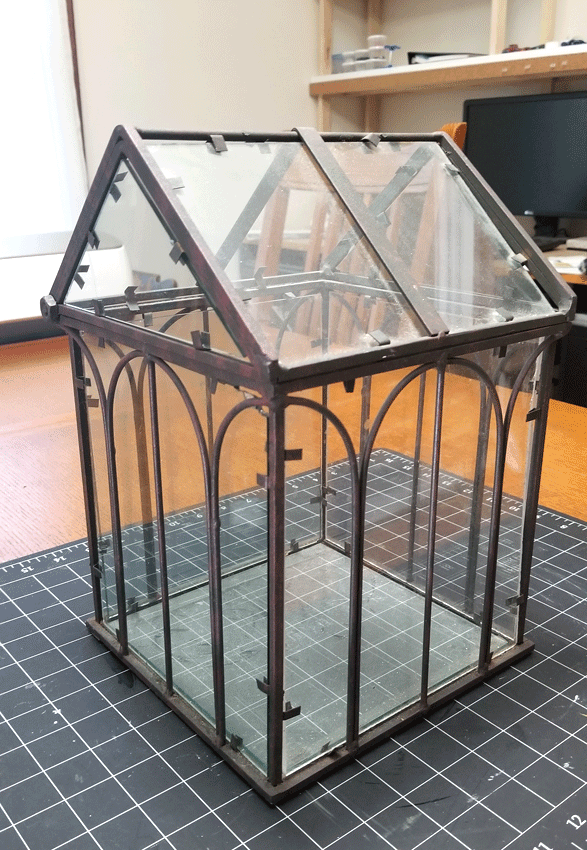
Step 3: Creating the Gabled Roof
The roof is what gives the greenhouse its house shape. You will use the remaining four frames to create two triangular peaks.
- 1 Form the Peaks: Take two frames and lean them against each other at the top to create a “V” shape.
- 2 Measure the Gable: You will notice a triangular gap on the sides of the roof. You can leave these open for ventilation or cut two additional small frames (or pieces of plexiglass) to fit these triangles.
- 3 Assemble the Roof: Glue the top ridge where the two frames meet. For extra stability, you can glue a thin wooden dowel along the interior ridge.
Step 4: Final Assembly and Reinforcement
Now, you will attach the roof to the base.
- 1 Permanent vs. Accessible: If you want the greenhouse to be permanent, glue the roof directly onto the base. However, for easy plant maintenance, it is better to attach one side of the roof with small hinges.
- 2 Hinge Attachment: Screw the hinges into the top edge of the base and the bottom edge of the roof frame. This allows the roof to flip open like a lid.
- 3 Seal the Bottom: If you plan to put a tray of pebbles or water inside, ensure the bottom of your greenhouse is sitting on a waterproof tray or a piece of sealed plywood.
Step 5: Finishing Touches and Painting
Once the glue has fully cured (usually 24 hours), you can paint the structure.
- Distressed Look: Use chalk paint and lightly sand the edges.
- Modern Look: Use a matte black spray paint for a “Crittall” window effect.
- Protection: If you are using wood frames, apply a clear polyurethane spray to protect the wood from the high humidity that will be trapped inside.
5 Creative Styles for Your Miniature Greenhouse
If you want to move beyond the basic design, here are five specific styles you can emulate to match your home decor.
1. The Victorian Conservatory
To achieve this look, use highly ornate, gold-leafed frames with filigree details.
The Victorian style often features a double-height base, where you stack two rows of frames on top of each other before adding the roof.
This creates a tall, elegant structure perfect for miniature climbing ivy or tall ferns. Add a decorative finial to the top ridge of the roof for an authentic 19th-century aesthetic.
2. The Rustic Farmhouse
Focus on reclaimed or distressed wood frames. Look for frames with wide, flat profiles.
You can use chicken wire instead of glass on one or two panels to allow for more airflow if you are housing succulents rather than tropicals.
A light white-wash or seafoam green paint job works beautifully here.
3. The Modern Minimalist
Use thin, sleek black metal or plastic frames. The key to this style is less is more.
Ensure your glue lines are incredibly clean—use clear silicone sparingly.
This style looks best with a single, dramatic plant inside, such as a large air plant (Tillandsia) or a geometric terrarium arrangement.
4. The Shabby Chic
This style utilizes mismatched frames of varying textures but keeps them cohesive by painting everything the same shade of antique white or cream.
Use sandpaper to distress the corners so the original wood or gold leaf peeks through.
This style is perfect for a sunroom or a kitchen windowsill.
5. The Industrial Glass House
Choose frames with a metallic finish, such as brushed copper, pewter, or gunmetal gray.
Instead of a traditional gabled roof, you can create a lean-to style roof where one side is higher than the other, mimicking urban industrial architecture.
This style pairs exceptionally well with concrete planters placed inside the greenhouse.
Best Plants for Your Miniature Greenhouse
Not all plants thrive in the enclosed, humid environment of a miniature greenhouse. Here is a guide to choosing the right inhabitants:
- Nerve Plants (Fittonia): These love high humidity and will faint if they get too dry. The greenhouse keeps them turgid and vibrant.
- Polka Dot Plants (Hypoestes): Their bright pink and green foliage adds a pop of color to the glass structure.
- Ferns: Specifically Lemon Button Ferns or Maidenhair Ferns, which often struggle in standard room humidity.
- Mosses: A carpet of cushion moss or sheet moss at the base helps maintain moisture levels.
- Orchids: Miniature Phalaenopsis orchids benefit from the trapped warmth and humidity.

Maintenance and Care Tips
- 1 Ventilation: Even humidity-loving plants need fresh air. If your greenhouse is fully sealed, open the roof for an hour every few days to prevent mold and mildew growth.
- 2 Light: Glass can magnify sunlight. Avoid placing your greenhouse in direct, scorching midday sun, as it can cook your plants. Bright, indirect light is ideal.
- 3 Watering: You will find you need to water much less frequently inside a greenhouse. Always check the soil moisture before adding water; the condensation on the glass is a good indicator of internal humidity.
- 4 Cleaning: Wipe the glass every few weeks with a microfiber cloth to remove mineral deposits from misting.
FAQ
Q: Can I use plastic glass instead of real glass?
Yes. Many modern frames come with acrylic or plexiglass. These are lighter and safer if you have children or pets, though they may scratch more easily over time.
Q: My frames are different sizes. Can I still make this?
You can, but it requires more planning. Use the largest frames for the long sides and the smaller ones for the ends. You may need to fill gaps with wood trim or extra caulking.
Q: How do I prevent the wood frames from rotting?
Always seal the wood with a waterproof varnish or outdoor-grade paint. Additionally, place your plants in a plastic tray inside the greenhouse rather than sitting them directly on the wood base.
Q: What glue is best for glass-to-glass contact?
Clear silicone sealant is best for glass-to-glass, while E6000 is superior for bonding the wood or plastic frames to each other.
Conclusion
Building a miniature greenhouse from picture frames is the perfect weekend project that yields a high-end look for a fraction of the retail price.
It’s an exercise in creativity, allowing you to play with architectural shapes and interior styling while providing a functional home for your favorite plants.
Whether you build a grand Victorian conservatory or a sleek modern case, your hand-crafted greenhouse will undoubtedly become a conversation piece that brings a touch of nature’s serenity into your living space.
Gather your frames, heat up your glue gun, and start building your own indoor garden sanctuary today.
Leave a Reply