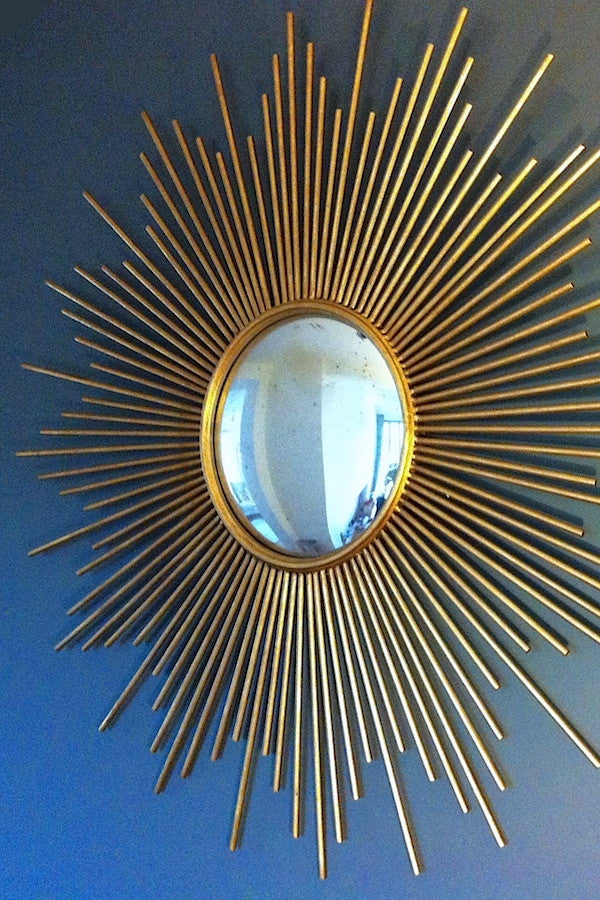
Creating a gorgeously shiny painted straw mirror is one of the most cost-effective ways to achieve a high-end, designer sunburst look for your home.
By repurposing simple drinking straws and a basic round mirror, you can create a striking piece of wall art that mimics the appearance of expensive brass or polished chrome fixtures.
This project is perfect for upcycling enthusiasts who want to add a touch of mid-century modern or glam aesthetics to their living space without the triple-digit price tag.
Essential Materials for Your DIY Straw Mirror
Before you begin, gathering the right supplies is crucial for ensuring a professional finish.
While the bones of this project are humble straws, the secret to the gorgeous shine lies in the quality of your paint and the precision of your assembly.
The Core Components
| Item | Recommended Type | Purpose |
|---|---|---|
| Mirror | 5-inch to 10-inch round glass | The focal point of the piece. |
| Straws | Plastic or heavy-duty paper (200-300 count) | Creates the rays of the sunburst. |
| Base | Cardboard or MDF circle | Provides the structural support. |
| Adhesive | High-temp hot glue or E6000 | Secures straws and mirror to the base. |
| Paint | Metallic Spray Paint (Gold, Silver, or Copper) | Provides the high-shine finish. |
| Primer | Plastic-bonding primer | Ensures paint adheres to plastic straws without peeling. |
Step-by-Step Tutorial: Crafting the Sunburst Mirror
Follow these detailed steps to ensure your mirror looks like a boutique find rather than a school project.
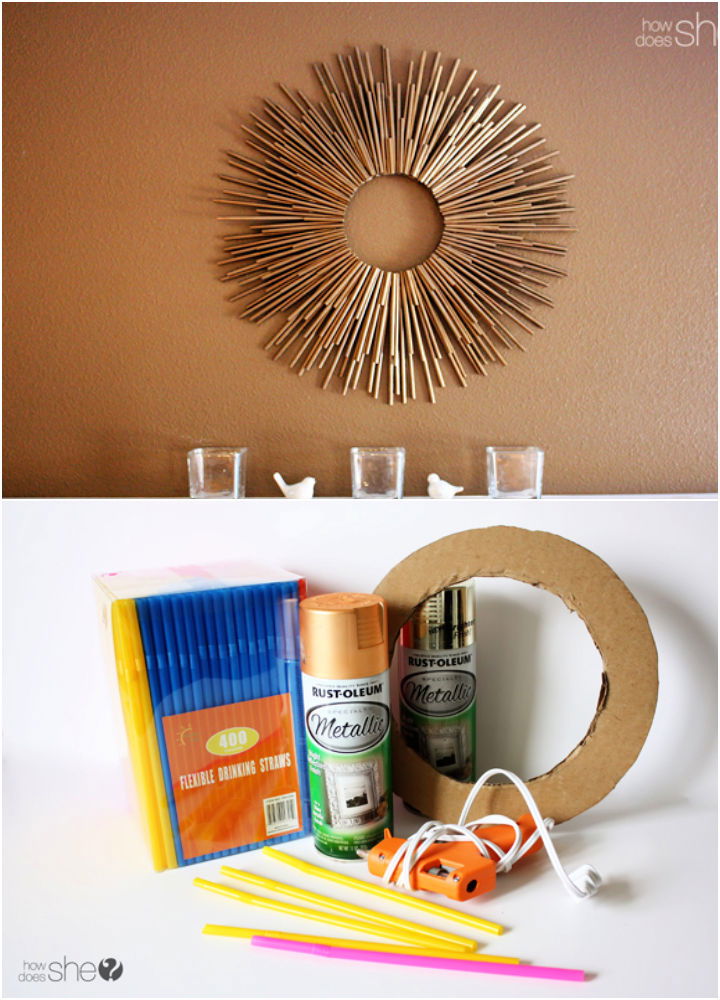
Step 1: Prepare the Base
Trace your mirror onto a piece of thick cardboard or MDF, then draw a second, larger circle around it (about 2 inches wider).
Cut out this larger circle. This donut or solid disc will be the foundation where you glue your straws. If you want a more substantial feel, use a wooden craft hoop.
Step 2: Sorting and Cutting the Straws
To create a dynamic, multi-dimensional look, you should use straws of varying lengths.
- ✨ Long Rays: Keep 100 straws at full length.
- ✨ Medium Rays: Cut 100 straws by 2 inches.
- ✨ Short Rays: Cut 50 straws in half.
Having varying lengths creates the layered effect that makes the mirror look professional.
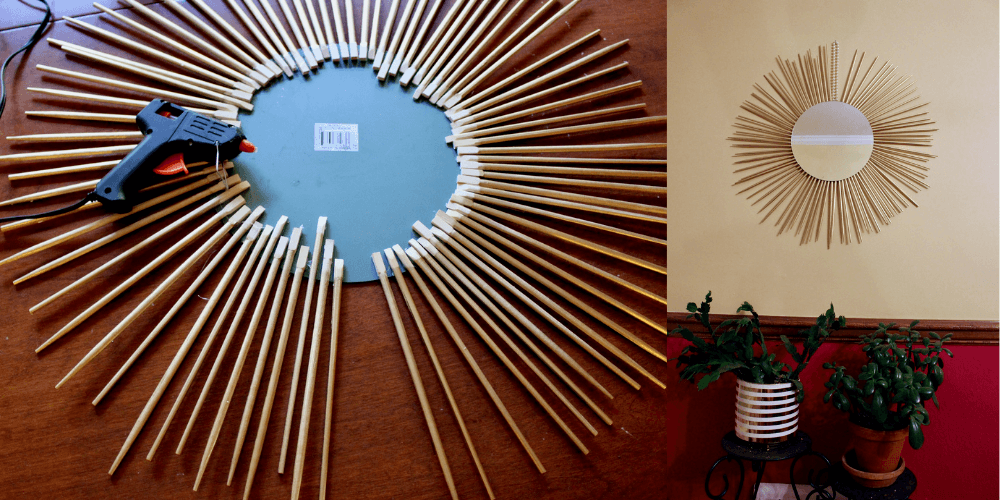
Step 3: The First Layer of Rays
Start by gluing your longest straws to the base. Imagine the base as a clock face.
Glue straws at the 12, 3, 6, and 9 positions first to ensure symmetry. Then, fill in the gaps between these points. Ensure the ends of the straws are flush with the inner circle where the mirror will eventually sit.
Step 4: Layering for Depth
Once the first layer is secure, begin adding your medium and short straws on top of the first layer.
Angle them slightly or place them directly in the gaps between the long straws. This layering hides the cardboard base and gives the piece a thick, luxurious volume.
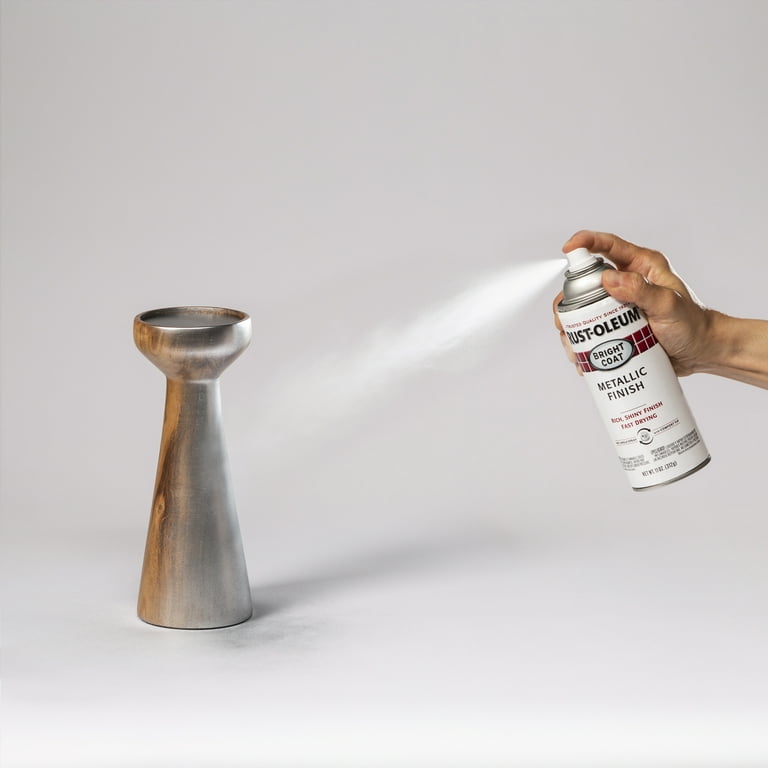
Mastering the Gorgeously Shiny Paint Finish
The difference between a crafty look and a designer look is the paint job.
Since plastic straws are non-porous, they can be tricky to paint.
Choosing the Right Paint
Look for spray paints labeled Metallic or Bright Coat. Brands like Rust-Oleum or Krylon offer Metallic Gold or Chrome finishes that have a reflective quality.
Avoid satin or flat paints if you want a high-shine result.
The Painting Process
- ✨ Prime: Apply a light coat of plastic-adhering primer. This prevents the paint from cracking when the straws flex.
- ✨ Light Coats: Do not try to cover the straws in one go. Apply 3–4 very thin, light coats.
- ✨ The 360-Degree Technique: Straws are cylindrical. You must spray from multiple angles (top, sides, and slightly underneath) to ensure no blue or red straw color peeks through the metallic finish.
- ✨ Dry Time: Let the frame dry for at least 24 hours before handling. Metallic paints take longer to set than standard colors.
10 Custom Design Variations for Your Straw Mirror
To make your project truly unique, consider these ten stylistic variations.
Each offers a different vibe to match your specific home decor.
1. The Classic Gold Sunburst
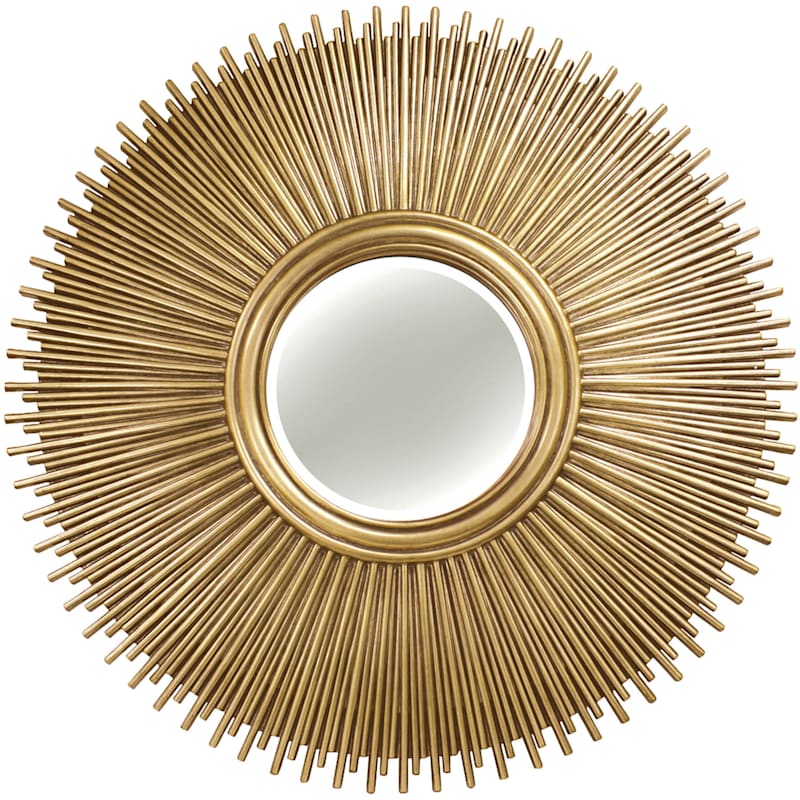
The most popular version. Use a bright 14k Gold spray paint.
This fits perfectly in a Hollywood Regency or Mid-Century Modern room. The key is using a high-gloss finish to mimic polished brass.
2. The Industrial Silver Spoke

Use chrome or brushed nickel spray paint. This variation looks best with thinner straws and a larger central mirror.
It complements modern, minimalist, or industrial lofts with cool color palettes.
3. The Two-Tone Ombre
Paint the inner half of the straws one color (like copper) and the outer tips another (like black or a darker bronze).
This creates a sophisticated gradient that draws the eye inward toward the mirror.
4. The Alternating Length Starburst
Instead of layering randomly, create a strict pattern: one long straw, two short, one long.
This geometric precision creates a very clean, architectural look that works well in home offices.
5. The Matte Black Gothic Glam
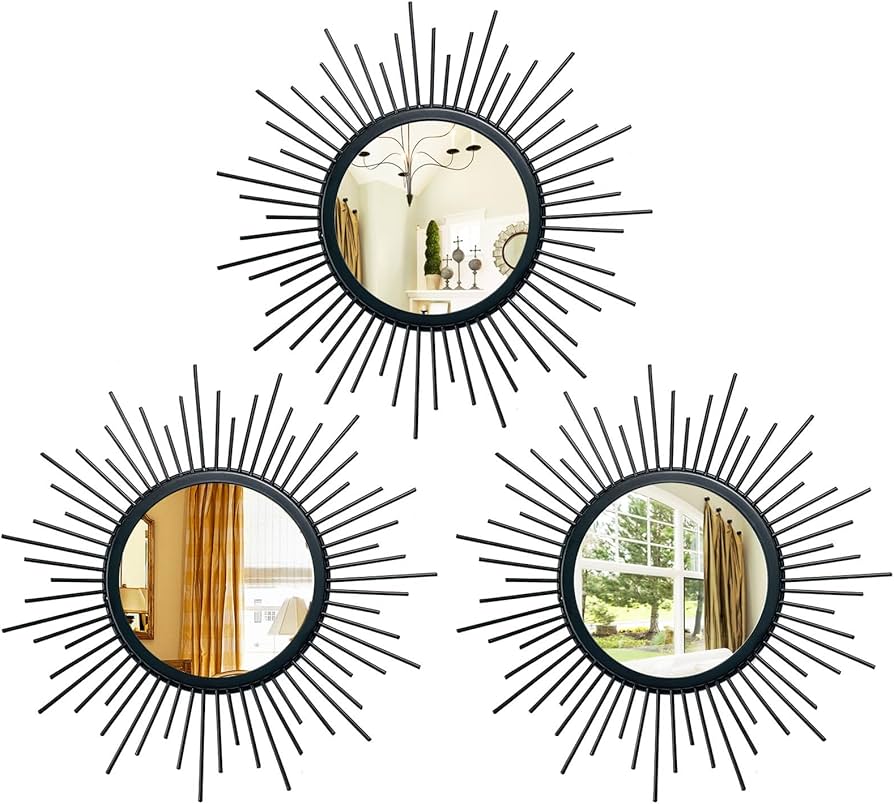
While the goal is shiny, a high-gloss black finish can be incredibly striking.
It looks like wrought iron and provides a bold contrast against white or light-colored walls.
6. The Copper Rose Gold
Rose gold or copper paint offers a warmer, more contemporary feel than traditional yellow gold.
This style is excellent for bedrooms or nurseries where you want a softer glam touch.
7. The Beaded Ray Mirror

Before painting, slide a single wooden or plastic bead onto the end of each straw.
Once painted, these look like expensive metal droplets or jewelry-inspired accents.
8. The Thick and Thin Texture
Mix standard drinking straws with thin coffee stirrers or extra-wide smoothie straws.
The variation in diameter creates a rich texture that looks like a custom-forged metal piece.
9. The Square Sunburst
Instead of a round mirror, use a square one. Arrange the straws so they radiate from the flat edges.
This creates a more modern, Art Deco feel that breaks away from the traditional circular shape.
10. The Floating Halo
Leave a small gap between the mirror and the start of the straws by using a slightly larger base.
This creates a halo effect where the wall color peeks through the center, making the mirror appear to float.
How to Mount Your Mirror Securely
Because a glass mirror plus glue and hundreds of straws can become surprisingly heavy, you need a reliable mounting method.
- ✨ The Tab Method: Use a soda can tab glued to the back of the cardboard base with a generous amount of E6000 glue.
- ✨ The Wire Loop: Poke two holes in the cardboard base before gluing the straws and thread a picture-hanging wire through them.
- ✨ Command Strips: For smaller mirrors, heavy-duty Command Strips are ideal as they keep the mirror flush against the wall without damaging the paint.
Maintenance and Cleaning Tips
To keep your straw mirror looking gorgeously shiny for years, follow these maintenance tips:
- ✨ Dusting: Use a soft-bristled paintbrush or a can of compressed air (like you use for keyboards) to remove dust from between the straws. Avoid heavy cloths that might snag or bend the straws.
- ✨ Mirror Cleaning: Spray glass cleaner onto a microfiber cloth first, then wipe the mirror. Never spray directly onto the mirror, as the liquid can seep behind the glass and dissolve the glue or ruin the paint on the straws.
- ✨ Avoid Heat: Do not hang your straw mirror directly above a radiator or a high-heat fireplace, as the hot glue can soften, causing the straws to sag.
Frequently Asked Questions
Can I use paper straws instead of plastic?
Yes! Paper straws are actually easier to glue and are more eco-friendly. However, they are more absorbent, so you may need an extra coat of paint to achieve the same metallic shine as plastic.
How do I prevent the straws from looking like… straws?
The secret is in the layering and the paint. By using multiple lengths and a high-quality metallic spray, the cylindrical shape of the straws begins to look like metal rods. Ensure you cover the open holes at the ends of the straws with paint.
What is the best glue for this project?
Hot glue is best for speed, but if you live in a very warm climate, the glue can soften. For a permanent bond, use a combination: a few dots of hot glue for an instant hold and E6000 for a long-term, structural bond.
How many straws will I actually need?
For a 10-inch mirror, expect to use between 200 and 300 straws. It is always better to have an extra pack on hand to fill in any sparse areas.
Conclusion
Creating a shiny painted straw mirror is a rewarding DIY project that proves you don’t need a massive budget to create high-impact home decor.
By focusing on the details—varying the straw lengths, using a high-quality metallic primer and paint, and ensuring a symmetrical layout—you can create a piece that rivals high-end retailers.
Whether you choose a classic gold finish or a modern matte black, this upcycled mirror will serve as a stunning focal point in any room, reflecting both the light and your creative flair.
Leave a Reply