Creating a glittery Valentine heart flower bouquet is the perfect way to blend romantic sentiment with sparkling home decor. Unlike fresh flowers that wither within a week, these handcrafted blooms serve as a long-lasting keepsake, a vibrant centerpiece, or a thoughtful handmade gift.
By combining simple cardstock, floral wire, and high-shine glitter, you can create a professional-looking arrangement that captures the whimsical spirit of Valentine’s Day. This tutorial will guide you through the precise steps of construction, from mess-free glittering techniques to structural assembly, ensuring your final product looks like a high-end boutique find.
Essential Materials for Your Glittery Heart Bouquet
Before you begin, gathering the right tools is essential for a seamless crafting experience. Using high-quality cardstock ensures the petals don’t wilt under the weight of the glitter, while the right adhesive prevents shedding.
Step-by-Step Tutorial: Crafting the Perfect Heart Bouquet
Step 1: Template and Cutting
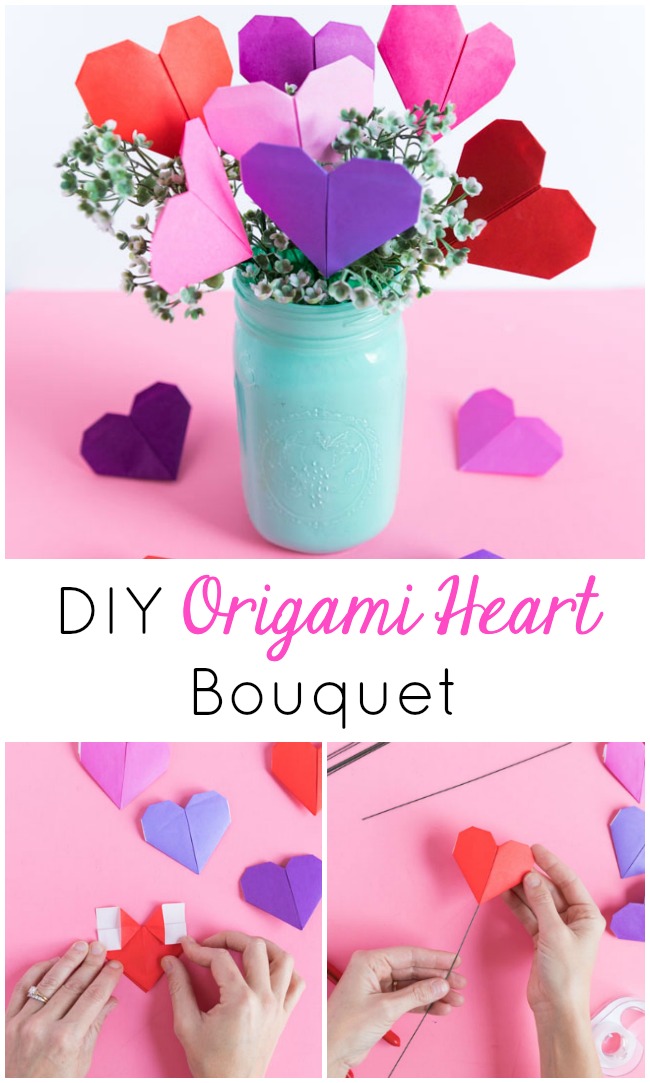
To ensure uniformity, create three different sizes of heart templates from scrap cardboard: small (2 inches), medium (3 inches), and large (4 inches). Trace these onto your colored cardstock.
For a full-looking bouquet, you will need approximately 12 to 15 hearts. If you want a double-sided look, cut two of every heart.
Step 2: The Glittering Process (No-Mess Tips)
Apply a thin, even layer of liquid glue to the surface of the heart using a foam brush. Avoid thick globs, as these will cause the paper to warp.
Place the heart in a shallow tray or a coffee filter and generously sprinkle the glitter over the glue. Shake off the excess.
Pro Tip: Once the glue is dry, spray the hearts with a light coat of clear acrylic sealer or aerosol hairspray. This locks the glitter in place and prevents it from falling off onto your furniture.
Step 3: Attaching the Stems
Take your floral wire and create a small loop or hook at the top using needle-nose pliers. This provides more surface area for the glue to grab.
Apply a bead of hot glue to the back of a glittered heart and press the wire hook into it. If you are making double-sided flowers, glue the second heart directly onto the back of the first, sandwiching the wire in between.
Step 4: Adding Dimensional Layers
For a more floral look, you can stack hearts. Take a large glittered heart as the base, then use a foam adhesive dot to center a medium heart of a contrasting color on top.
This creates a 3D effect that mimics the depth of real flower petals.
Step 5: Arranging the Bouquet
Start with your tallest blooms in the center and work your way outward. Bend the floral wires slightly to give the bouquet a natural, organic shape.
You can fill the gaps between the hearts with faux greenery, baby’s breath, or even loops of satin ribbon.
❤ 1. Ombre Gradient Heart Blooms
The ombre effect is a timeless design choice that adds sophistication to your bouquet. To achieve this, choose five shades of pink or red cardstock, ranging from the deepest burgundy to the softest blush.
When glittering, use clear iridescent glitter on the lighter papers and deep metallic glitter on the darker ones. Arrange the bouquet so the colors transition from dark at the bottom to light at the top, creating a visual growth effect that mimics natural flowers.
❤ 2. Vintage Sheet Music Hearts

For a more shabby chic or farmhouse aesthetic, use vintage sheet music or book pages as your base material instead of solid cardstock. Cut the hearts from the music sheets and apply glitter only to the very edges (the rims) of the hearts.
This creates a delicate, frosted look. These hearts look stunning when paired with rustic twine bows and placed in a galvanized metal bucket or a Mason jar.
❤ 3. Fabric-Wrapped Heart Blooms
If you want a tactile, soft texture, consider wrapping your cardstock hearts in fabric before adding glitter. Scraps of velvet, lace, or felt work beautifully.
Use a spray adhesive to bond the fabric to the cardstock, then apply glitter accents using a glitter glue pen to draw patterns like swirls or polka dots. The contrast between the soft fabric and the sharp sparkle of the glitter adds a high-end, multidimensional feel to the arrangement.
❤ 4. Photo Memory Bouquet
Transform your bouquet into a sentimental centerpiece by incorporating photos. Print small, circular photos of loved ones and glue them into the center of the larger glittered hearts.
This turns the bouquet into a family tree of sorts for Valentine’s Day. It’s an excellent gift for grandparents or a beautiful way to celebrate a couple’s history.
Ensure the glitter color complements the tones in the photographs for a cohesive look.
❤ 5. Lace-Edged Romantic Hearts
Combine the sparkle of glitter with the delicate texture of lace. After glittering your hearts, glue a strip of white or cream scalloped lace around the perimeter of the heart’s back, so the lace peeks out from behind the glittery front.
This creates a Victorian-inspired look that is incredibly romantic. Use gold or rose-gold glitter to enhance the antique vibe of this specific variation.
❤ 6. Mixed Metal Metallic Hearts
Who says Valentine’s Day has to be strictly red and pink? Create a modern, glam bouquet using a mix of gold, silver, and copper glitters.
Use black cardstock as the base to make the metallic colors pop intensely. This variation works perfectly in a sleek, minimalist black vase and serves as a sophisticated decor piece for a Valentine’s dinner party or a modern home office.
❤ 7. Scented Paper Hearts
Engage more than just the sense of sight by making your bouquet fragrant. Before assembling, lightly mist the back of the cardstock hearts with a rose or vanilla-scented essential oil spray.
Alternatively, you can mix a small amount of dried lavender or cinnamon into your glitter. As the bouquet sits in the room, it will release a subtle, pleasant aroma, mimicking the experience of a real floral arrangement.
❤ 8. Double-Sided Shimmer Hearts

Most DIY bouquets look great from the front but messy from the back. To create a professional 360-degree arrangement, always glitter both sides of your hearts.
This is especially important if the bouquet will be placed on a dining table where guests will see it from all angles. Use a slightly different shade of glitter on the reverse side to add interest and variety as the flowers spin or move in the breeze.
❤ 9. Jeweled Centerpiece Hearts
For those who believe there is no such thing as too much sparkle, add flat-back rhinestones or sequins on top of your glittered surface. Use a pair of tweezers and a small dab of clear-drying glue to place jewels in the center of each heart or along the cleavage of the heart shape.
These will catch the light differently than the fine glitter, creating a multifaceted shimmer that looks stunning under candlelight.
❤ 10. Rustic Burlap and Glitter Hearts
Create a beautiful juxtaposition by mixing rough burlap with fine glitter. Cut heart shapes out of stiffened burlap and apply a thick dipped glitter effect to the bottom half of each heart.
The organic, earthy texture of the burlap paired with the refined sparkle of the glitter creates a boho-chic look. Wrap the floral wire stems in brown floral tape or twine to complete the rustic aesthetic.
Pro Tips for Long-Lasting Paper Bouquets
- ❤ Avoid Direct Sunlight: Just like real flowers, paper and glitter can fade. Keep your bouquet away from windows where harsh UV rays can bleach the vibrant reds and pinks.
- ❤ Dusting: Use a clean, soft makeup brush or a can of compressed air to gently remove dust from the glittered surfaces. Never use water or damp cloths.
- ❤ Vase Fillers: To keep the wire stems in place, fill your vase with clear glass marbles, conversation heart candies, or dry white rice. This prevents the flowers from flopping over and allows you to position them precisely.
- ❤ Storage: If you plan to bring this out only once a year, store it in a sturdy box with tissue paper padding. Avoid plastic bags, which can trap moisture and cause the wire to rust or the glue to soften.
Frequently Asked Questions (FAQ)
Q: What is the best glue to use so the glitter doesn’t fall off?
A: A high-quality liquid “Tacky Glue” is best for the initial application because it holds a lot of glitter. However, the secret to zero shedding is the top coat.
Once the glue is dry, use a clear acrylic sealer spray (available at craft stores) to lock everything in.
Q: Can I make these with a Cricut or Silhouette machine?
A: Absolutely! Using a cutting machine is a great way to get perfectly symmetrical hearts. You can even find “intricate cut” heart designs that look like paper lace, which look stunning when glittered.
Q: How do I make the bouquet look fuller without making 50 hearts?
A: Use fillers. Incorporate sprigs of faux eucalyptus, silk leaves, or even loops of wide decorative ribbon on wires.
These fill the gaps between your glittery hearts and give the bouquet a professional, lush appearance.
Q: My hearts are drooping on the wire. How do I fix this?
A: This usually happens if the wire is too thin or the heart is too heavy. Use a lower gauge wire (which is thicker) or glue a secondary spine of wire halfway up the back of the heart to provide more vertical support.
Conclusion
Creating a glittery Valentine heart flower bouquet is a rewarding project that combines the precision of paper crafting with the joy of floral arrangement. Whether you opt for the classic romantic red or experiment with modern metallic and rustic burlap, the result is a personalized piece of decor that radiates warmth and creativity.
By following the layering techniques and sealing methods outlined in this guide, you can ensure your handmade bouquet remains a sparkling highlight of your Valentine’s Day celebrations for many years. Grab your glitter, heat up your glue gun, and start crafting a gift that truly shines from the heart.
Leave a Reply