Creating a decorative hanging DIY jewelry organizer is the ultimate solution for transforming tangled necklaces and missing earrings into a curated wall display.
By utilizing vertical space, you not only protect your delicate accessories from damage but also create a functional piece of art that complements your room’s aesthetic.
Whether you prefer a rustic farmhouse look with reclaimed wood or a sleek modern vibe using metallic accents, a handmade organizer ensures your favorite pieces are always visible and within reach.
The Essential Components of a Quality Jewelry Organizer

Before diving into specific designs, it is important to understand the fundamental elements that make a hanging organizer effective.
A high-quality DIY project should balance weight distribution, material durability, and ease of access.
Materials and Tools Comparison Table
| Component | Best Material Options | Best For |
|---|---|---|
| Base/Frame | Reclaimed wood, vintage frames, pegboards | Structural integrity and style |
| Hanging Surface | Chicken wire, decorative mesh, lace, cork | Earrings and pins |
| Hooks | Cup hooks, drawer pulls, S-hooks | Necklaces and bracelets |
| Adhesives | Wood glue, E6000, hot glue | Securing small decorative elements |
| Mounting | Sawtooth hangers, command strips, twine | Securing the organizer to the wall |
1. The Vintage Picture Frame Organizer
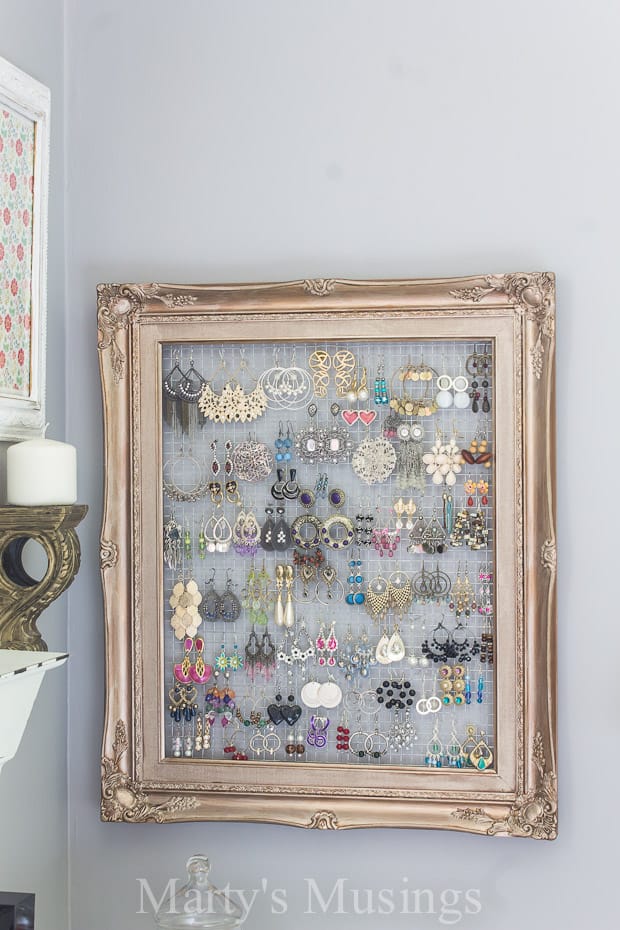
One of the most popular and beginner-friendly projects involves upcycling an old picture frame.
This method allows you to match your decor perfectly by choosing a frame that fits your style—whether it’s ornate Victorian or minimalist modern.
To create this, remove the glass and backing from a frame. Sand the wood and apply a fresh coat of chalk paint or metallic spray paint.
For the interior, staple a piece of decorative metal radiator mesh or chicken wire to the back of the frame. This creates a grid perfect for hooking earrings.
Add a row of small cup hooks along the bottom edge of the frame to hang necklaces. This project turns a thrift store find into a high-end boutique display.
2. The Driftwood Branch Hanger
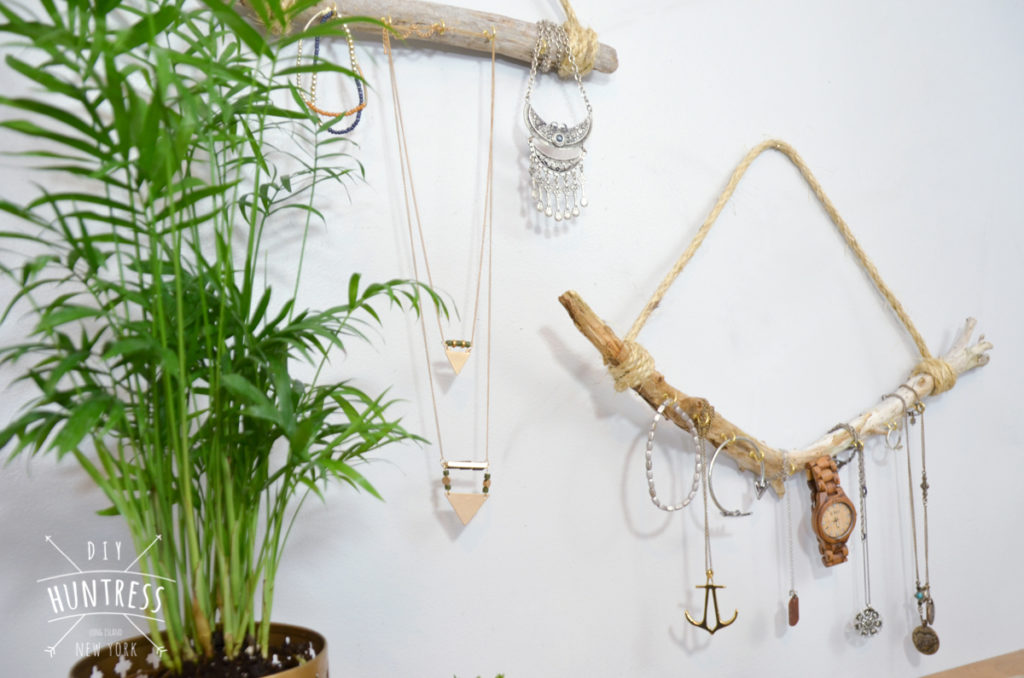
For those who love a coastal or bohemian aesthetic, a driftwood branch serves as a stunning natural base.
This project is incredibly cost-effective as the primary material can often be found in nature.
Find a sturdy, dried branch approximately 15-20 inches long. Clean it thoroughly and apply a light sealant if desired.
Screw small brass cup hooks into the underside of the branch, spacing them about an inch apart.
To hang the branch, tie a length of leather cord or thick twine to both ends and suspend it from a single wall nail. This organic look is perfect for long statement necklaces that tend to tangle in drawers.
3. Upcycled Window Shutter Display
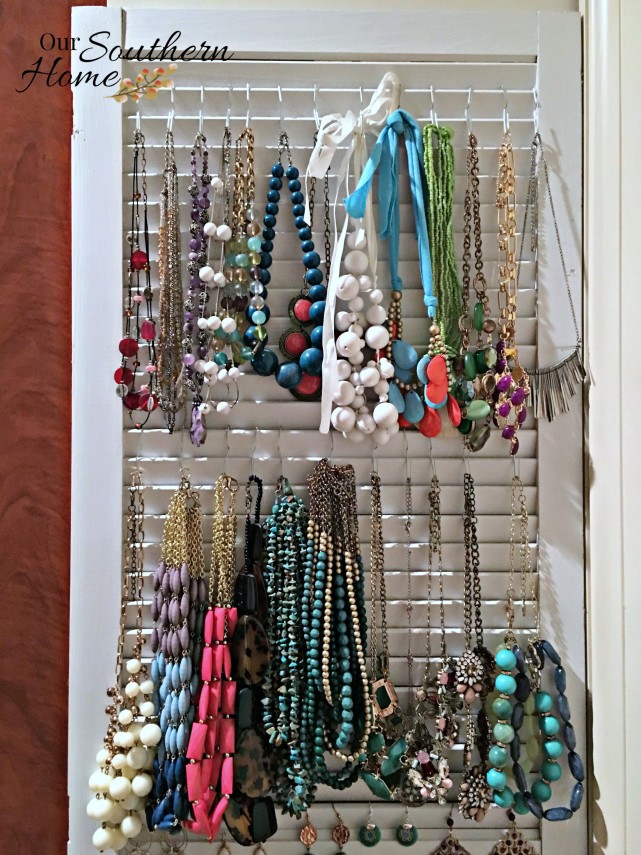
Old window shutters are naturally designed with slats that are perfect for holding earring cards and hanging S hooks.
This is a larger-scale project that works well if you have an extensive jewelry collection.
Start by cleaning an old wooden shutter and removing any loose lead paint (ensure you use safety gear).
Paint it in a distressed white or a bold accent color. The horizontal slats allow you to slide earring hooks directly over the wood.
You can also add decorative knobs or mismatched drawer pulls to the solid sections of the shutter to hold heavy chunky bracelets or watches.
4. Geometric Brass Pipe Hanger
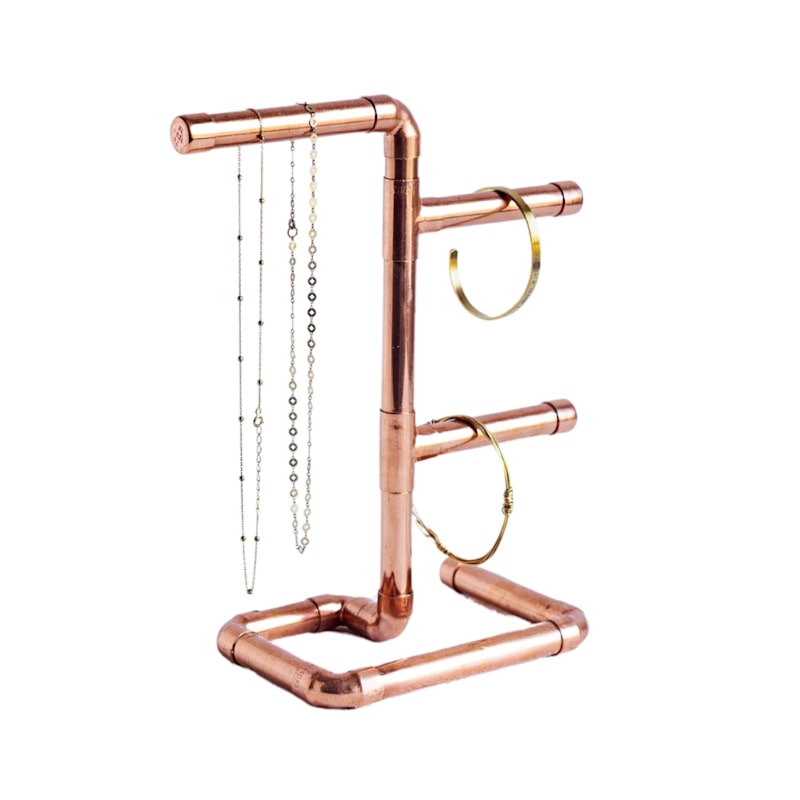
If your home features industrial or modern mid-century decor, a brass pipe organizer is a sophisticated choice.
This design uses thin brass tubes (available at hardware stores) and jewelry wire to create a minimalist hanging sculpture.
Thread a sturdy wire through several lengths of brass tubing to create a series of horizontal tiers. Connect these tiers using vertical wires or decorative chains.
The smooth surface of the brass is ideal for sliding on rings and bangles, while the ends of the tubes can be capped with decorative finials.
This airy design keeps your jewelry looking organized without adding visual bulk to your wall.
5. Boho Macrame Earring Holder
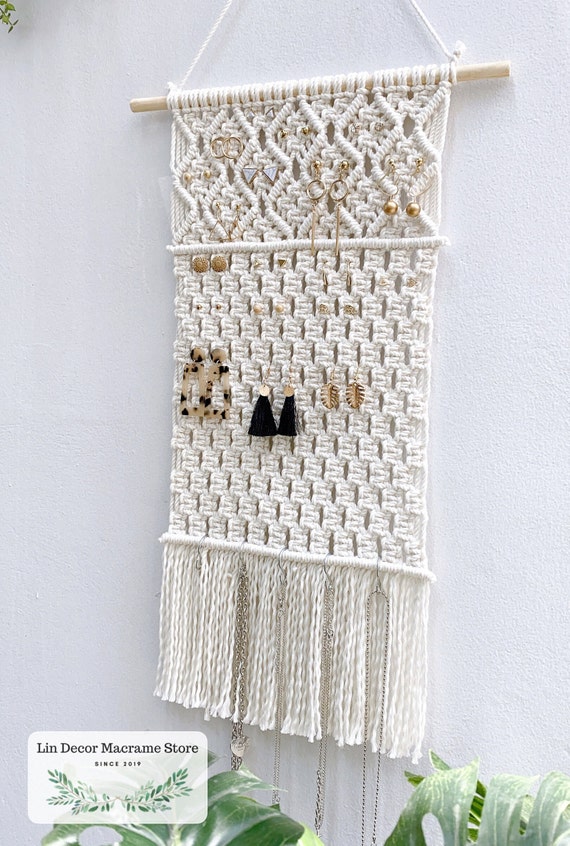
Macrame isn’t just for plant hangers; it’s also a fantastic medium for holding earrings.
The knotted patterns create thousands of tiny holes that are perfect for stud and hook earrings alike.
Using a wooden dowel as your base, tie several lengths of cotton cord using Lark’s Head knots. Work your way down using Square Knots or Double Half Hitch knots to create a flat, woven panel.
The texture of the cord prevents jewelry from slipping, and the soft material ensures that delicate metals won’t be scratched.
This adds a soft, tactile element to your bedroom or dressing area.
6. Industrial Pipe and Hook Rack
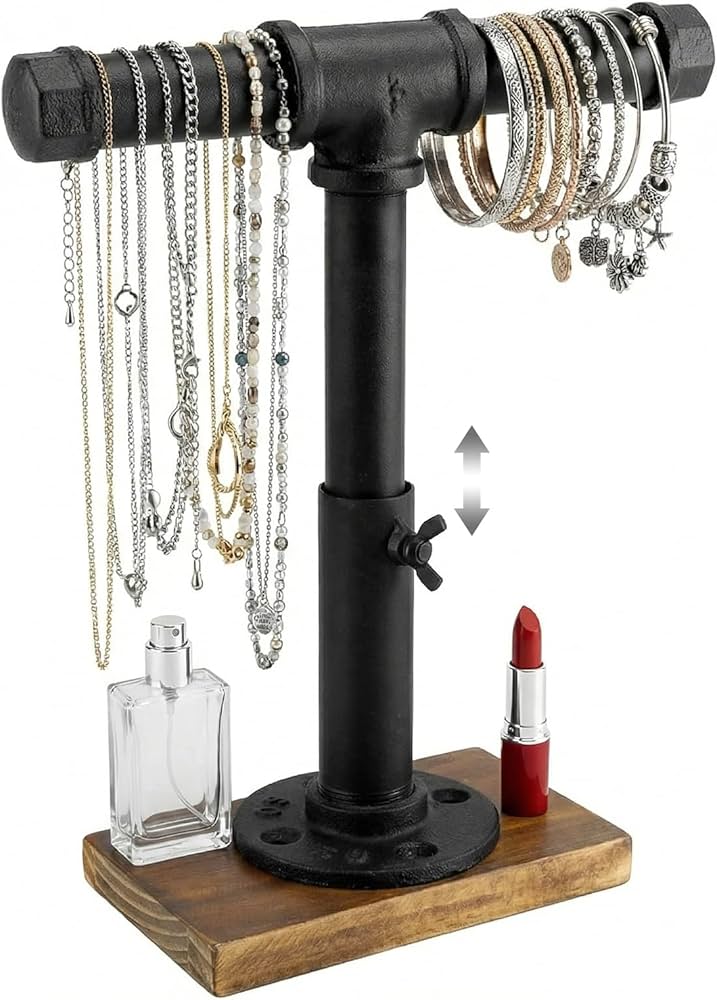
For a rugged, urban look, use black iron plumbing pipes. This style is incredibly durable and can hold a significant amount of weight, making it ideal for heavy statement necklaces and metal watches.
Assemble a short length of pipe with an elbow joint and a floor flange. The flange is screwed directly into the wall, providing a very secure mount.
You can hang S hooks along the pipe to hold jewelry. To add more functionality, you can mount a small wooden shelf above the pipe to hold ring dishes or perfume bottles, creating a complete getting ready station.
7. Corkboard and Fabric Pin-Up
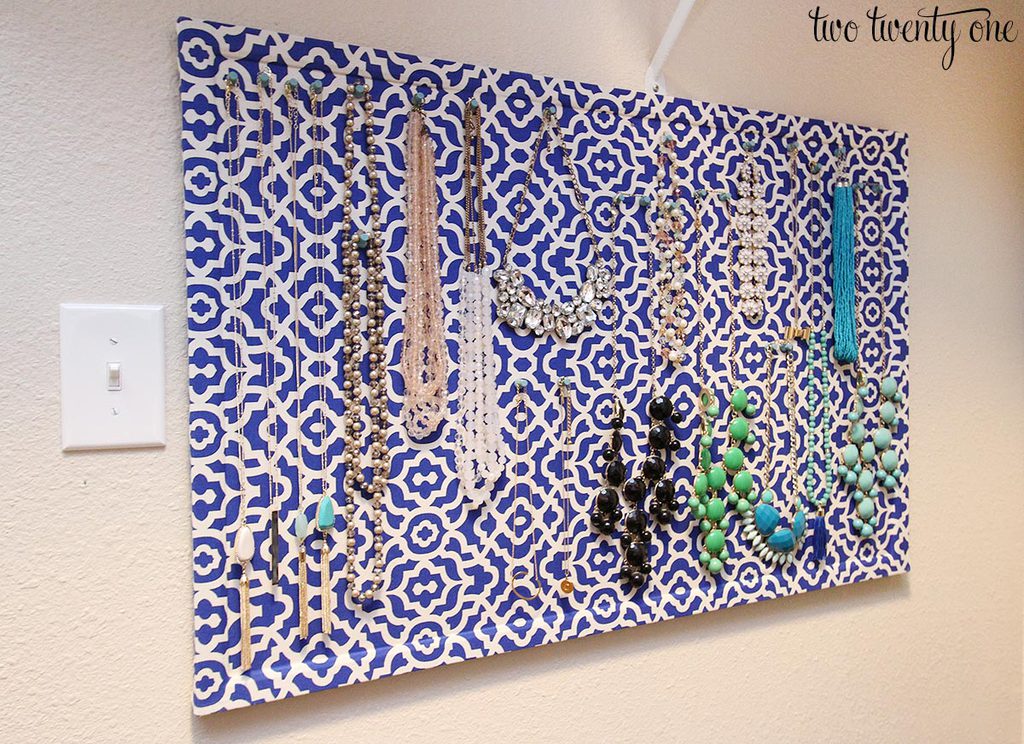
A corkboard is highly functional but often looks too office-like for a bedroom.
By covering it with a beautiful fabric, you transform it into a decorative jewelry pin-board.
Choose a fabric like linen or velvet that complements your room. Wrap the fabric tightly over a standard corkboard and secure it on the back with staples.
Place the board inside a decorative frame for a finished look. Use decorative upholstery tacks or push pin style hooks to hang your jewelry.
This method is the most flexible, as you can rearrange your layout in seconds as your collection grows.
8. Embroidery Hoop Lace Holder
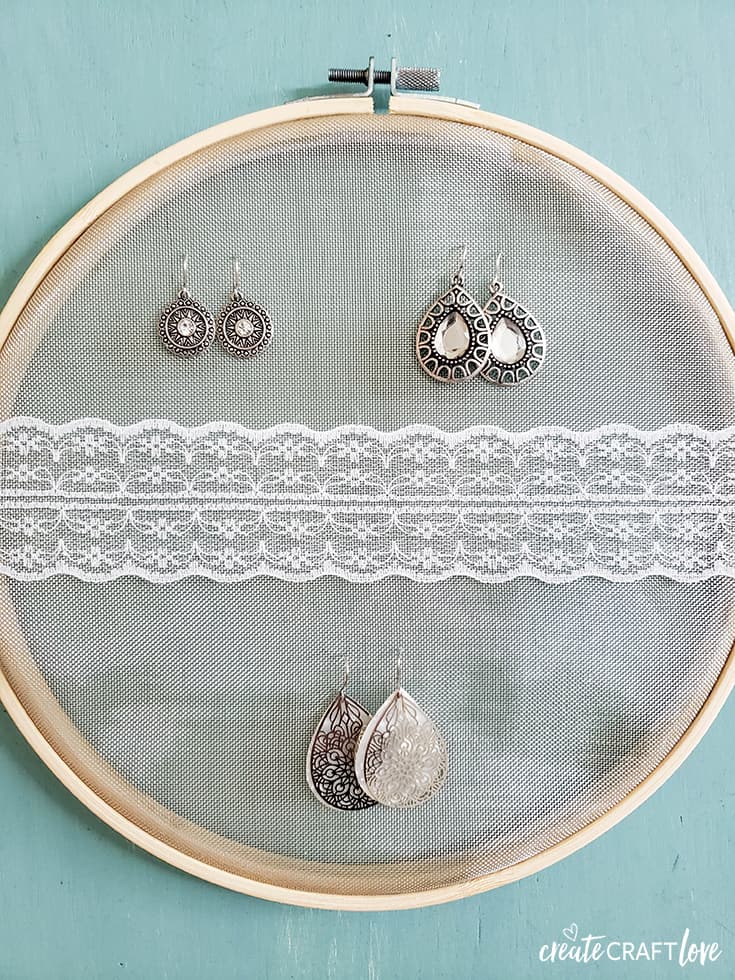
This is a charming, delicate project that is perfect for small spaces.
It utilizes the tension of an embroidery hoop to hold a piece of lace or tulle taut.
Place a piece of heavy-duty lace or a decorative crochet doily inside a large wooden embroidery hoop. Tighten the screw until the fabric is drum-tight.
Trim the excess fabric from the back. You can hang the hoop directly on a nail. The holes in the lace are perfect for dangling earrings.
You can even group three different sized hoops together to create a gallery wall effect that doubles as storage.
9. Modern Pegboard Station
Pegboards are the ultimate organization tool because they are infinitely customizable.
By painting a small section of pegboard and framing it, you create a professional-grade jewelry station.
Purchase a 2×2 foot piece of pegboard and paint it a trendy color like sage green or terracotta.
Use standard pegboard hooks to hang necklaces, but get creative by adding small pegboard baskets for items like hair ties or loose charms.
You can even use L brackets to attach a small wooden ledge for rings. This is the best option for someone whose jewelry collection is constantly changing.
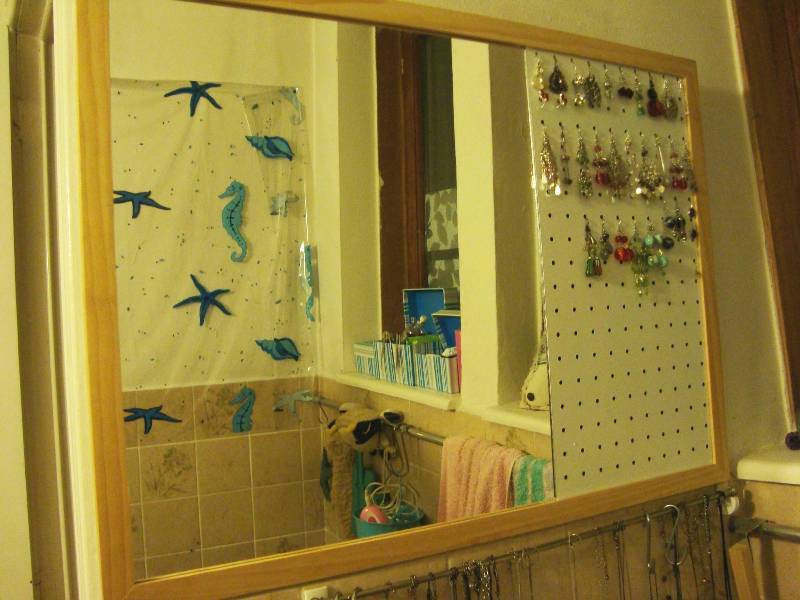
10. Hidden Mirror Cabinet Organizer
If you prefer a clean, minimalist room with no visible clutter, a hidden organizer behind a full-length mirror is the perfect DIY project.
Build a shallow wooden box (about 3 inches deep) that is the same dimensions as a full-length wall mirror.
Inside the box, install rows of hooks and mesh panels. Attach the mirror to the front of the box using heavy-duty piano hinges.
When closed, it looks like a standard wall mirror; when swung open, it reveals your entire jewelry collection beautifully organized and protected from dust.
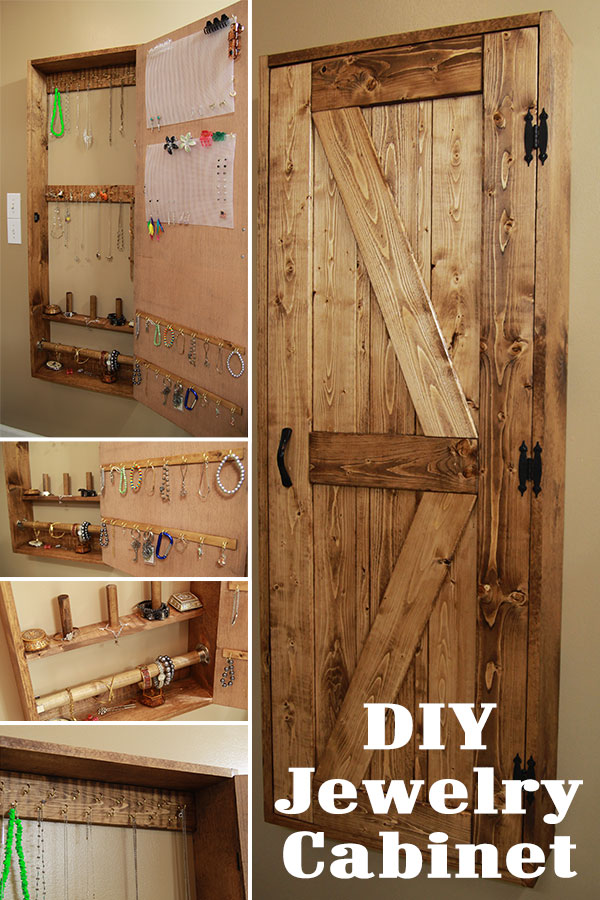
Step-by-Step Tutorial: The Classic Framed Mesh Organizer
While there are many styles, the Framed Mesh Organizer remains the gold standard for DIYers. Here is how to build one from scratch.
Step 1: Prepare the Frame
Find an old frame and remove everything but the wooden skeleton. Sand it down to remove old varnish.
If you want a shabby chic look, apply a base coat of dark paint, let it dry, rub some wax on the edges, and then paint a lighter color over the top. Sand the edges again to reveal the dark paint underneath.
Step 2: Cut the Mesh
Measure the opening of the back of the frame. Using wire snips, cut your hardware cloth or decorative mesh to be about 1/2 inch larger than the opening on all sides.
Safety Tip: Wear gloves, as the cut edges of the wire can be very sharp.
Step 3: Secure the Mesh
Lay the mesh across the back of the frame. Use a staple gun to secure the mesh to the wood, pulling it tight as you go.
Ensure the staples are driven in flush so they don’t snag your clothes or wall.
Step 4: Add the Hardware
Turn the frame over. On the bottom horizontal bar of the frame, pre-drill small holes every 1.5 inches.
Screw in your cup hooks by hand. If the wood is very hard, you can use pliers to help turn the hooks.
Step 5: Final Mounting
Attach a sawtooth hanger to the top center of the back. For extra stability (especially if you have heavy necklaces), use two hangers placed at the top corners.
Hang it on the wall and start arranging your jewelry!
Maintenance and Styling Tips
- Rotate Your Collection: Every season, move your most-worn pieces to the center of the organizer for easy access.
- Clean the Metal: Dust your organizer once a month with a soft microfiber cloth. If you used brass pipes, a little lemon juice and baking soda will keep them shining.
- Color Code: For a visually stunning display, organize your jewelry by color or material (gold, silver, rose gold).
- Avoid Humidity: Do not hang your jewelry organizer in the bathroom, as the steam can cause costume jewelry to tarnish and wood to warp.
Frequently Asked Questions (FAQ)
What is the best way to prevent necklaces from tangling on a wall organizer?
The key is spacing. Ensure your hooks are at least 1 to 1.5 inches apart. If you have very thick statement necklaces, give them even more room. Also, ensure the organizer is hung high enough so that long necklaces don’t puddle on a dresser below.
Can I make a jewelry organizer without power tools?
Absolutely. The Embroidery Hoop (Idea #8) and the Driftwood Hanger (Idea #2) require little to no tools. Most cup hooks can be screwed into soft wood by hand without a drill.
How do I hang heavy jewelry safely?
If your collection includes heavy stones or metal, ensure your organizer is anchored into a wall stud. If a stud isn’t available, use high-quality drywall anchors rather than just a standard nail.
What fabric is best for a jewelry board?
Linen, burlap, and velvet are the top choices. Linen and burlap have a visible weave that makes it easy to push pins through, while velvet provides a luxurious backdrop that prevents jewelry from sliding.
Conclusion
A decorative hanging DIY jewelry organizer is more than just a storage solution; it is a reflection of your personal style and a way to simplify your morning routine.
By choosing one of the ten designs above—ranging from the rustic charm of driftwood to the sleek utility of a pegboard—you can create a custom piece that protects your investment and beautifies your home.
With a few basic materials and a bit of creativity, you’ll never have to untangle a knot or search for a lost earring again. Happy crafting!
Leave a Reply