Bug crafts offer a unique intersection of nature education and creative expression for children. By transforming everyday household items like egg cartons, toilet paper rolls, and popsicle sticks into colorful insects, kids develop fine motor skills, hand-eye coordination, and an early appreciation for the environment.
Whether you are looking for a rainy-day activity or a classroom project, these 20 bug-themed crafts provide a hands-on way to explore the tiny world of bees, ladybugs, butterflies, and more.
Essential Supplies for Bug Crafting
Before diving into the projects, it is helpful to have a bug kit ready. Most of these projects utilize upcycled materials, making them both eco-friendly and budget-conscious.
1. Classic Egg Carton Ladybugs
Ladybugs are a staple of childhood crafts. Using the individual cups from a cardboard egg carton creates a perfect dome shape for the ladybug’s shell.
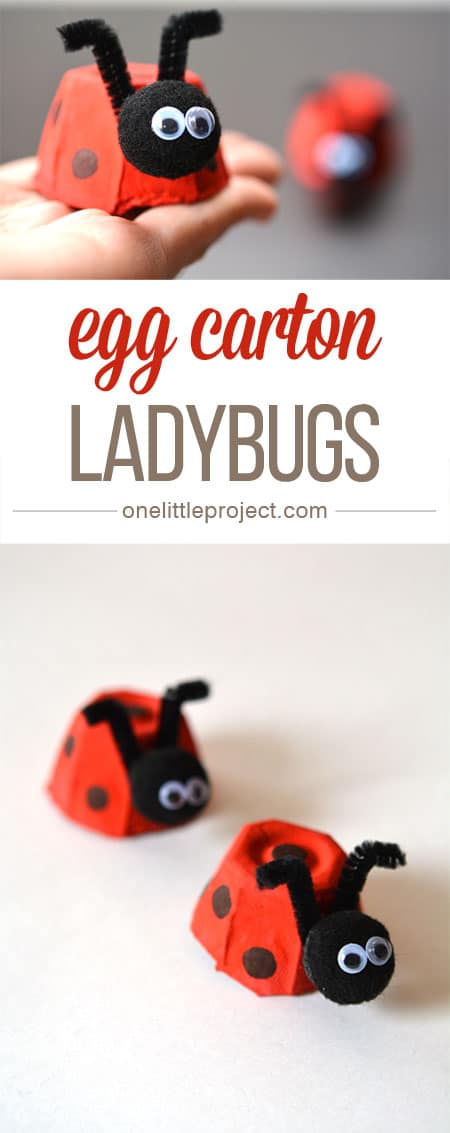
Materials: Cardboard egg carton, red paint, black markers, black pipe cleaners, googly eyes.
How to Make:
- Cut out a single cup from the egg carton and trim the edges so it sits flat.
- Paint the entire cup bright red and let it dry completely.
- Use a black marker or black paint to draw a line down the center and add several dots on either side.
- Poke two small holes in the front and insert a small piece of black pipe cleaner for antennae.
- Glue two googly eyes to the front of the cup.
2. Cardboard Tube Bumblebees
This upcycling project turns a standard toilet paper roll into a buzzing friend. It’s an excellent way to teach kids about the importance of pollinators.
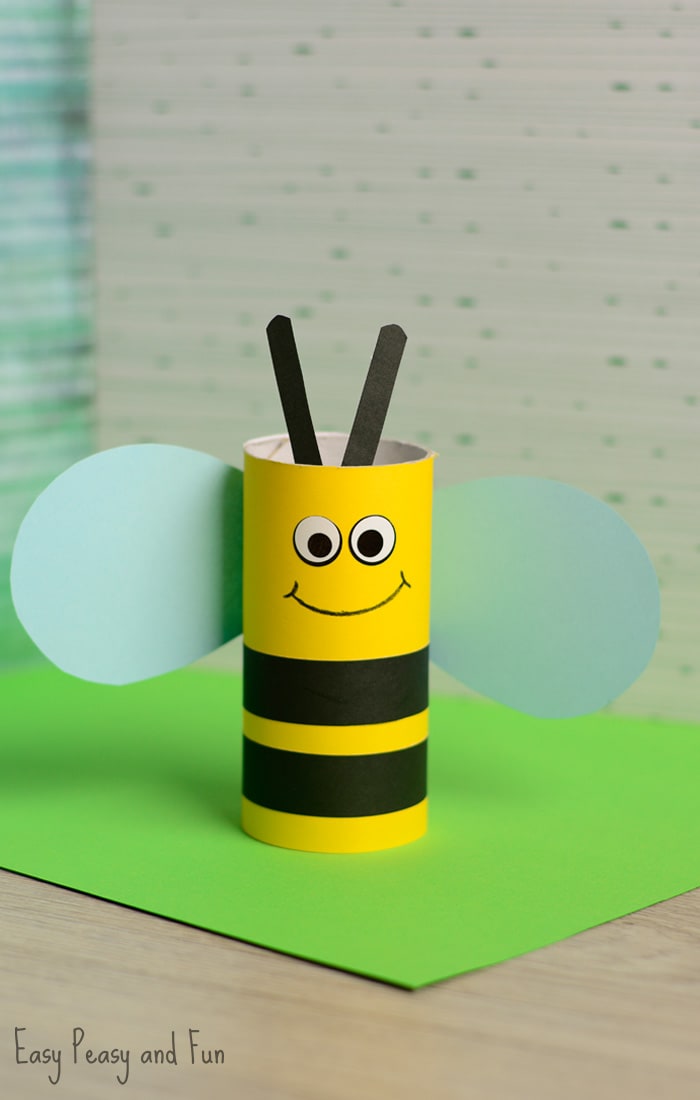
Materials: Toilet paper roll, yellow and black construction paper (or paint), white cardstock, glue.
How to Make:
- Wrap the tube in yellow paper or paint it solid yellow.
- Cut three thin strips of black paper and wrap them around the tube to create the bee’s stripes.
- Cut two large heart shapes out of white cardstock to serve as wings and glue them to the back.
- Add a face using markers or googly eyes.
- Attach two small black paper strips at the top for antennae.
3. Paper Plate Spiders
While technically arachnids, spiders are a must-have in any bug collection. This project is great for practicing counting to eight.
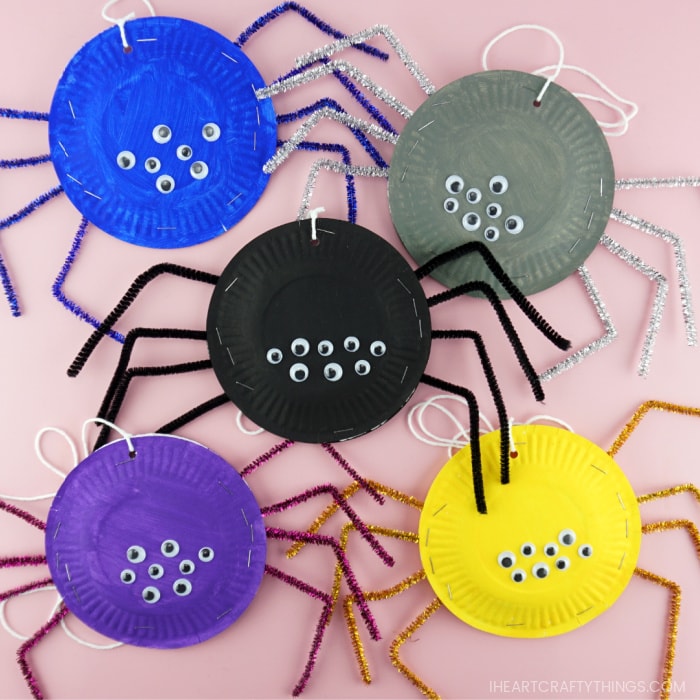
Materials: Small paper plates, black paint, 8 pipe cleaners, large googly eyes.
How to Make:
- Paint the bottom of a paper plate black.
- Once dry, staple or glue four pipe cleaners to each side of the plate.
- Bend the pipe cleaners in the middle to create knees so the spider can stand.
- Glue as many googly eyes as you like to the front (spiders usually have eight!).
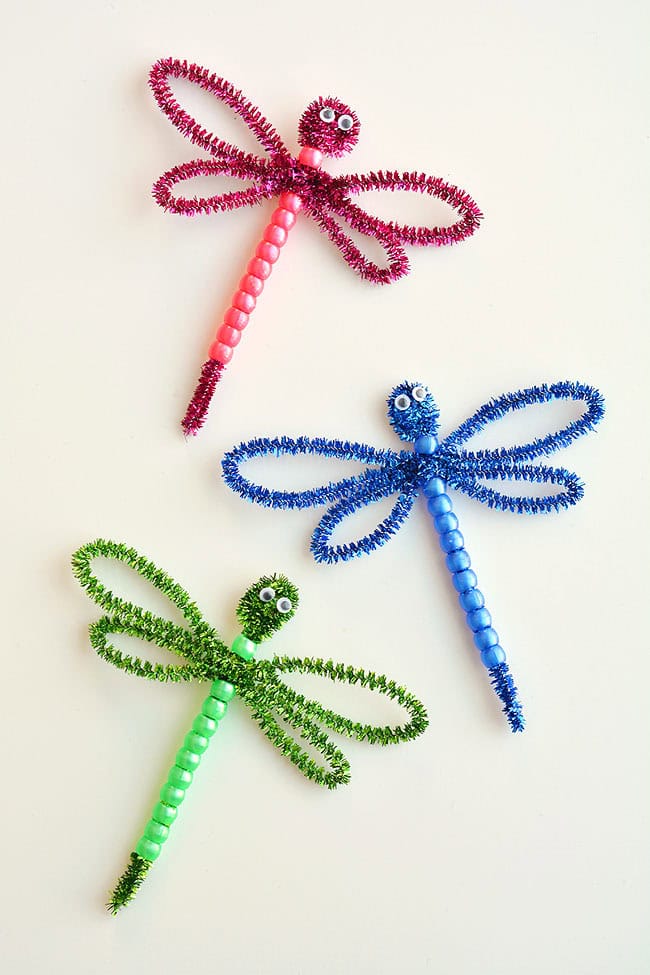
4. Popsicle Stick Dragonflies
Dragonflies are known for their shimmering wings. This craft allows kids to experiment with glitter and bright colors.
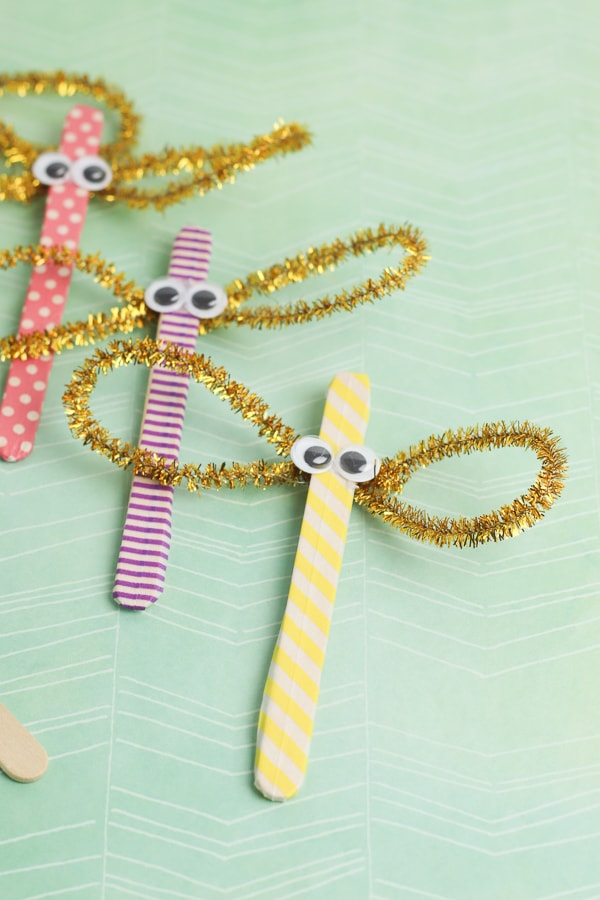
Materials: Standard popsicle sticks, wooden clothespins, glitter, glue, sequins.
How to Make:
- Paint a clothespin a bright color (this is the body).
- Take two popsicle sticks and glue them in an X shape.
- Glue the X onto the top of the clothespin.
- Decorate the wings with glitter glue, sequins, or markers to give them a translucent, shimmering effect.
5. Painted Rock Beetles
Rock painting is a meditative and durable craft. These beetles can live in your garden or on a windowsill.
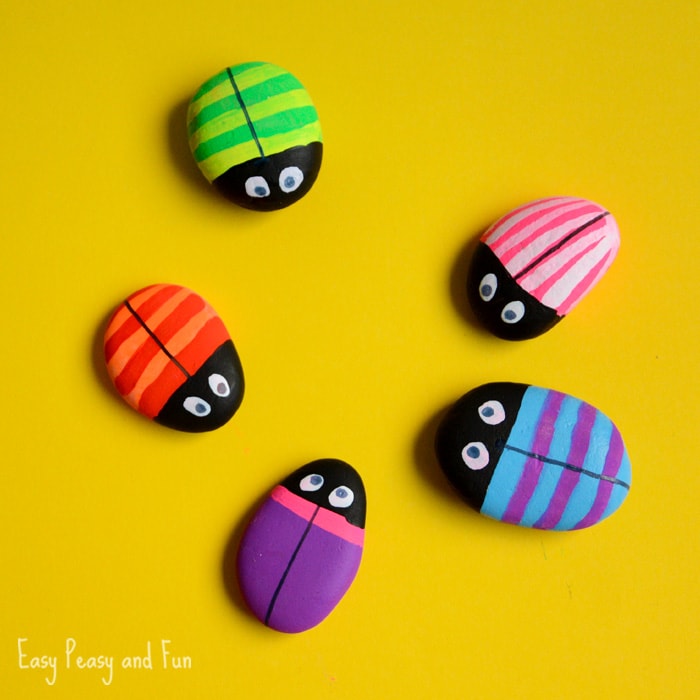
Materials: Smooth, flat river stones, acrylic paints, outdoor sealant (optional).
How to Make:
- Wash and dry the stones.
- Paint the entire stone a base color (green, blue, or metallic).
- Once dry, paint a head at one end and a line down the back.
- Add patterns like stripes, dots, or even jeweled spots using metallic pens.
- If placing outside, apply a clear coat of sealant to protect the paint from rain.
6. Clothespin Butterflies
These butterflies are perfect for clipping onto curtains or backpacks. The coffee filter wings create a beautiful tie-dye effect.
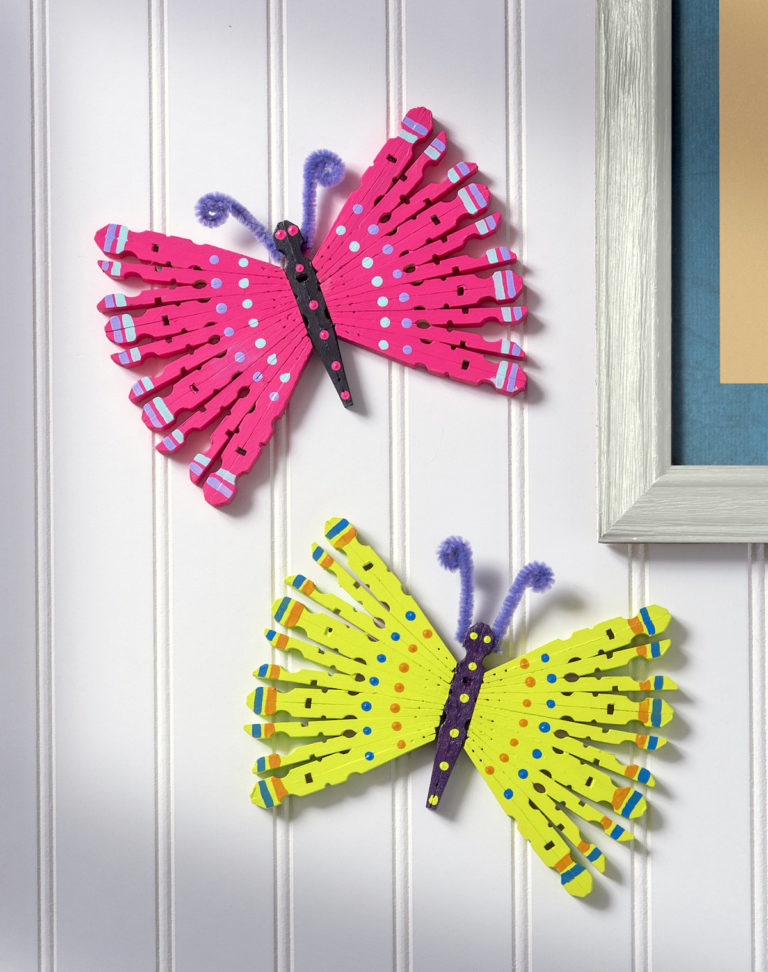
Materials: Wooden clothespins, coffee filters, washable markers, water spray bottle.
How to Make:
- Flatten a coffee filter and color it heavily with washable markers.
- Lightly mist the filter with water so the colors bleed together. Let dry.
- Once dry, scrunch the middle of the filter and clip the clothespin over the center.
- Decorate the clothespin body and add pipe cleaner antennae.
7. Bottle Cap Bumblebees
Small and adorable, these bees utilize plastic bottle caps that would otherwise end up in the bin.
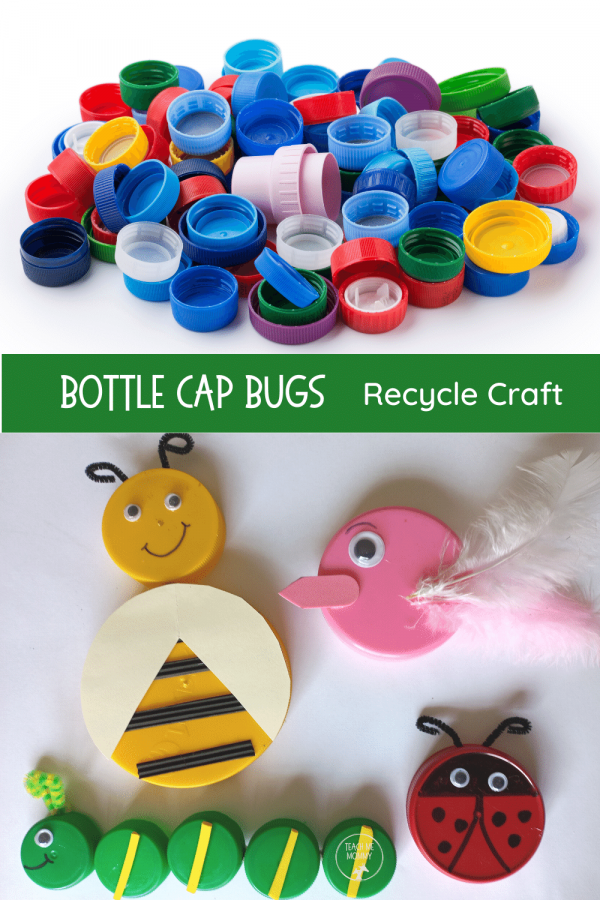
Materials: Yellow bottle caps, black permanent marker, vellum or wax paper (for wings), glue.
How to Make:
- Draw black stripes directly onto the yellow bottle cap.
- Cut small teardrop shapes out of wax paper.
- Glue the wings to the top of the cap.
- Add two tiny dots for eyes at the front edge.
8. Fingerprint Bug Jar
This is a wonderful keepsake craft that captures a child’s small fingerprints.

Materials: White cardstock, blue marker, ink pads (various colors), fine-tip black pen.
How to Make:
- Draw a large mason jar outline on the cardstock.
- Have the child dip their fingers into various ink pads and press them inside the jar.
- Once the ink is dry, use the black pen to turn the fingerprints into bugs by adding legs, wings, and antennae.
9. Paper Loop Caterpillar
Inspired by The Very Hungry Caterpillar, this 3D craft is excellent for teaching patterns and color sequences.
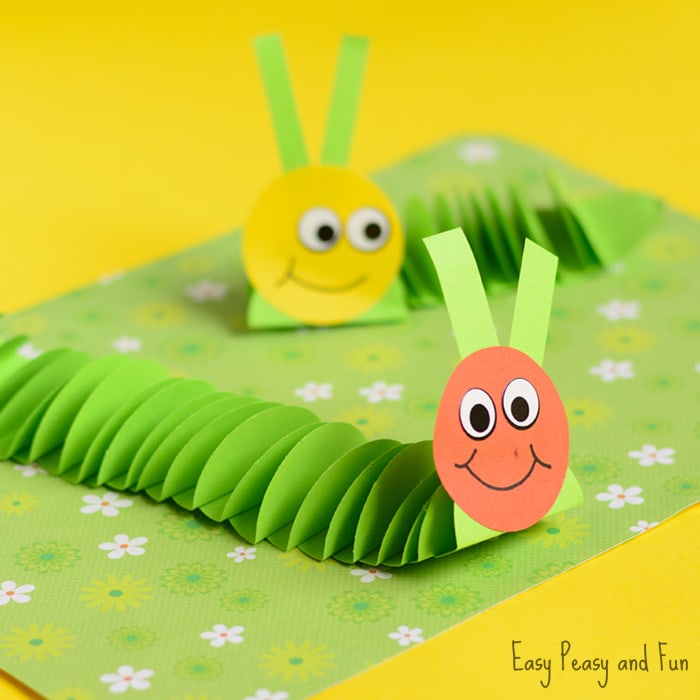
Materials: Green and red construction paper, stapler or glue, googly eyes.
How to Make:
- Cut several strips of green paper (about 1 inch wide) and one strip of red paper.
- Create a chain by looping the first strip and stapling it, then threading the next strip through and repeating.
- Use the red loop for the head.
- Attach antennae and eyes to the red loop.
10. Mason Jar Fireflies
This craft doubles as a nightlight. It uses glow in the dark paint to mimic the bioluminescence of fireflies.
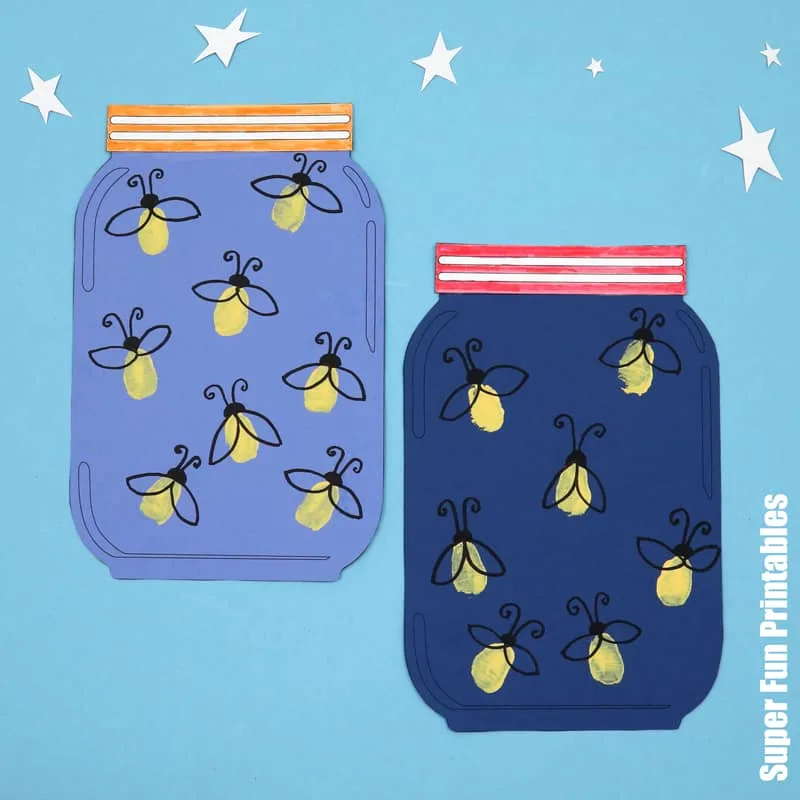
Materials: Clean glass jar, glow-in-the-dark acrylic paint, paintbrushes.
How to Make:
- Use a small brush to make tiny dots of glow-in-the-dark paint all over the inside of the jar.
- Use different colors of glow paint if available.
- Charge the jar under a bright light, then turn the lights off to see your fireflies glow.
11. Nature Leaf Bugs
Take the kids on a nature walk to collect supplies for this organic art project.

Materials: Dried leaves of various shapes, twigs, glue, heavy paper.
How to Make:
- Arrange leaves on the paper to form the bodies of bugs (e.g., an oval leaf for a beetle).
- Use small twigs for legs and antennae.
- Glue everything down and add googly eyes for a whimsical touch.
12. Pinecone Spiders
Pinecones provide a wonderful fuzzy texture that mimics the body of a spider.
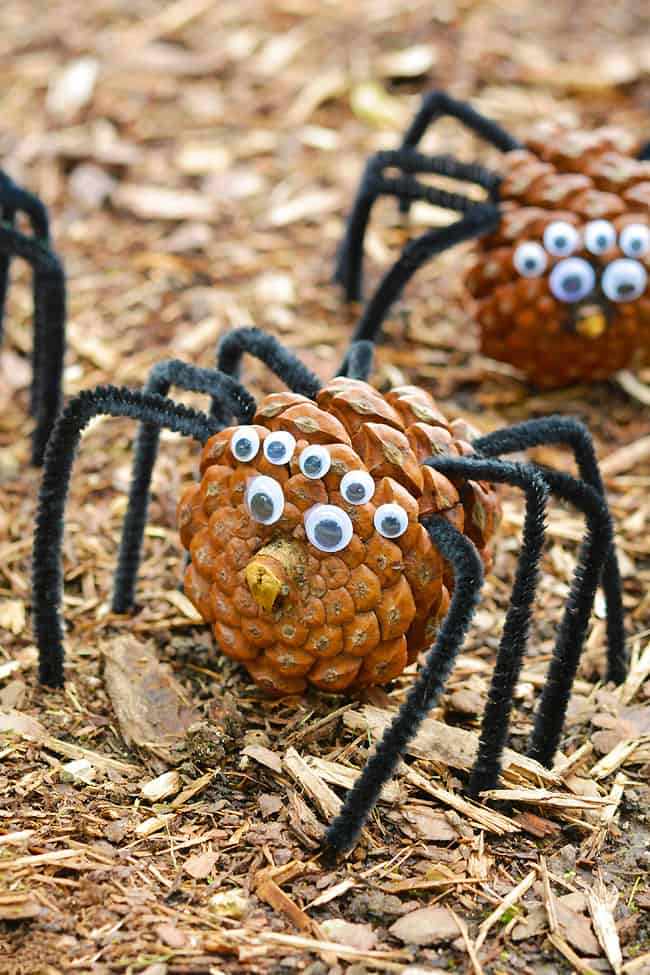
Materials: Pinecones, brown or black pipe cleaners, glue.
How to Make:
- Wrap four long pipe cleaners around the center of the pinecone.
- Bend the ends down to create eight legs.
- Glue large eyes onto the flat end of the pinecone.
13. Cupcake Liner Butterflies
Cupcake liners come in so many patterns that they make naturally beautiful butterfly wings.
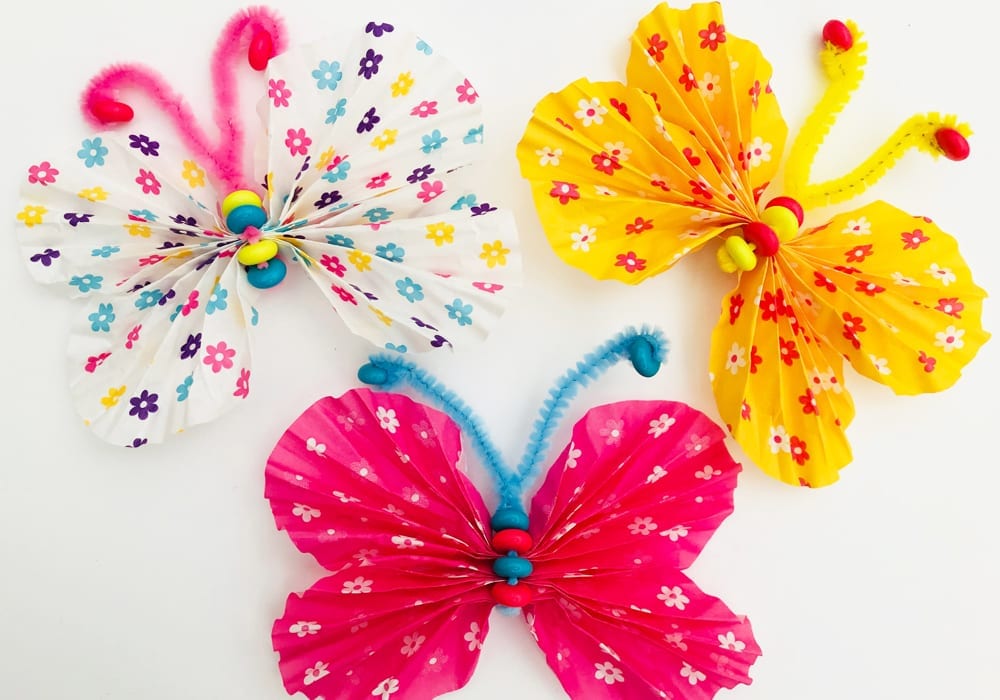
Materials: Patterned cupcake liners, clothespins or popsicle sticks, glue.
How to Make:
- Flatten two cupcake liners and fold them in half.
- Glue the folded liners to the sides of a popsicle stick.
- Decorate the stick to look like the butterfly’s body.
14. Plastic Spoon Ants
Ants are social creatures, so it’s fun to make a whole colony of these!
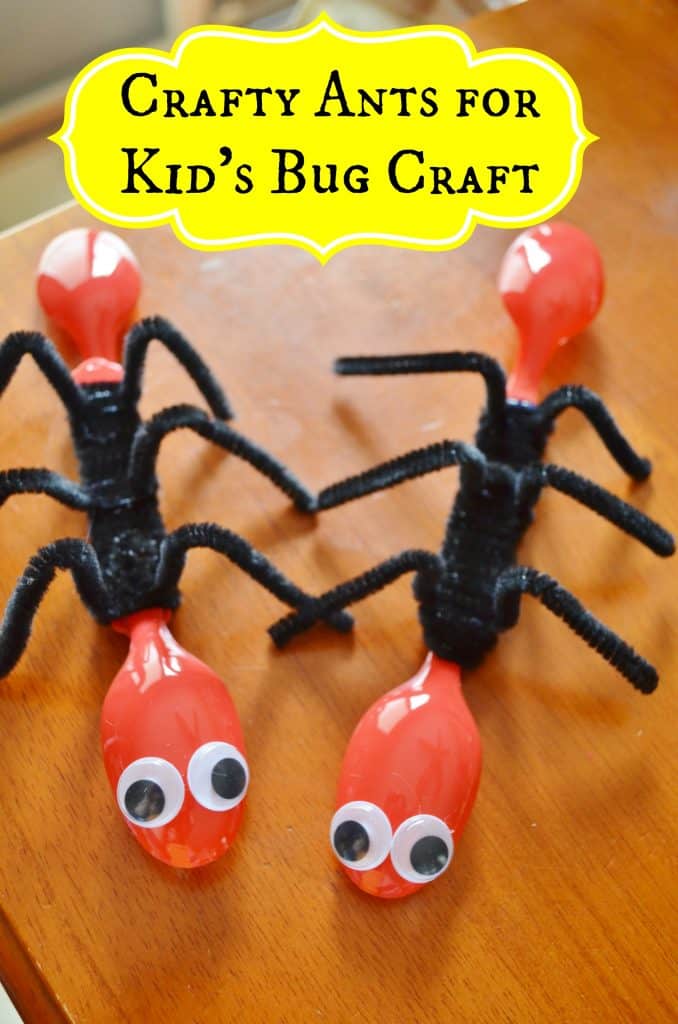
Materials: Three plastic spoons, black tape or black paint, black pipe cleaners.
How to Make:
- Cut the handles off two spoons, leaving just the heads.
- Keep the handle on the third spoon.
- Tape or glue the three spoon heads together in a row (the one with the handle is the back).
- Paint them all black.
- Wrap pipe cleaners around the joints to create legs.
15. Wine Cork Bees
Wine corks have a great texture for painting and are the perfect size for thumb-sized bees.

Materials: Wine corks, yellow paint, black marker, white felt.
How to Make:
- Paint the cork yellow.
- Once dry, draw black rings around it.
- Cut wings out of white felt and glue them to the top.
- Use a pin or marker to make eyes.
16. Tin Can Ladybugs
Upcycle your soup cans into sturdy outdoor decorations or pencil holders.
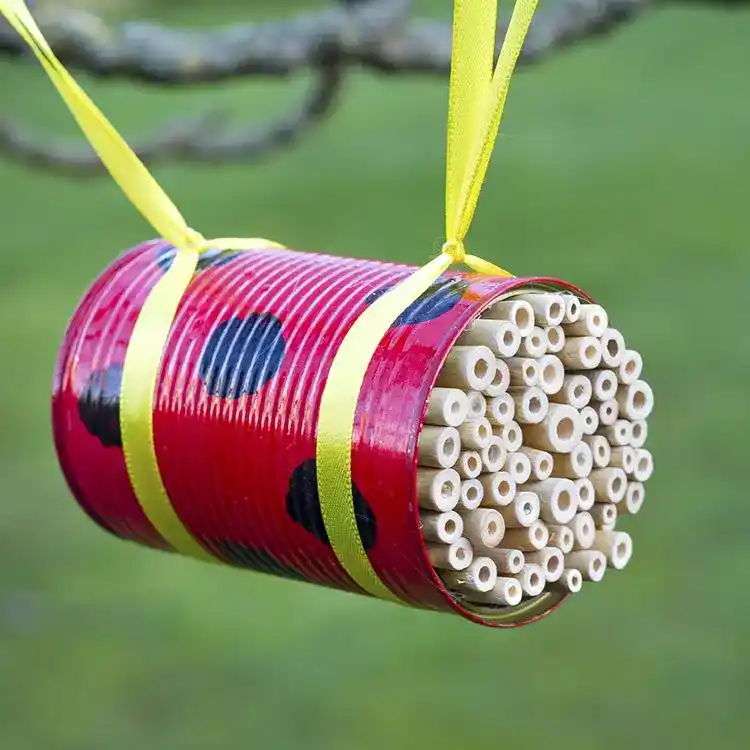
Materials: Clean tin cans (edges smoothed), red and black spray paint or acrylics.
How to Make:
- Paint the can red.
- Paint the top rim and a vertical stripe black.
- Add large black polka dots.
- Glue on giant googly eyes near the rim.
17. Beaded Pipe Cleaner Worms
This is a fantastic fine motor activity for toddlers as they practice threading beads.
Materials: Pipe cleaners, colorful plastic pony beads.
How to Make:
- Fold a small stop at the end of a pipe cleaner.
- Have the child thread beads until the pipe cleaner is full.
- Bend the pipe cleaner into a wiggly shape.
- Coil one end to make a head and add eyes.
18. Cardboard Box Grasshoppers
Use small cereal boxes or cracker boxes to create a larger-than-life grasshopper.
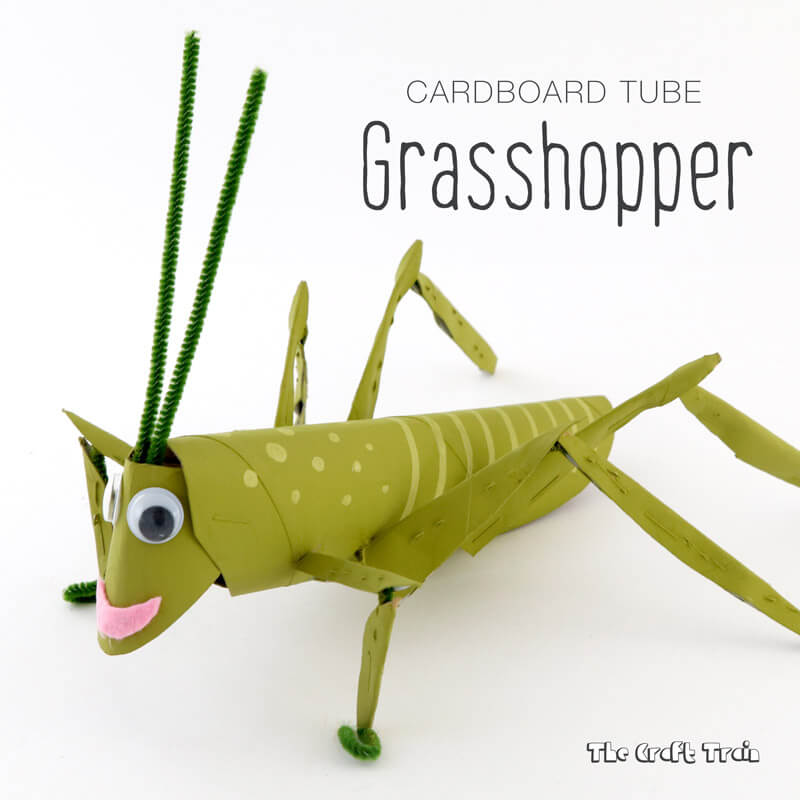
Materials: Small cardboard boxes, green paint, long cardboard strips (for legs).
How to Make:
- Paint the box bright green.
- Cut long, L shaped legs out of scrap cardboard and attach them to the sides so the grasshopper looks like it’s ready to jump.
- Add long pipe cleaner antennae.
19. Recycled CD Snails
The iridescent side of an old CD makes a perfect, shiny snail shell.
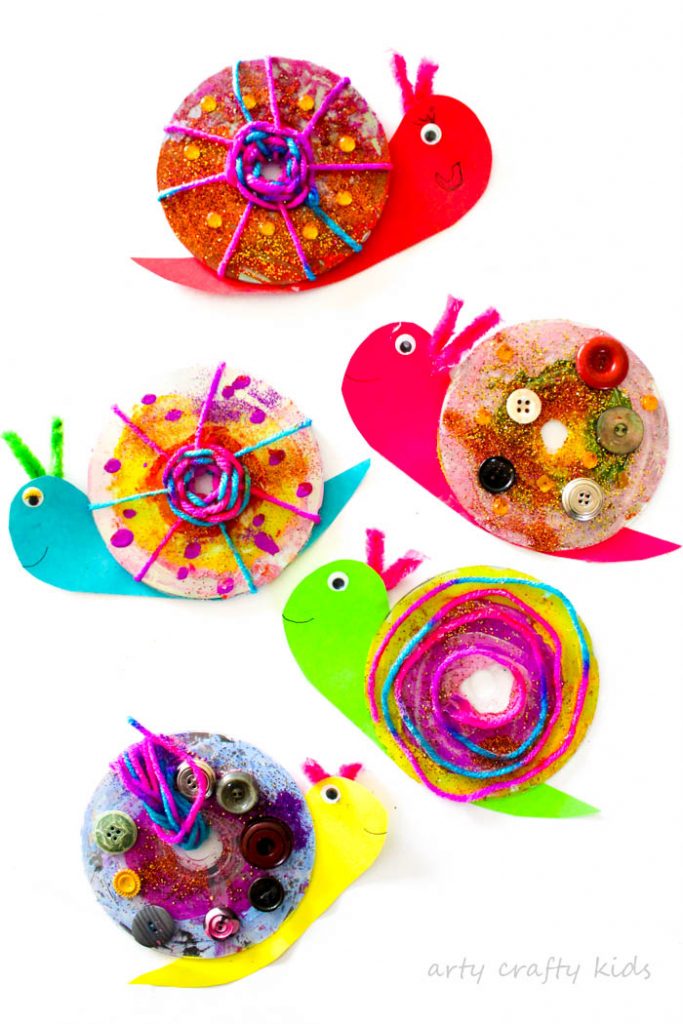
Materials: Old CDs, construction paper, glue.
How to Make:
- Cut a slug shape out of construction paper.
- Glue the CD onto the middle of the paper shape to act as the shell.
- Decorate the CD with markers or sequins in a spiral pattern.
20. Bubble Wrap Print Honeycomb
This project focuses on the habitat of the bee rather than just the insect itself.
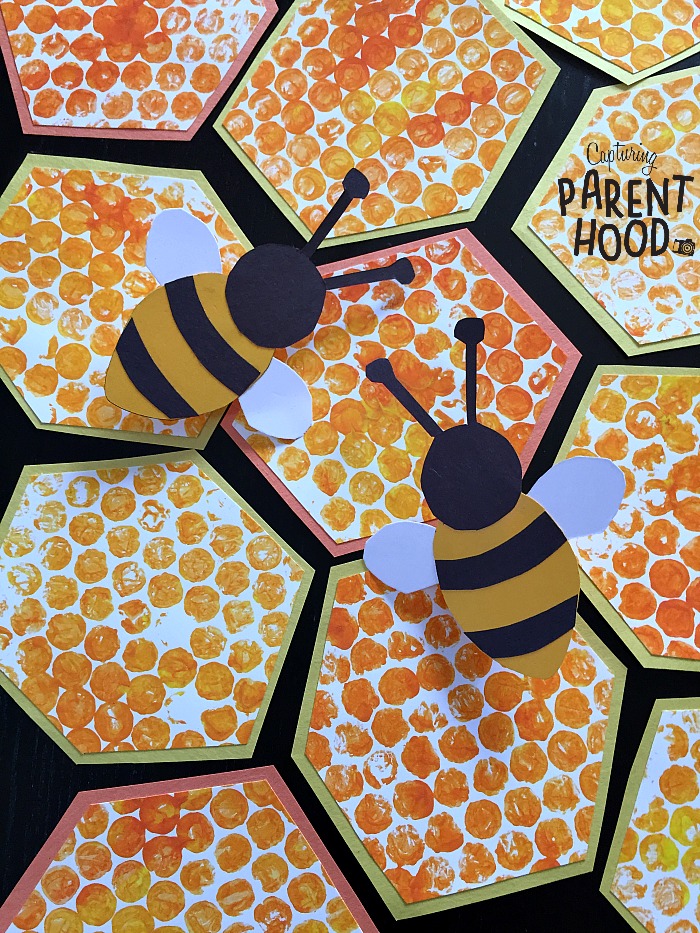
Materials: Bubble wrap, yellow paint, white paper.
How to Make:
- Paint a piece of bubble wrap with yellow paint.
- Press it onto white paper like a stamp to create a honeycomb pattern.
- Once dry, add small thumbprint bees (refer back to idea #8) onto the honeycomb.
Tips for a Successful Craft Session
-
✓
Preparation is Key: For younger children, pre-cut the shapes (like wings or legs) so they can focus on the assembly and decorating. -
✓
Embrace the Mess: Use a plastic tablecloth or old newspapers to protect surfaces. Bug crafts often involve paint and glue! -
✓
Educational Integration: While crafting, talk about what the bug eats, where it lives, and whether it flies or crawls. This turns art time into a science lesson.
FAQ
Q: What is the best glue for bug crafts?
A: For paper-based crafts, a standard glue stick or school glue works well. For heavier items like rocks, tin cans, or pinecones, a low-temperature glue gun is much more effective (supervised by an adult).
Q: My child is a toddler; which of these is easiest?
A: The Beaded Pipe Cleaner Worms (#17) and the Fingerprint Bug Jar (#8) are excellent for toddlers as they don’t require precise cutting or complex assembly.
Q: How can I make these crafts more sustainable?
A: Focus on projects that use found items from nature (leaves, rocks, pinecones) or items from your recycling bin (egg cartons, toilet paper rolls, bottle caps). Avoid using plastic glitter; opt for biodegradable glitter or colorful sand instead.
Conclusion
Bug crafts for kids are a delightful way to explore the beauty of the natural world through the lens of creativity. From the shimmering wings of a popsicle stick dragonfly to the textured body of a pinecone spider, these projects encourage children to look closer at the environment around them.
By using everyday materials and a bit of imagination, you can create a whole garden of creepy crawlies that are more cute than scary. Happy crafting!
Leave a Reply