Keeping children engaged during the long summer months requires a blend of creativity, sustainability, and hands-on fun.
The best summer crafts for kids aren’t just about making stuff—they are about developing fine motor skills, encouraging outdoor exploration, and teaching the value of upcycling everyday household items into works of art.
By utilizing materials you likely already have—like cardboard boxes, old t-shirts, and glass jars—you can create an at-home camp experience that is both budget-friendly and environmentally conscious.
1. Vibrant Tie-Dye Beach Towels

Tie-dye is the quintessential summer activity. Instead of basic t-shirts, upgrading plain white cotton beach towels gives kids a functional piece of gear they can use at the pool all season long.
Materials Needed
- ✦White 100% cotton towels
- ✦Fabric dye kits (multiple colors)
- ✦Rubber bands
- ✦Plastic gloves and squeeze bottles
- ✦Large Ziploc bags
Step-by-Step Instructions
- Prep the Towel: Dampen the towel with water; damp fabric absorbs dye more evenly.
- Bind: Use rubber bands to create patterns. Try the spiral method by pinching the center and twisting, or the scrunch method for a marbleized look.
- Apply Dye: Wearing gloves, apply the dye generously into the folds of the towel.
- Set: Place the towel in a plastic bag for 12–24 hours to let the color bond.
- Rinse: Rinse in cold water until the water runs clear, then wash separately in the machine.
2. Upcycled Fairy Gardens
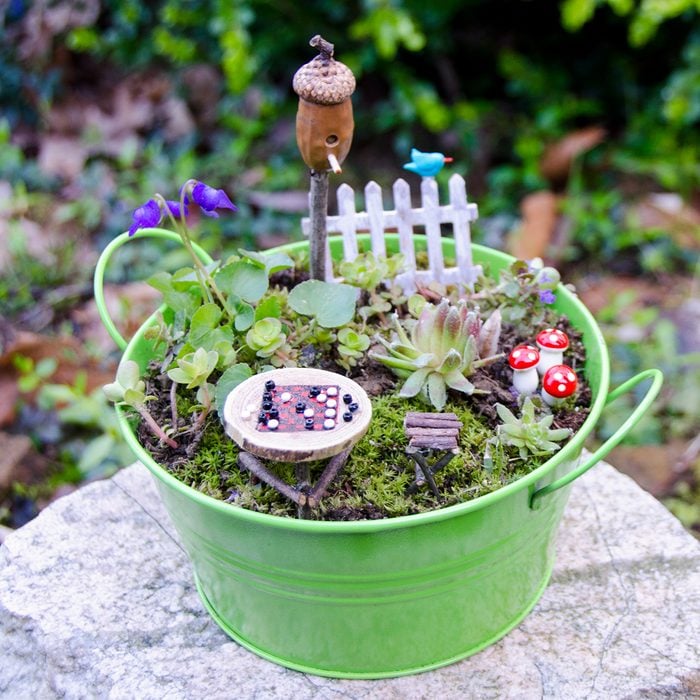
Fairy gardens are a fantastic way to introduce kids to gardening and miniature scale design. You can upcycle broken terracotta pots or old wooden crates to create these magical landscapes.
Materials Needed
- ✦Large shallow planter or recycled container
- ✦Potting soil and small plants (succulents work best)
- ✦Pebbles, twigs, and moss
- ✦Acrylic paint and small brushes
Step-by-Step Instructions
- Foundation: Fill your container with potting soil and arrange your plants.
- Hardscaping: Create paths using pebbles or flat stones.
- Decorate: Use twigs to build tiny fences or ladders. Kids can paint small rocks to look like ladybugs or miniature houses.
- Maintenance: Teach kids how to lightly mist the plants to keep the fairies happy.
3. Homemade Puffy Sidewalk Paint
Take sidewalk chalk to the next level with a 3D puffy version that dries into a textured masterpiece. This is a great science-meets-art project.
Materials Needed
- ✦1 cup flour
- ✦1 cup water
- ✦1 tablespoon dish soap
- ✦Washable tempera paint or food coloring
- ✦Squeeze bottles
Step-by-Step Instructions
- Mix: Combine flour, water, and dish soap in a bowl until smooth.
- Color: Divide the mixture into squeeze bottles and add different colors to each.
- Create: Squeeze the paint onto the driveway or sidewalk. The soap ensures it washes away easily with a garden hose.
4. Recycled Tin Can Bird Feeders
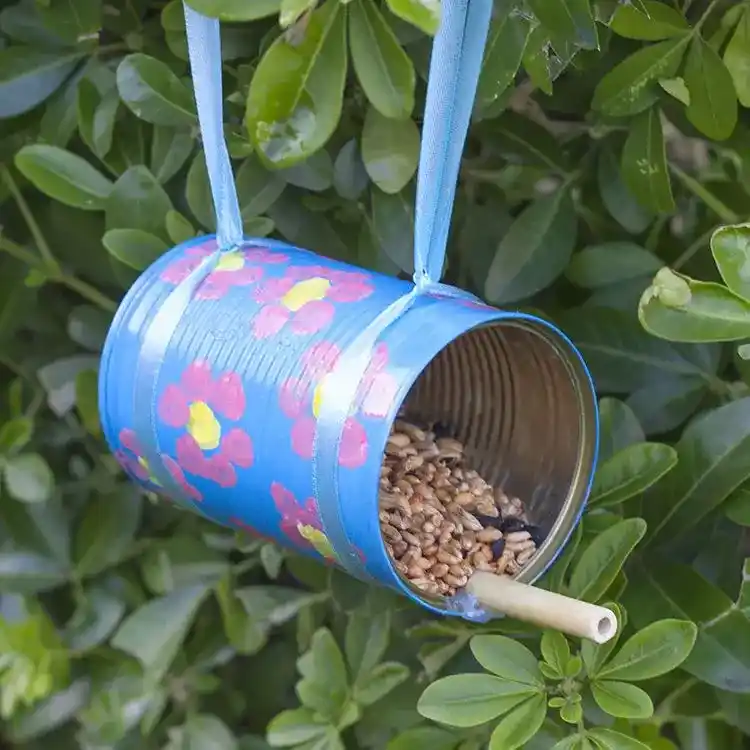
This project combines upcycling with nature observation. It’s a great way to teach kids about local bird species while repurposing pantry waste.
Materials Needed
- ✦Empty, cleaned tin cans (edges sanded smooth)
- ✦Outdoor acrylic paint
- ✦Ribbon or twine
- ✦A wooden dowel or sturdy twig
- ✦Birdseed
Step-by-Step Instructions
- Paint: Let kids paint the exterior of the can with bright summer patterns.
- Perch: Glue a dowel or twig to the inside lip of the can so it sticks out about 3 inches.
- Hang: Wrap a ribbon around the center of the can and tie it to a tree branch.
- Fill: Fill the bottom half with birdseed and wait for your feathered friends to arrive.
5. Nature Sun Catchers
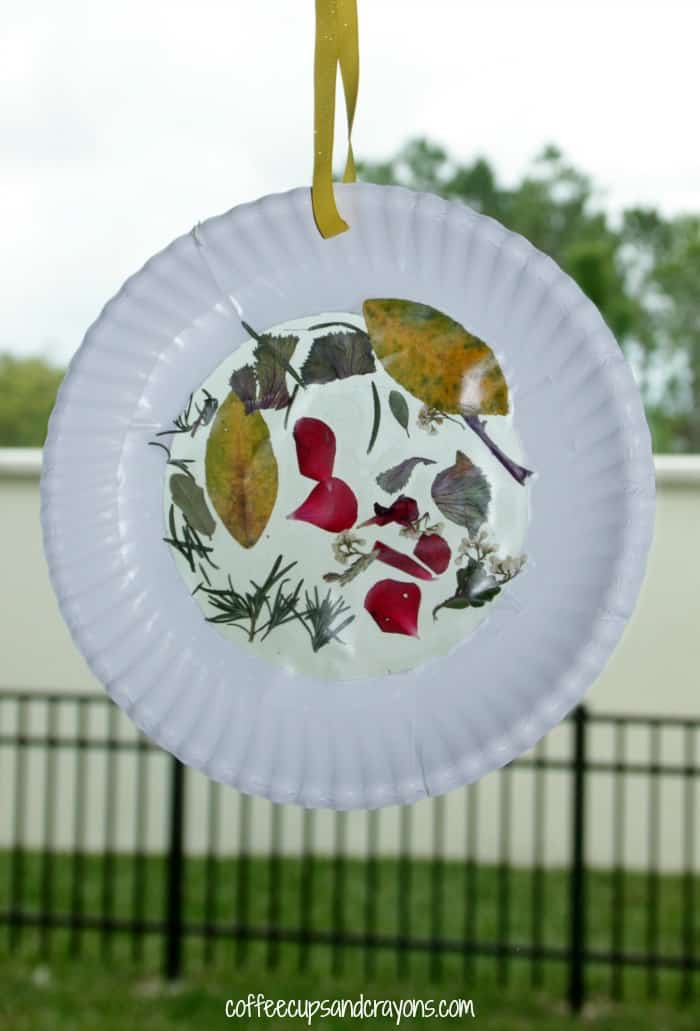
Celebrate the beauty of summer flora by creating transparent stained glass art using items found during a nature walk.
Materials Needed
- ✦Clear contact paper
- ✦Pressed flowers, leaves, and petals
- ✦Paper plates (with the center cut out)
- ✦Hole punch and string
Step-by-Step Instructions
- Collect: Go on a backyard scavenger hunt for thin petals and interesting leaves.
- Frame: Cut the center out of a paper plate and paint the rim.
- Stick: Place a piece of contact paper over the hole. Arrange the nature finds on the sticky side.
- Seal: Place another piece of contact paper on top to seal the flowers in.
- Display: Punch a hole in the top and hang it in a sunny window.
6. Painted Rock Garden Markers
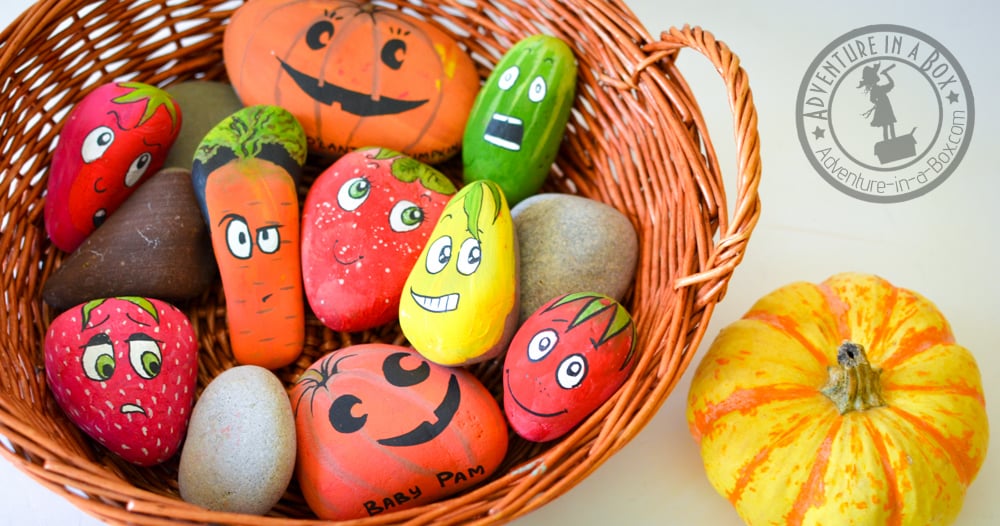
If you have a vegetable garden, these markers are a fun way to keep track of what’s growing while adding a pop of color to the soil.
Materials Needed
- ✦Smooth river rocks
- ✦Acrylic paint or paint pens
- ✦Outdoor waterproof sealant (Mod Podge or spray)
Step-by-Step Instructions
- Clean: Wash the rocks to remove any dirt.
- Design: Paint the name of a vegetable (e.g., Tomato, Carrot) or draw the vegetable itself.
- Seal: Once dry, apply a coat of sealant to protect the art from rain and sun.
7. Epic Cardboard Box Forts
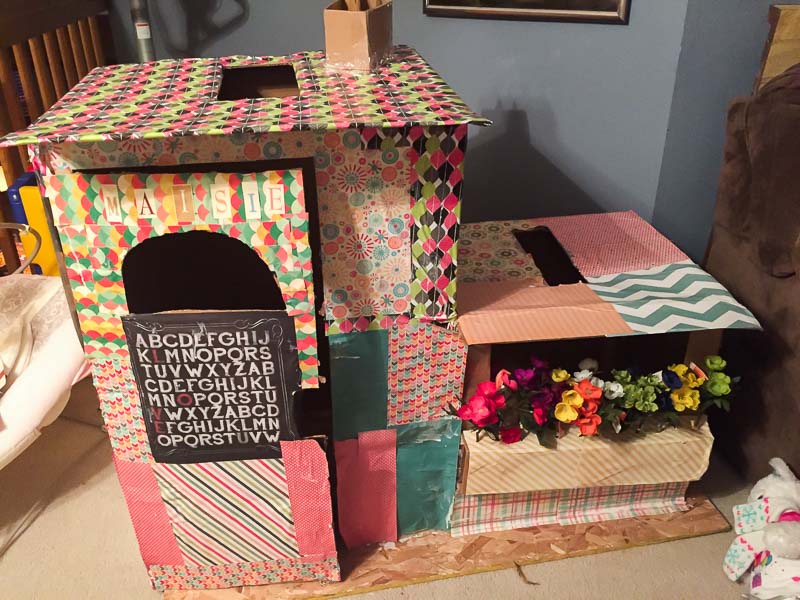
Never underestimate the power of a large appliance box. This is the ultimate upcycling project that can provide days of imaginative play.
Materials Needed
- ✦Large cardboard boxes
- ✦Duct tape
- ✦Box cutter (adult use only)
- ✦Battery-operated fairy lights
- ✦Markers and paint
Step-by-Step Instructions
- Construct: Tape boxes together to create rooms or towers.
- Windows: Cut out windows and doors.
- Decorate: Let the kids go wild with markers, paint, and even shingles made from paper plates.
- Finish: Add pillows and fairy lights inside for a cozy summer reading nook.
8. Mason Jar Firefly Lanterns
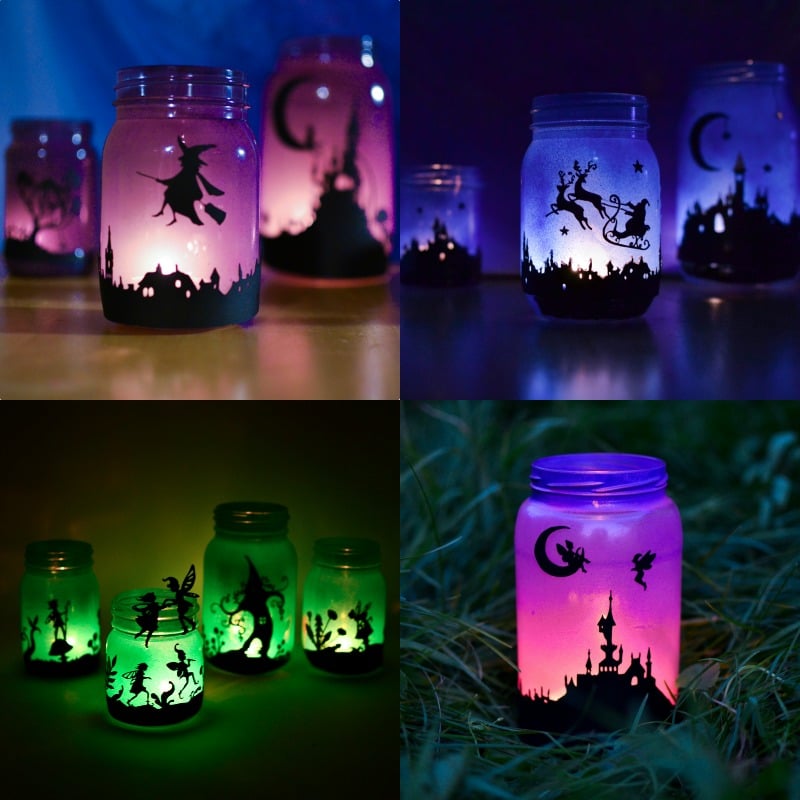
These fireflies in a jar use glow-in-the-dark paint to mimic the magic of summer evenings without harming actual insects.
Materials Needed
- ✦Clean glass jars
- ✦Glow-in-the-dark acrylic paint
- ✦Fine-tipped paintbrushes
- ✦Glitter (optional)
Step-by-Step Instructions
- Dotting: Use the paintbrush to make tiny dots of glow paint all over the inside of the jar.
- Charge: Place the jar under a bright light or in the sun for an hour.
- Glow: Take the jar into a dark room to see the fireflies shimmer.
9. Ice Cream Stick Airplanes

A classic wood craft that uses basic supplies to create toys that actually fly (or at least look great on a shelf).
Materials Needed
- ✦Standard and jumbo popsicle sticks
- ✦Wooden clothespins
- ✦Glue gun or tacky glue
- ✦Paint
Step-by-Step Instructions
- Body: The clothespin serves as the fuselage (body).
- Wings: Glue a jumbo stick across the top and bottom of the clothespin near the mouth end.
- Tail: Glue a smaller piece of a stick to the back end.
- Paint: Decorate with racing stripes or pilot names.
10. DIY Kinetic Sand
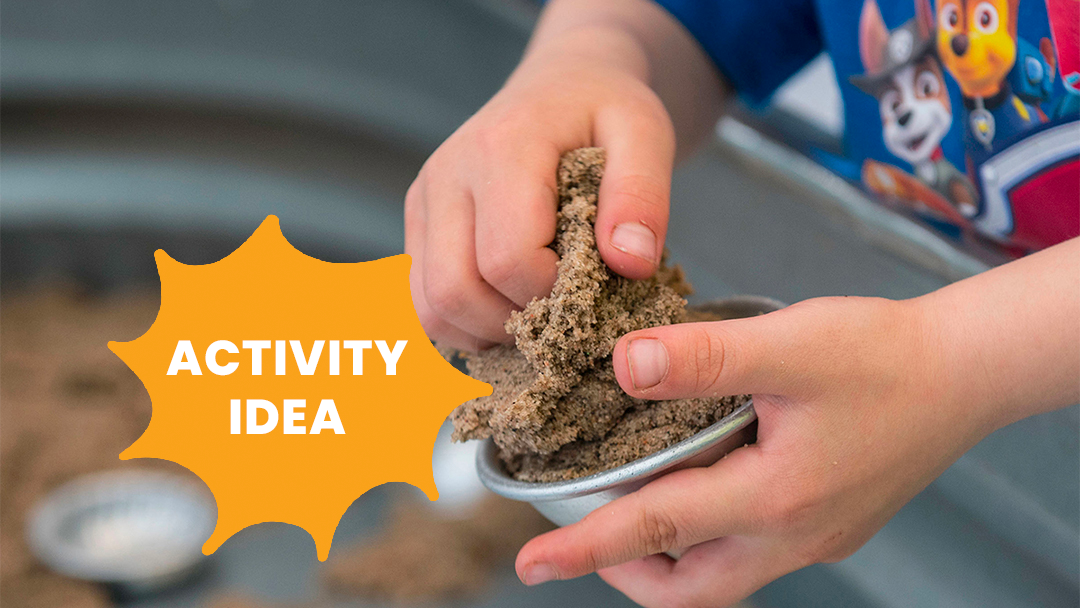
Perfect for sensory play, this homemade version of kinetic sand is much cheaper than store-bought and provides hours of indoor entertainment on rainy days.
Materials Needed
- ✦5 cups fine sand
- ✦3 cups cornstarch
- ✦1 cup oil (baby oil or vegetable oil)
- ✦Food coloring (optional)
Step-by-Step Instructions
- Dry Mix: Whisk sand and cornstarch together in a large bin.
- Wet Mix: Mix the oil and food coloring separately.
- Combine: Slowly add the oil to the sand mixture, kneading with your hands until it reaches a moldable, flowy consistency.
11. Upcycled T-Shirt Tote Bags
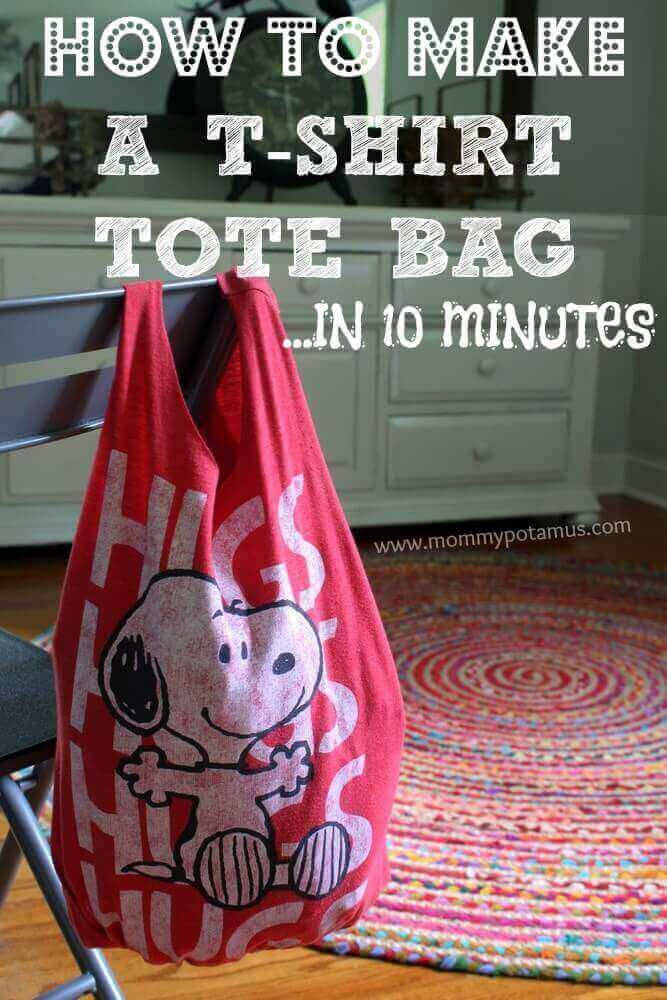
Teach kids about sustainable fashion by turning old, outgrown t-shirts into reusable bags for library books or beach toys.
Materials Needed
- ✦Old cotton t-shirts
- ✦Fabric scissors
- ✦Washable markers
Step-by-Step Instructions
- Cut: Cut off the sleeves and deepen the neckline to create the handles.
- Fringe: Cut 2-inch vertical slits along the bottom hem of the shirt.
- Tie: Tie the front and back fringe pieces together in double knots to close the bottom of the bag.
- Decorate: Use markers to add summer designs.
12. Bottle Cap Wind Chimes
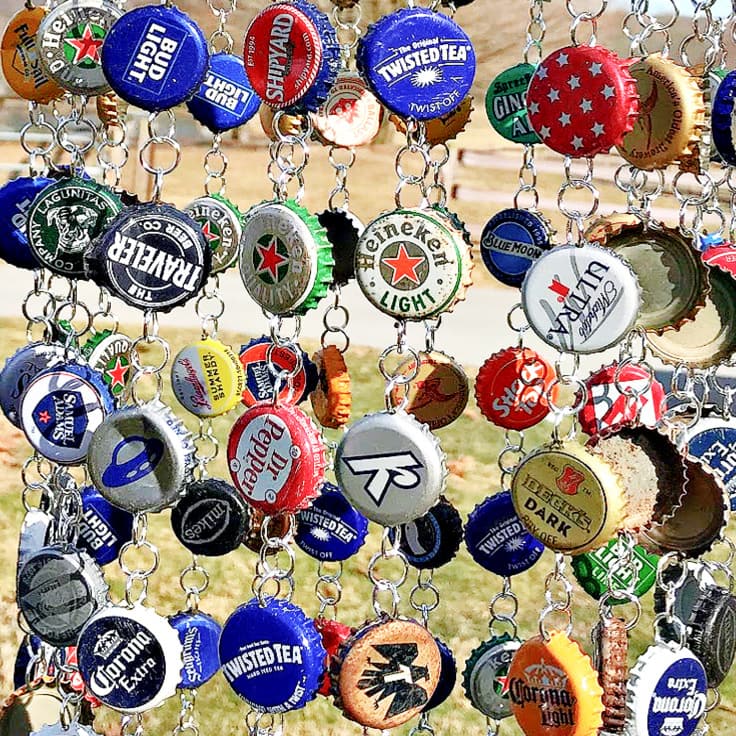
Save your metal bottle caps to create a colorful, musical addition to your porch or garden.
Materials Needed
- ✦20–30 metal bottle caps
- ✦Hammer and nail (for making holes)
- ✦Fishing line or thin wire
- ✦A sturdy stick or an old lid for the base
Step-by-Step Instructions
- Holes: An adult should use the hammer and nail to punch a hole in the center of each cap.
- String: Thread the caps onto lengths of fishing line, tying knots to keep them spaced out.
- Assemble: Tie the lines to your base (stick or lid) and hang outside to catch the breeze.
13. Paper Plate Tropical Birds
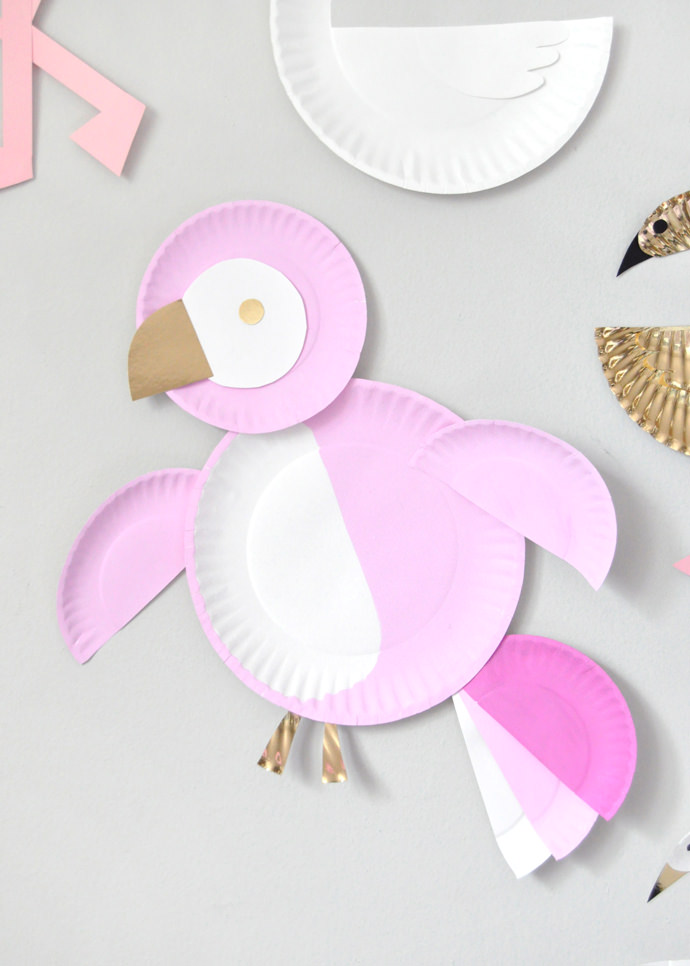
Bring the jungle to your living room with these bright, feathered parrots and toucans.
Materials Needed
- ✦Paper plates
- ✦Bright tempera paint
- ✦Construction paper
- ✦Googly eyes
- ✦Craft feathers
Step-by-Step Instructions
- Base: Fold a paper plate in half to create the bird’s body.
- Color: Paint the plate in vibrant reds, yellows, and blues.
- Features: Glue on a construction paper beak, googly eyes, and plenty of craft feathers for the tail.
14. Seashell Picture Frames
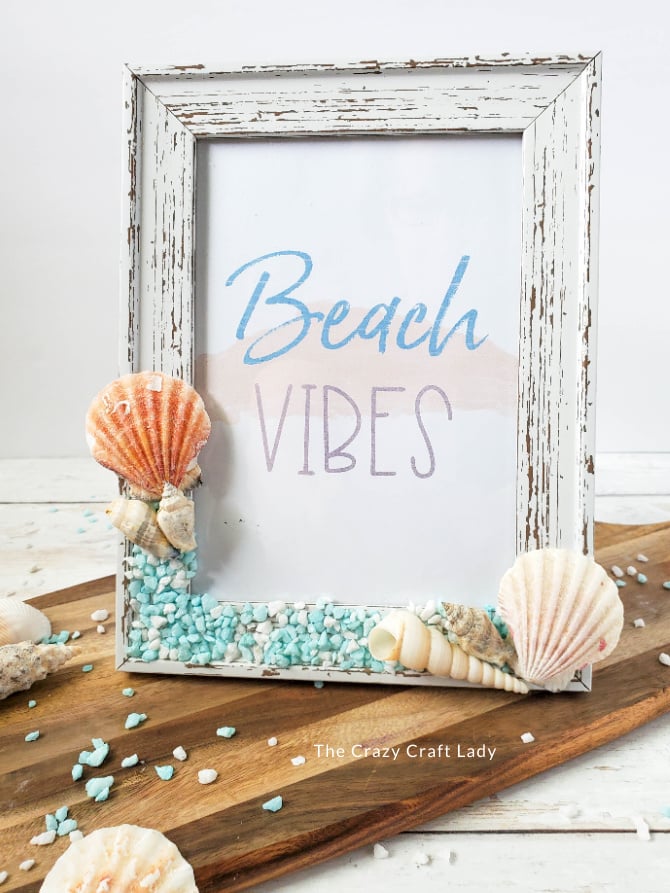
The perfect way to preserve memories from a family beach trip.
Materials Needed
- ✦Plain wooden or cardboard frames
- ✦Assorted seashells
- ✦Tacky glue or a low-temp glue gun
- ✦Sand (optional)
Step-by-Step Instructions
- Border: Apply glue to the frame and press seashells into the glue.
- Fill Gaps: If there are small gaps, sprinkle a little sand over glue patches to give it a full beach effect.
- Insert Photo: Add a photo of the kids at the beach for a perfect keepsake.
15. Giant Homemade Bubble Wands
End the summer with a bang—or a giant bubble. This project teaches physics and provides high-energy outdoor fun.
Materials Needed
- ✦Two wooden dowels
- ✦Cotton string
- ✦A metal washer (for weight)
- ✦Solution: 6 cups water, 1 cup dish soap, 1 tablespoon guar gum or cornstarch.
Step-by-Step Instructions
- The Loop: Tie the string to the ends of the two dowels to form a large loop, with the washer hanging at the bottom to keep the loop open.
- The Dip: Fully submerge the string in the bubble solution.
- The Release: Slowly pull the dowels apart and walk backward to let the wind catch the giant bubble.
Project Summary & Difficulty Guide
| Craft Project | Difficulty Level | Mess Factor | Best Age Group |
|---|---|---|---|
| Tie-Dye Towels | Moderate | High | 7+ |
| Fairy Gardens | Easy | Medium | 4+ |
| Puffy Sidewalk Paint | Easy | High | 3+ |
| Tin Can Bird Feeders | Moderate | Medium | 6+ |
| Nature Sun Catchers | Easy | Low | 3+ |
| Cardboard Forts | Moderate | Low | All Ages |
| Kinetic Sand | Easy | Medium | 4+ |
| T-Shirt Totes | Easy | Low | 8+ |
Frequently Asked Questions
Q: How can I keep the mess contained during these crafts?
A: The best strategy is to move messy crafts (paint, tie-dye, sand) outdoors. Use a plastic tablecloth or an old shower curtain as a drop cloth. For indoor crafts, use a rimmed baking sheet to contain beads, glitter, or sand.
Q: What are the best adhesives for kid-friendly upcycling?
A: For most cardboard and paper projects, a glue stick or school glue works fine. For heavier items like seashells or tin cans, use Tacky Glue or a low-temperature glue gun (with adult supervision).
Q: Where can I find free crafting materials?
A: Check your recycling bin first! Cereal boxes, egg cartons, and plastic bottles are crafting gold. You can also find natural materials like acorns, flat stones, and driftwood in your local park or backyard.
Conclusion
Summer crafting is about more than just filling time; it’s an opportunity to foster a child’s resourcefulness and appreciation for the world around them.
By focusing on upcycled materials and nature-based projects, you provide a rich, sensory experience that doesn’t require a massive budget.
Whether they are building a cardboard empire or painting rocks for the garden, these activities create lasting memories and tangible reminders of a summer well-spent. So, clear off the picnic table, gather your recycled treasures, and let the creativity flow all season long.
Leave a Reply