A DIY paper flower photo card is a sophisticated, three-dimensional keepsake that combines the personal touch of photography with the artisanal beauty of handcrafted paper blooms.
Unlike standard store-bought cards, these creations serve as miniature pieces of home decor, often framed or displayed long after the occasion has passed.
By layering textures like cardstock, crepe paper, and vellum around a central photograph, you can create a high-impact gift that conveys effort, creativity, and deep personal sentiment.
Essential Materials for Professional Paper Flower Cards
To achieve a “boutique” look, the quality of your materials is paramount.
While you can use basic construction paper, upgrading to specific weights and textures will elevate the final product.
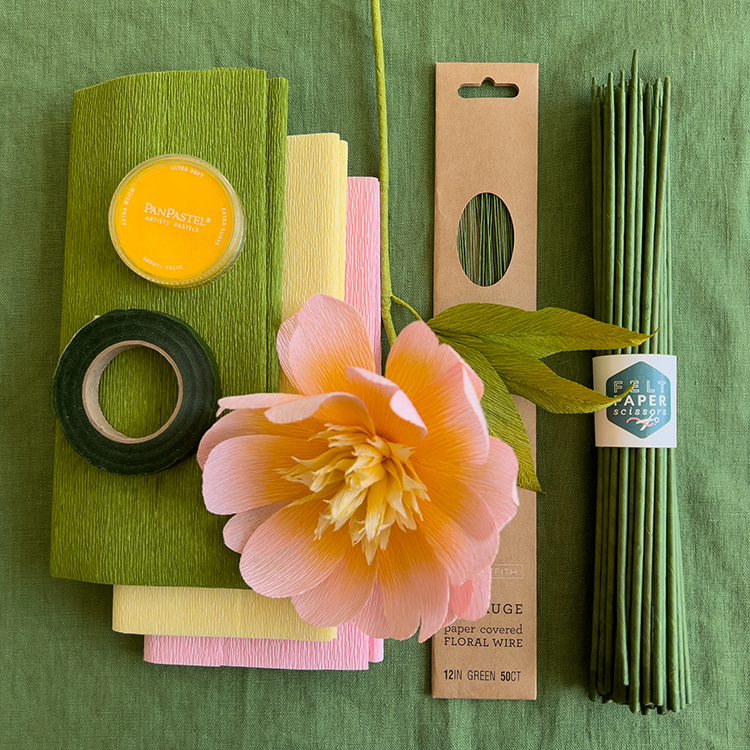
- ✿Cardstock (65lb to 80lb): Ideal for the card base and sturdy flower petals.
- ✿Crepe Paper (Heavy or Extra Fine): Essential for realistic, organic-looking flowers with stretch and texture.
- ✿Vellum: Provides a soft, translucent layer that adds elegance to floral designs.
- ✿Precision Tools: Micro-tip scissors, a bone folder for clean creases, and a quilling tool.
- ✿Adhesives: Acid-free glue sticks for photos, hot glue for 3D flowers, and foam squares for pop-up depth.
- ✿Photos: High-resolution prints (matte finish usually looks better with paper crafts).
Step-by-Step: The Foundation of Your Photo Card
Before diving into specific floral styles, you must master the basic structural assembly of a photo card.
1. Preparing the Card Base
Choose a heavy cardstock (80lb+) and cut it to your desired size (standard 5×7 inches is most common).
Use a bone folder to create a crisp, professional center crease. If you want the photo to be the focal point, consider a “window” or “aperture” cut-out in the front panel.
2. Mounting the Photograph
Center your photo on the card. For a professional finish, create a “mat” by placing a slightly larger piece of colored cardstock behind the photo before gluing it to the card.
Use acid-free adhesive to ensure the photo doesn’t yellow or peel over time.
3. Petal Shaping Techniques
To make paper look like real flowers, you must break the fibers of the paper.
Use the edge of your scissors or a wooden skewer to curl the edges of your paper petals. Curled edges catch the light and create the shadows necessary for a 3D effect.
10 Creative DIY Paper Flower Photo Card Styles
To help you find the perfect aesthetic, here are 10 distinct styles of paper flower photo cards, ranging from minimalist modern to lush Victorian.
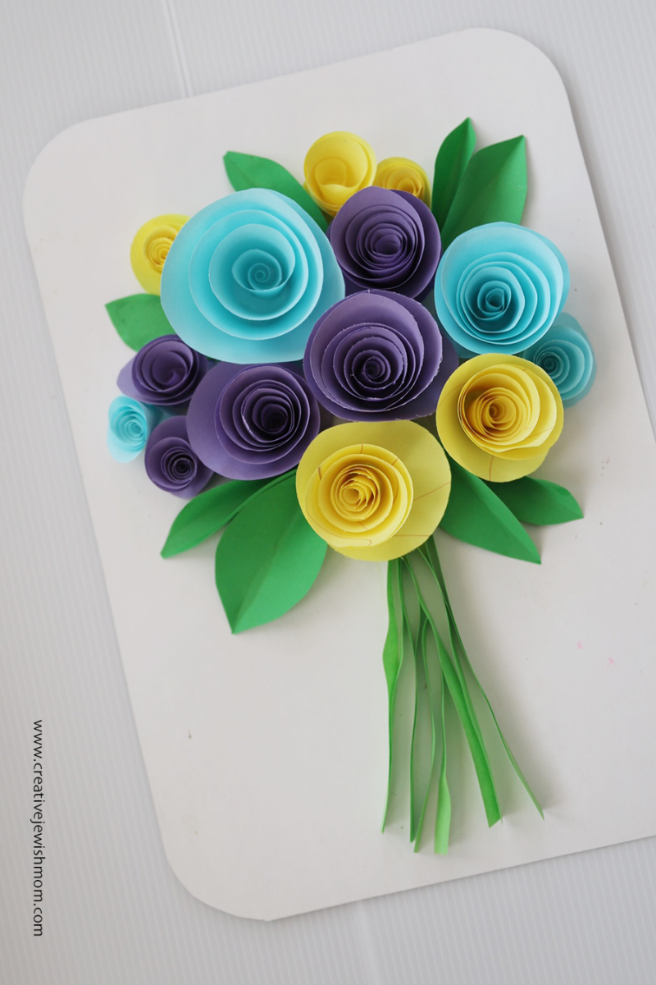
1. The Classic Spiral Rose Frame
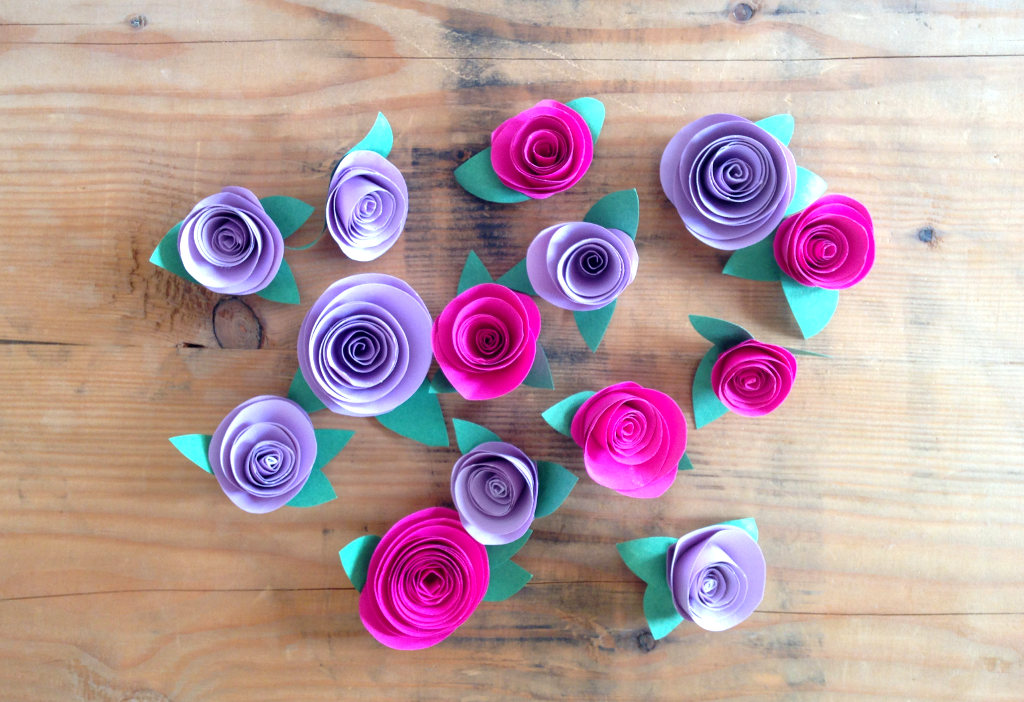
The spiral rose is the most beginner-friendly 3D flower.
Simply cut a circle of paper, then cut it into a continuous spiral toward the center. Roll the paper from the outside in using a quilling tool or toothpick, and glue the base.
- ✪Best For: Framing a square Instagram-style photo.
- ✪Pro Tip: Use red or deep pink cardstock and cluster five roses in the bottom corner of the photo.
2. Minimalist Lavender Sprigs
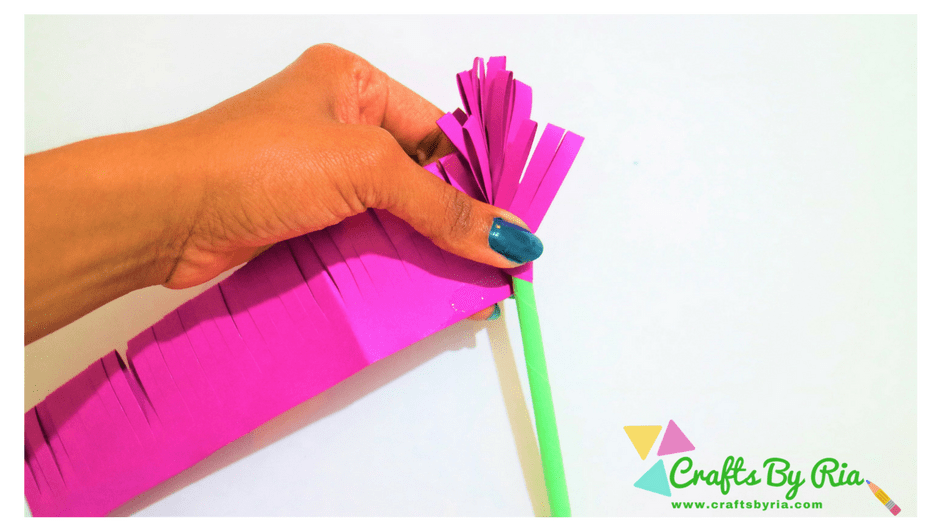
For a clean, modern look, create lavender sprigs by cutting thin strips of purple crepe paper and fringing the edges.
Wrap the fringed strip around a thin wire or a rolled piece of green paper.
- ✪Best For: Black and white photography.
- ✪Design Note: Place two or three sprigs vertically along the left side of the photo, tied with a real piece of twine.
3. Vibrant Tropical Hibiscus
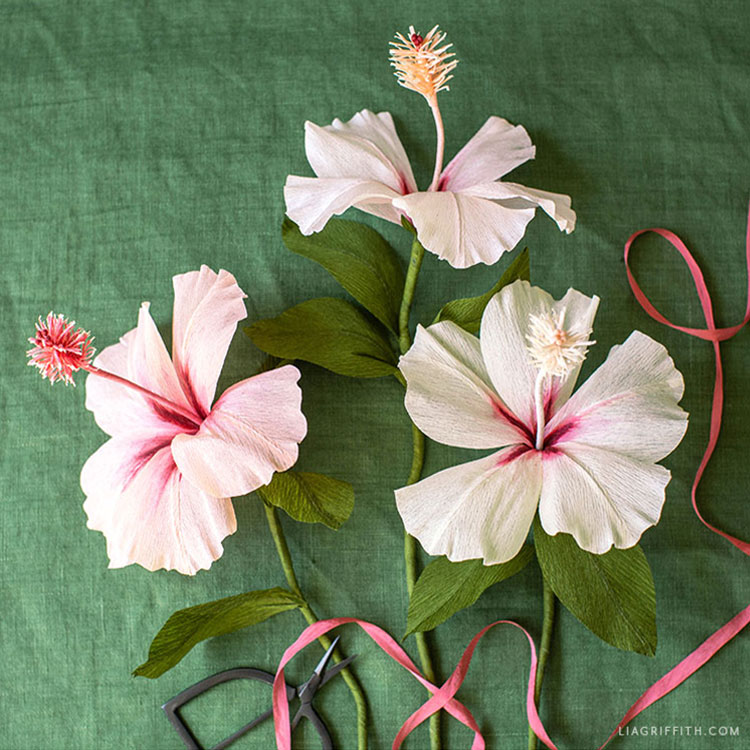
Hibiscus flowers require five large, heart-shaped petals.
Use a bright yellow or orange cardstock and use a red marker to add “veins” from the center outward for realism. Add a long yellow stamen made from a rolled strip of paper.
- ✪Best For: Vacation photos or summer birthday cards.
- ✪Image Integration: Place one large hibiscus overlapping the corner of the photo.
4. Retro Polka-Dot Daisies

Daisies are cheerful and nostalgic.
Use white cardstock for petals and a bright yellow button or a circle of felt for the center. For a retro vibe, use patterned paper with small polka dots for the petals.
- ✪Best For: “Thank You” notes or children’s photos.
- ✪Assembly: Layer two sets of petals, offsetting them to create a full, double-bloom look.
5. Elegant Quilled Filigree Blooms
Quilling involves rolling thin strips of paper into coils and pinching them into petal shapes.
This technique creates a very delicate, high-authority look that resembles lace.
- ✪Best For: Wedding or anniversary cards.
- ✪Complexity: High. This requires patience and a quilling tool, but the result is stunningly intricate.
6. Boho Dried-Look Peonies
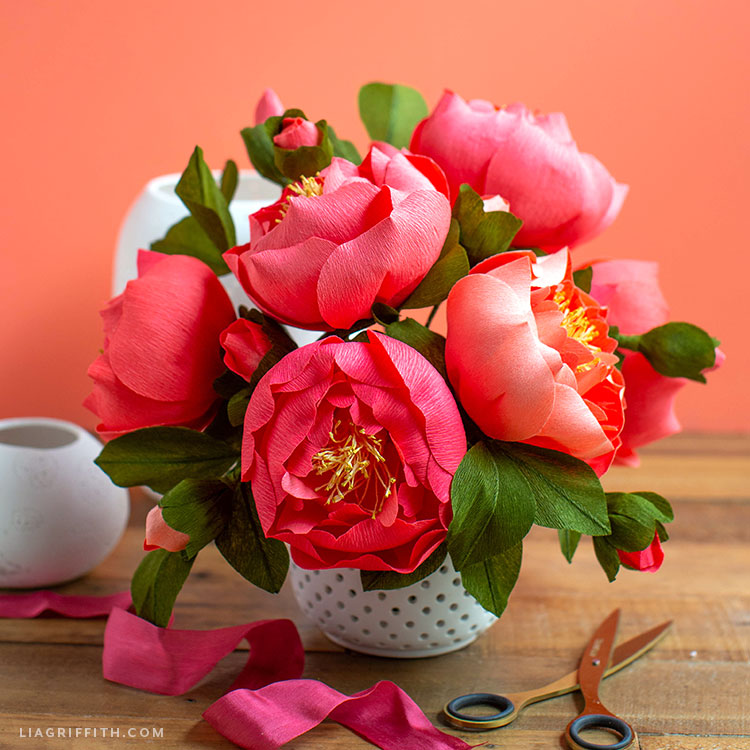
Use heavy-weight crepe paper in muted “dusty rose” or “terracotta” tones.
Cut dozens of rounded petals and stretch the center of each petal to create a cup shape. Layer them tightly to build a voluminous, ruffled peony.
- ✪Best For: Bohemian-themed baby showers or bridal cards.
- ✪Detailing: Lightly brush the edges of the petals with brown ink to give them a “dried flower” aesthetic.
7. The Pop-Up Garden

Instead of putting flowers on the front, create a pop-up mechanism inside.
When the recipient opens the card, a small garden of paper flowers “blooms” around a hidden photo inside.
- ✪Best For: Milestone birthdays.
- ✪Mechanism: Use “V-fold” tabs to attach the flowers to the center crease of the card.
8. Mixed Media Watercolor Petals
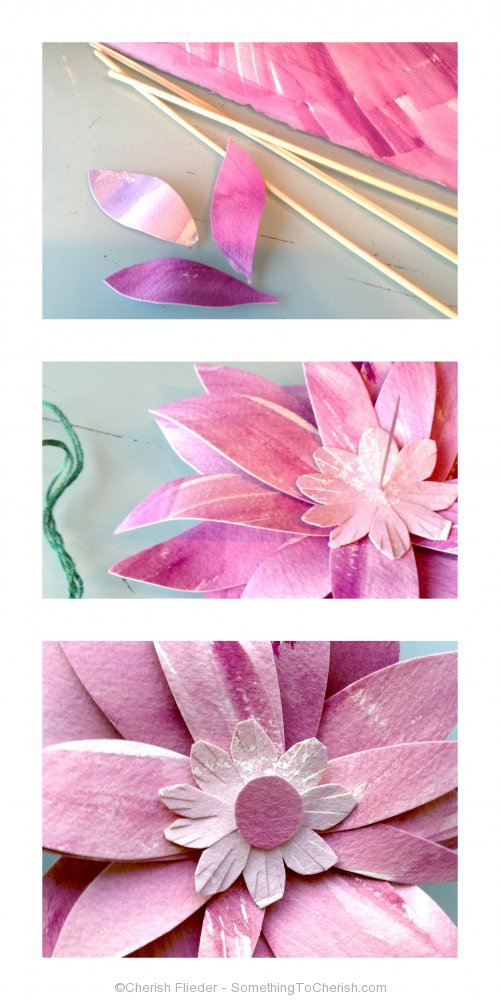
Paint a sheet of watercolor paper with a soft wash of colors before cutting out your petal shapes.
The variegation in the paint will mimic the natural color shifts found in real flora.
- ✪Best For: Artistic or soulful portraits.
- ✪Style: Keep the flower shapes simple (like 5-petal blossoms) to let the watercolor texture shine.
9. Modern Geometric Succulents

Succulents are a trendy alternative to traditional flowers.
Use shades of sage green, teal, and plum. Cut pointed petals and glue them in a tight, concentric star pattern.
- ✪Best For: “Thinking of You” or “New Home” cards.
- ✪Texture: Use a matte cardstock to replicate the waxy look of real succulents.
10. Festive Holiday Poinsettia
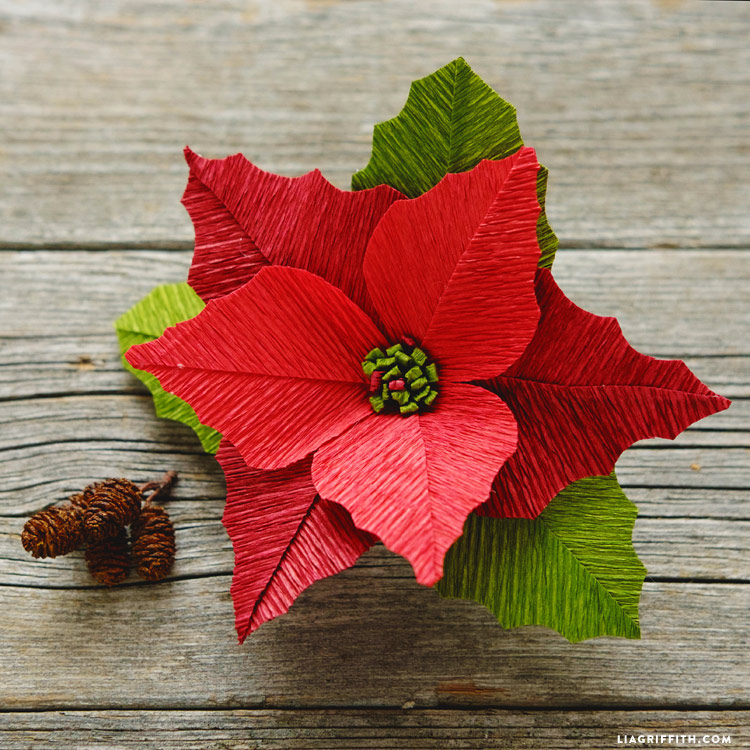
For holiday-themed photo cards, the poinsettia is king.
Use bright red and deep green cardstock. The “petals” are actually leaves, so give them a sharp central crease for structural integrity.
- ✪Best For: Family Christmas photo cards.
- ✪Finishing Touch: Use gold glitter glue in the center for the cyathia (the small yellow parts of the flower).
Comparison of Paper Flower Techniques
| Flower Style | Difficulty Level | Time Investment | Best Paper Type |
|---|---|---|---|
| Spiral Rose | Beginner | 5 Minutes | Medium Cardstock |
| Daisy | Beginner | 10 Minutes | Patterned Paper |
| Succulent | Intermediate | 15 Minutes | Matte Cardstock |
| Crepe Peony | Intermediate | 25 Minutes | Heavy Crepe Paper |
| Quilled Bloom | Advanced | 45+ Minutes | Quilling Strips |
| Watercolor Bloom | Intermediate | 30 Minutes | Watercolor Paper |
Pro-Tips for High-Authority Crafting
- ✿Depth Perception: Use double-sided foam adhesive squares between layers of your flowers. This creates shadows and makes the card feel like a professional 3D art piece rather than a flat piece of paper.
- ✿Edge Distressing: Use a small sponge and a distress ink pad (in a slightly darker shade than your paper) to rub the edges of your petals. This adds instant dimension and a “vintage” feel.
- ✿Protect the Photo: If you are using many 3D elements, the card may become heavy. Ensure the photo is glued down with a strong, permanent, acid-free adhesive so it doesn’t shift when the card is handled.
- ✿Envelope Sizing: Remember that 3D flowers add thickness. You may need a “padded” envelope or a small card box if the flowers are particularly tall (like the peonies).
Frequently Asked Questions
What is the best glue for paper flowers?
For the base of the flower, a hot glue gun is best because it sets instantly and holds the tension of curled paper.
For attaching delicate petals or vellum, use a clear-drying liquid glue with a fine-tip applicator.
How do I prevent the card from becoming too heavy to stand up?
If your floral arrangement is heavy, ensure your card base is made of at least 110lb cardstock.
Alternatively, you can create an “easel card” design which has a built-in support structure to handle the extra weight of 3D embellishments.
Can I use real dried flowers instead?
While you can, real dried flowers are extremely brittle and often crumble when the card is mailed.
Paper flowers are far more durable and allow for a wider range of colors that won’t fade as quickly as organic material.
How do I mail a 3D photo card without crushing it?
Place a piece of bubble wrap or a thin sheet of foam over the floral side before placing it in the envelope.
Always mark the envelope as “Hand Cancel” or “Non-Machinable” at the post office to prevent it from going through the automated sorting rollers.
Conclusion
Creating a DIY paper flower photo card is an exercise in intentionality.
By selecting a style that complements your photograph—whether it’s the structured elegance of a quilled bloom or the soft, ruffed texture of a crepe paper peony—you transform a simple greeting into a lasting memento.
Start with the spiral rose for a quick win, and as your confidence grows, experiment with mixed media and complex layering. These cards don’t just deliver a message; they deliver a piece of art that the recipient will cherish for years to come.
Leave a Reply