Upcycling empty Altoid tins has become a rite of passage for DIY enthusiasts and crafters alike.
These sturdy, pocket-sized metal containers offer the perfect blank canvas for functional gadgets, miniature art pieces, and organized kits.
Whether you are looking to create a thoughtful gift or a practical tool for your everyday carry (EDC), the Altoid tin’s hinged lid and durable frame make it one of the most versatile items in the upcycling world.
Why Upcycle Altoid Tins?
Before diving into the projects, it is important to understand why these specific tins are so popular.
Unlike cardboard or flimsy plastic, the tin-plated steel provides protection for delicate items.
They are also highly customizable; you can paint them, wrap them in fabric, or even solder components inside them.
In this guide, we will explore nine creative ways to transform your leftover mint tins into high-utility items.
| Project Name | Difficulty Level | Primary Use |
|---|---|---|
| Pocket Watercolor Kit | Intermediate | Art & Travel |
| Emergency Survival Kit | Easy | Outdoor/Safety |
| Miniature Zen Garden | Easy | Desk Decor |
| Magnetic Travel Games | Easy | Kids/Entertainment |
| Portable Sewing Kit | Easy | Practical/Repair |
| Miniature Diorama | Advanced | Hobby/Decor |
| Beeswax Pocket Candle | Intermediate | Home Fragrance |
| Electronics Prototype Box | Advanced | STEM/Tech |
| Gardener’s Seed Vault | Easy | Organization |
1. The Pocket Watercolor Kit
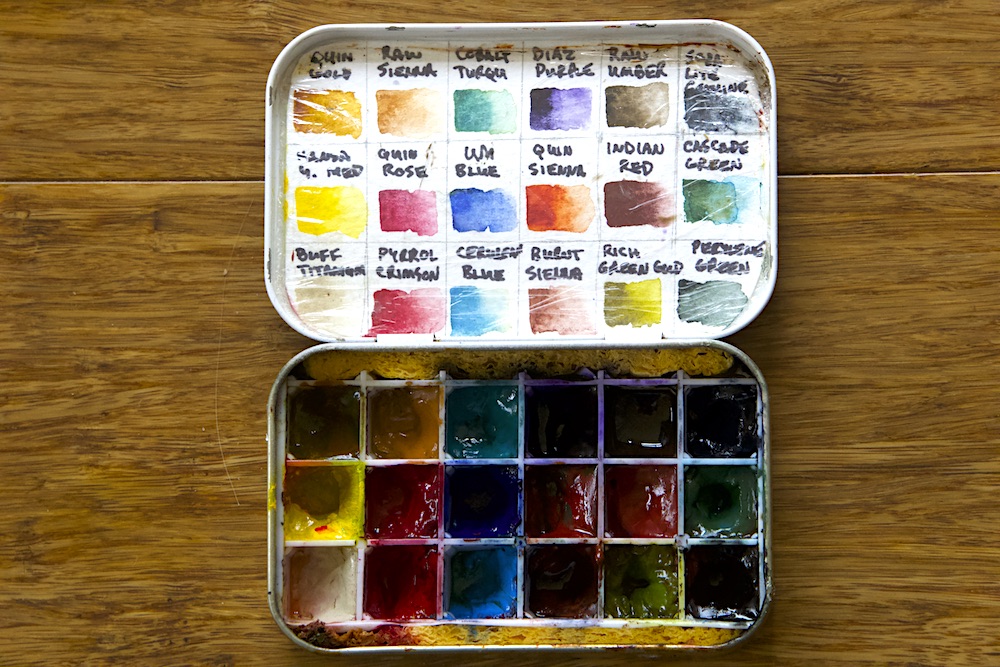
For artists on the go, a pocket watercolor kit is a game-changer.
It allows you to capture landscapes or urban sketches without lugging around a full studio.
Materials Needed:
- ● Empty Altoid tin
- ● White enamel spray paint (for the lid/mixing area)
- ● Empty watercolor pans (half-pans)
- ● Magnetic tape
- ● Small travel brush
Instructions:
- ● Prep the Mixing Surface: Spray the inside of the lid with white enamel paint. This creates a smooth, waterproof surface where you can mix your colors.
- ● Secure the Pans: Apply small strips of magnetic tape to the bottom of your watercolor pans and the bottom of the tin. This allows you to swap colors in and out easily.
- ● Layout: Arrange up to 12-14 half-pans inside. Leave a small gap for a collapsible travel brush or a small sponge for cleaning your brush.
2. The Ultimate Survival Tin
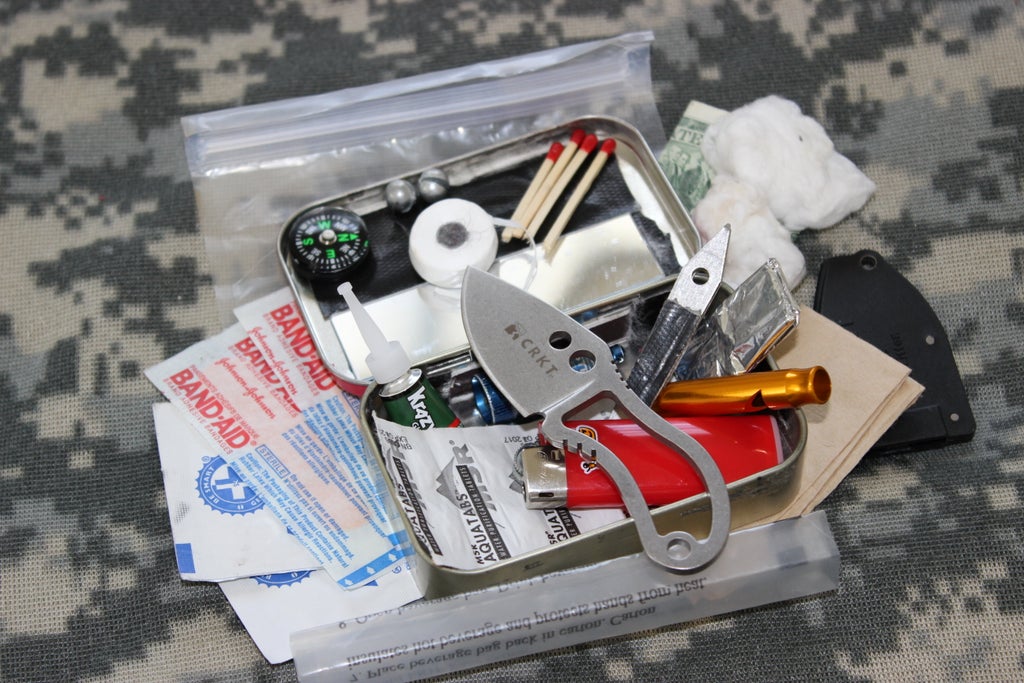
Often called a PSK (Personal Survival Kit) in the bushcraft community, this project packs life-saving tools into your pocket.
Materials Needed:
- ● Miniature compass
- ● Waterproof matches and striker
- ● Small multi-tool or razor blade
- ● Band-aids and antiseptic wipes
- ● Fishing line and hooks
- ● Signal mirror (polished inside of the lid)
Instructions:
- ● Waterproofing: Line the rim of the tin with a thin rubber gasket or electrical tape to keep moisture out.
- ● The Mirror: Polish the inside of the lid to a high shine to use as a signal mirror in emergencies.
- ● Organization: Place flat items (band-aids, foil) at the bottom and heavier items on top. Ensure nothing rattles by adding a cotton ball, which can also serve as fire tinder.
3. Desktop Miniature Zen Garden

If you need a moment of mindfulness at your desk, this miniature Zen garden provides a tactile way to de-stress.
Materials Needed:
- ● Fine white sand
- ● Small polished river stones
- ● A toothpick or a small plastic fork (to act as a rake)
- ● Small succulent cutting (optional/artificial)
Instructions:
- ● Fill: Fill the bottom half of the tin with about 1/2 inch of fine sand.
- ● Decorate: Place your feature stones and perhaps a small piece of moss or a tiny figurine.
- ● The Rake: Shorten a toothpick or use a decorative cocktail fork to create patterns in the sand. When finished, simply close the lid to keep the sand from spilling on your desk.
4. Magnetic Travel Games
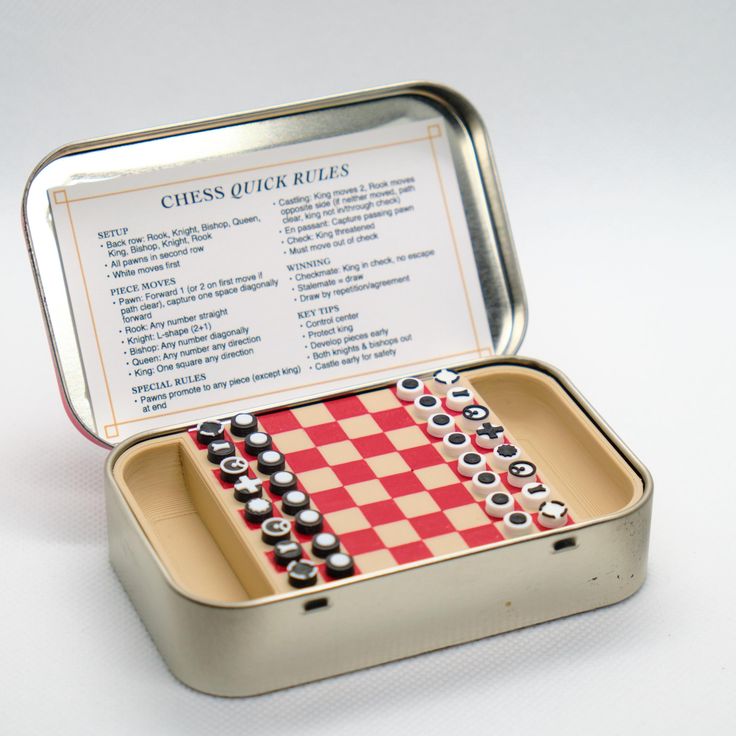
Perfect for long car rides or flights, magnetic games ensure that pieces don’t get lost when the terrain gets bumpy.
Materials Needed:
- ● Printable game board (Tic-Tac-Toe, Checkers, or Chess)
- ● Small magnets or magnetic sheets
- ● Glue or Mod Podge
Instructions:
- ● The Board: Measure the inside of the lid and print a game board to fit. Glue it down and seal it with Mod Podge.
- ● The Pieces: Use flat glass pebbles or wooden discs. Glue small magnets to the bottom of each piece.
- ● Storage: Store all the pieces inside the tin. When it’s time to play, the lid becomes the upright game board, and the magnets keep everything in place.
5. The Professional Sewing Kit
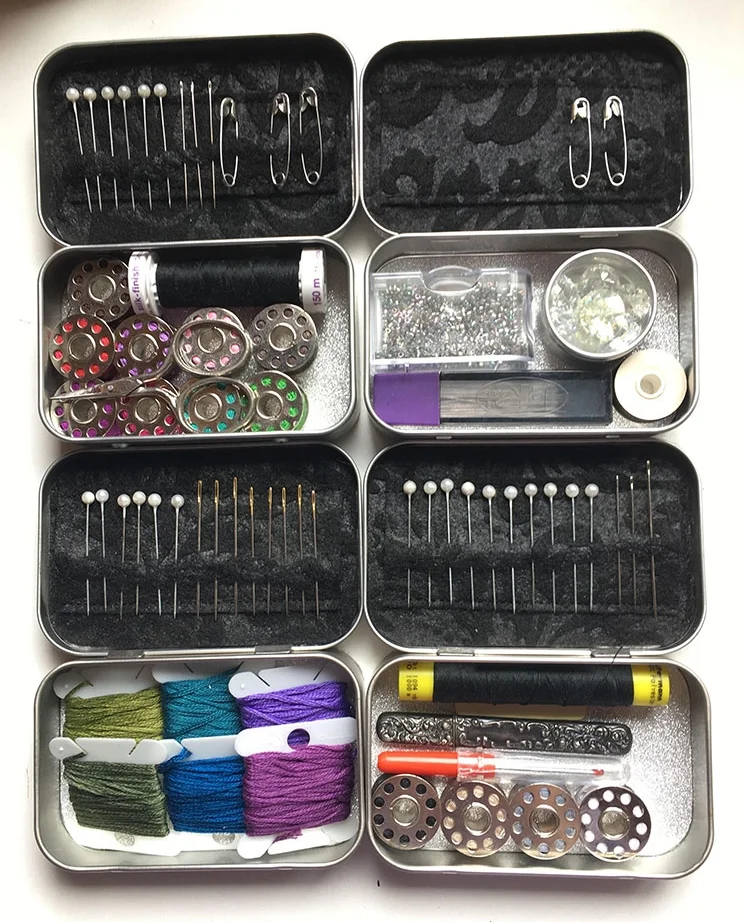
A wardrobe malfunction can happen anywhere.
This kit is far superior to the cheap plastic ones found in hotels.
Materials Needed:
- ● Assorted threads (wrapped around cardstock)
- ● Sewing needles and safety pins
- ● Small embroidery scissors
- ● Spare buttons
- ● Needle threader
Instructions:
- ● The Pincushion: Glue a small piece of felt or a thin sponge to the inside of the lid. This acts as a pincushion for your needles.
- ● Thread Management: Instead of full spools, wrap common colors (black, white, navy) around small pieces of flat cardboard to save space.
- ● Layout: Place the scissors and thread at the bottom, and keep the needles secured in the lid felt.
6. Miniature Fairy House Diorama
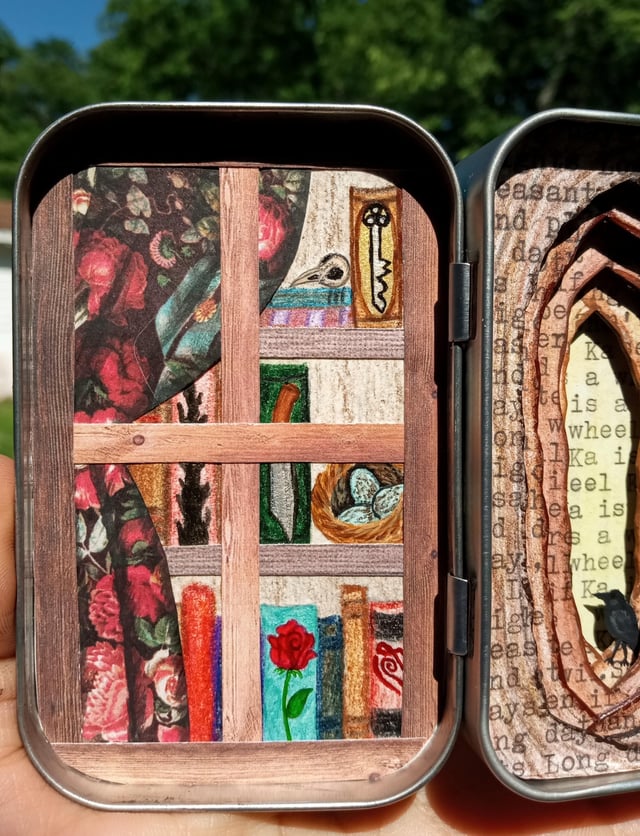
For those who love tiny things, a diorama turns a tin into a magical world.
These make wonderful sentimental gifts.
Materials Needed:
- ● Polymer clay
- ● Dried moss and twigs
- ● Acrylic paint
- ● LED fairy lights (battery operated)
Instructions:
- ● Background: Paint a sky or forest scene on the inside of the lid.
- ● Sculpting: Use polymer clay to create tiny mushrooms, a small cottage, or furniture. Bake these separately before gluing them into the tin.
- ● Landscaping: Use hot glue to attach moss and twigs around your clay creations.
- ● Lighting: If using LEDs, hide the small battery pack behind a false wall made of cardstock at the back of the tin.
7. Hand-Poured Beeswax Candle

An Altoid tin candle is an excellent addition to a camping kit or an emergency blackout bag.
The two-wick design provides ample light and heat.
Materials Needed:
- ● Beeswax pellets or soy wax
- ● Two cotton wicks with metal tabs
- ● Essential oils (optional)
- ● High-heat glue
Instructions:
- ● Secure Wicks: Use a drop of high-heat glue to secure two wicks to the bottom of the tin, spaced evenly apart.
- ● Melt Wax: Melt your wax in a double boiler. Add essential oils like cedarwood or lavender if desired.
- ● Pour: Carefully pour the wax into the tin, leaving about 1/4 inch of space from the top.
- ● Set: Hold the wicks straight using clothespins until the wax hardens. Trim the wicks to 1/2 inch.
8. Electronics Prototype Case
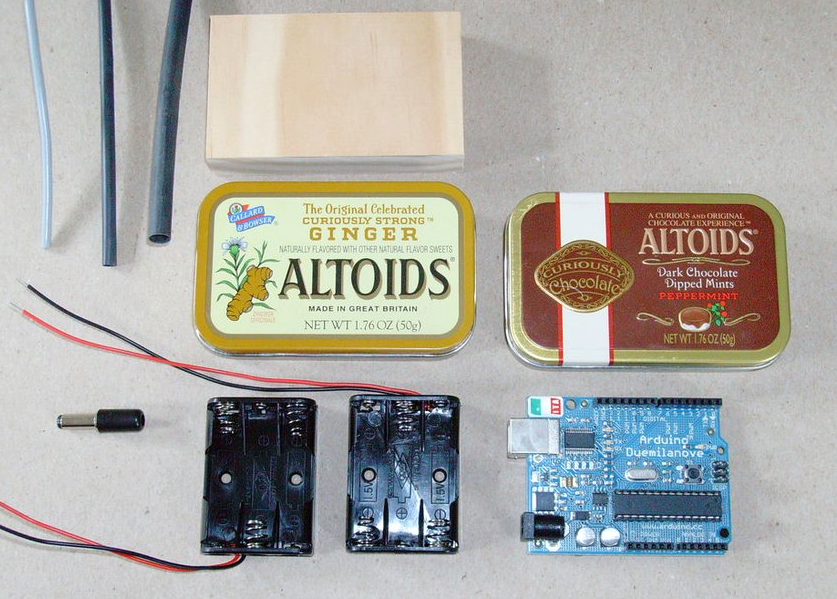
In the maker community, the MintyPi or small headphone amplifiers (CMOY amps) are legendary.
The metal tin provides excellent shielding for electronic components.
Materials Needed:
- ● Soldering iron and solder
- ● Circuit board (cut to size)
- ● Potentiometers, jacks, and switches
- ● Drill with metal-bit
Instructions:
- ● Drilling: Carefully mark and drill holes in the sides of the tin for your input/output jacks and volume knobs.
- ● Insulation: Line the inside of the tin with electrical tape or a thin sheet of plastic to prevent the circuit board from shorting against the metal walls.
- ● Assembly: Mount your hardware through the holes and solder your components. The tin acts as a chassis for your custom tech gadget.
9. Gardener’s Seed Vault
Organizing seeds is vital for any gardener.
An Altoid tin protects seeds from being crushed and keeps them away from light and moisture.
Materials Needed:
- ● Small glassine envelopes or parchment paper
- ● Fine-liner pen
- ● Silica gel packet (to absorb moisture)
Instructions:
- ● Labeling: Create small envelopes that fit vertically inside the tin. Label each with the plant variety and the date collected.
- ● Protection: Place a small silica gel packet (the kind found in shoe boxes) at the bottom. This prevents mold and ensures your seeds stay viable for the next season.
- ● Categorization: You can dedicated one tin to Herbs, another to Pollinator Flowers, and so on.
Tips for Customizing Your Tins
To elevate your project from a recycled box to a professional-looking craft, consider these finishing techniques:
- ● Sanding: Before painting, lightly sand the exterior of the tin with 220-grit sandpaper. This helps the primer and paint adhere to the metal.
- ● Decoupage: Use Mod Podge to apply decorative paper or vintage maps to the outside. This is much easier than painting for beginners.
- ● Fabric Lining: Use felt or velvet to line the inside of the tin for jewelry or delicate items. It provides a luxury feel and prevents rattling.
- ● Rust Prevention: If you live in a humid climate, clear-coat your finished project to prevent the hinges from rusting over time.
FAQ
Q: How do I remove the mint smell from the tin?
A: Wash the tin with warm, soapy water and let it soak in a mixture of baking soda and water for 24 hours. If the smell persists, leave it open in direct sunlight for a day.
Q: Can I use spray paint on these tins?
A: Yes, but use a primer specifically designed for metal first. Finish with a clear topcoat to prevent the paint from chipping when the lid opens and closes.
Q: Are Altoid tins food-safe after being upcycled?
A: Generally, yes, if you haven’t used toxic glues or paints inside. However, if you are storing snacks, it is best to line the tin with parchment paper or use it only for pre-wrapped items.
Q: What is the best way to cut holes in the metal?
A: Use a step-drill bit for clean, round holes. Always wear eye protection and clamp the tin down securely before drilling, as the thin metal can catch and spin.
Conclusion
Upcycling Altoid tins is a rewarding way to reduce waste while creating something truly functional.
From the artistic utility of a watercolor palette to the life-saving potential of a survival kit, these small metal boxes prove that great things really do come in small packages.
By following the steps outlined above, you can transform a simple piece of trash into a customized tool that fits perfectly in your pocket. Happy crafting!
Leave a Reply