DIY paper flower balls, often referred to as pomanders or kissing balls, are a versatile and budget-friendly way to elevate your home decor, wedding aesthetic, or party atmosphere.
Unlike fresh flowers that wither within days, these handcrafted spheres offer a permanent bloom, allowing you to experiment with colors, textures, and scales that nature does not always provide.
Whether you are upcycling old book pages or using high-end crepe paper, the process of creating these floral spheres is both meditative and deeply rewarding.
In this guide, we will explore eight distinct tutorials ranging from traditional Japanese Kusudama folds to whimsical coffee filter roses, ensuring you have the perfect floral accent for any space.
Essential Materials for Paper Flower Crafting
Before diving into the specific tutorials, it is helpful to have a crafter’s toolkit ready. While each project has specific needs, these are the staples you will use across most designs:
| Material | Best Use Case | Why It’s Recommended |
|---|---|---|
| Tissue Paper | Pom-poms and fluffy spheres | Lightweight, inexpensive, and high volume. |
| Crepe Paper | Realistic petals (Peonies/Roses) | High stretchability allows for realistic cupping of petals. |
| Cardstock | Structured flowers (Hydrangeas) | Holds its shape well and comes in vibrant colors. |
| Hot Glue Gun | Assembly | Provides an instant, strong bond for heavy spheres. |
| Styrofoam Balls | The base/core | Provides a consistent spherical shape for gluing petals. |
| Precision Scissors | Detailed cutting | Necessary for intricate petal shapes and fringe. |
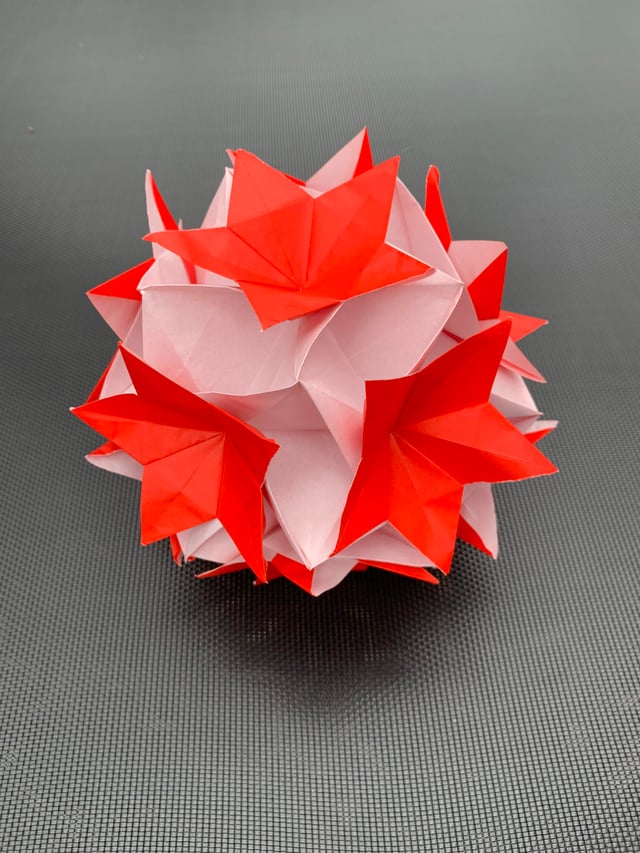
1. The Classic Origami Kusudama Flower Ball
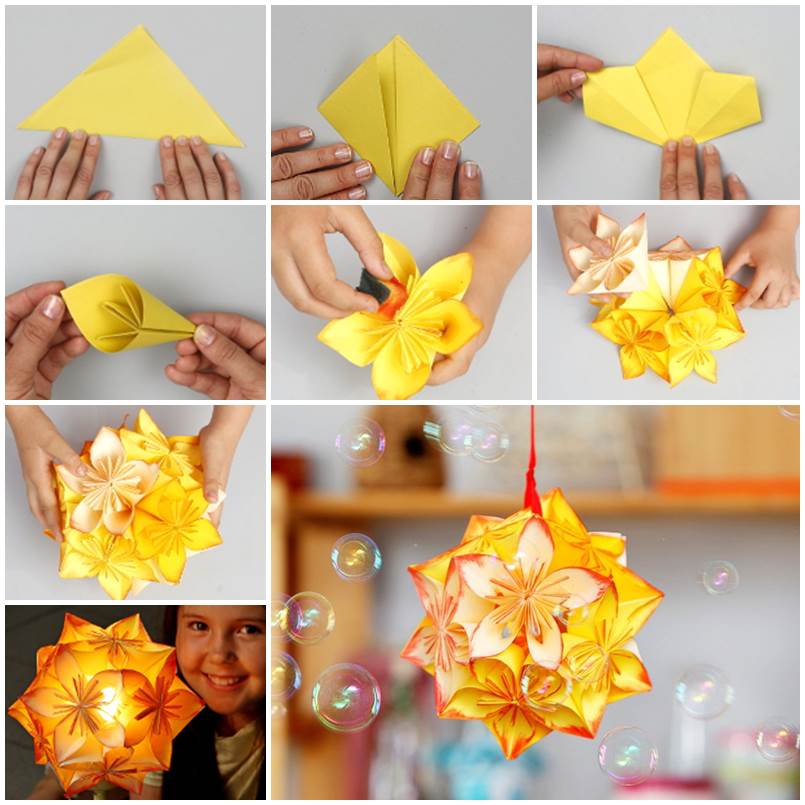
The Kusudama is a traditional Japanese paper model created by sewing or gluing multiple identical pyramidal units together. It is the gold standard for geometric floral decor.
Materials Needed:
- ✿60 squares of paper (3×3 inches is standard)
- ✿Glue stick or hot glue
- ✿Ribbon for hanging
Step-by-Step Instructions:
- Fold the Petal: Fold a square piece of paper diagonally to form a triangle. Fold the bottom corners up to the top peak to create a diamond.
- Create the Flaps: Fold the two upper flaps outward so their edges align with the outer edges of the diamond.
- Open and Flatten: Open those flaps and flatten them into a kite shape.
- Fold the Tips: Fold down the top triangles of the kite shapes.
- Form the Cone: Fold the flaps back in on the original crease and glue the two outer edges together to form a petal.
- Assemble the Flower: Glue five petals together to create one flower.
- Build the Ball: Repeat until you have 12 flowers. Glue the flowers together in a spherical arrangement (one on top, one on bottom, and two rows of five in the middle).
2. Whimsical Tissue Paper Pom-Pom Ball
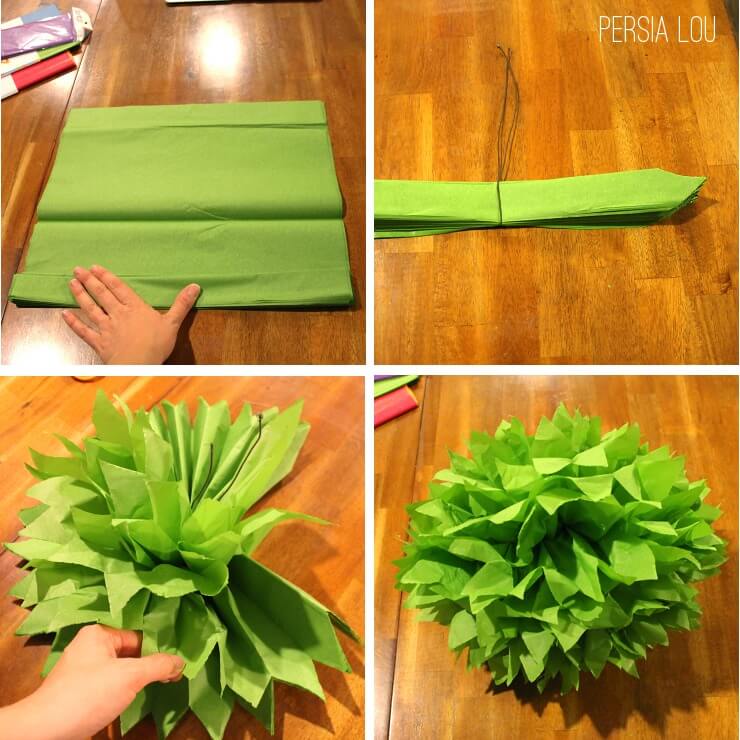
These are the easiest and most cost-effective flower balls to make, perfect for large-scale ceiling decor or nursery accents.
Materials Needed:
- ✿8-10 sheets of tissue paper (20×30 inches)
- ✿Floral wire or pipe cleaners
- ✿Sharp scissors
Step-by-Step Instructions:
- Stack and Fold: Stack your tissue paper sheets. Fold them in a 1.5-inch wide accordion (fan) style.
- Secure the Center: Wrap a piece of floral wire tightly around the center of the folded strip.
- Trim the Ends: Cut the ends of the paper into a rounded or pointed shape to determine the petal look.
- Open the Fan: Fan out both sides of the paper from the center.
- Peel Layers: Gently pull each layer of tissue paper toward the center. Be careful not to tear.
- Fluff: Continue until all layers are separated, creating a full, fluffy sphere.
3. Rolled Paper Rose Pomander
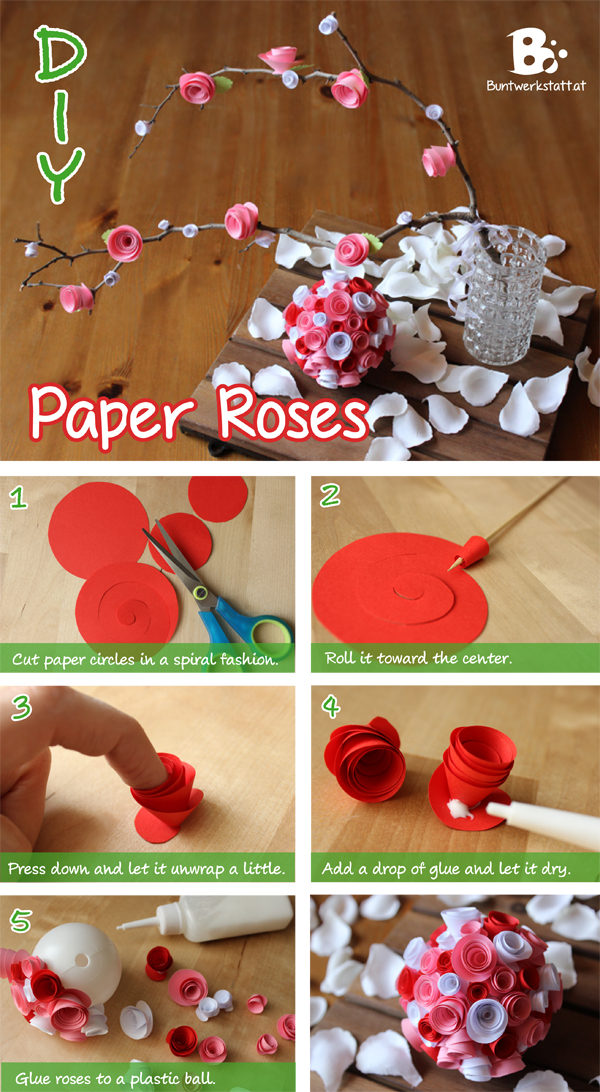
The rolled rose technique creates a dense, romantic look that mimics a tight bouquet of roses. This is a favorite for wedding flower girls.
Materials Needed:
- ✿Medium-weight cardstock or book pages
- ✿A circular object to trace (or a circle punch)
- ✿Styrofoam ball (4-6 inch diameter)
- ✿Hot glue gun
Step-by-Step Instructions:
- Cut the Circle: Cut a circle out of your paper (3-4 inches in diameter).
- Spiral Cut: Starting from the outside, cut a spiral toward the center of the circle, leaving a small tab in the very middle.
- Roll the Rose: Starting from the outer end of the spiral, roll the paper tightly toward the center.
- Secure: Let the roll loosen slightly to the desired rose width, then glue the bottom of the roll to the center tab.
- Attach to Base: Apply hot glue to the bottom of the rose and press it onto the Styrofoam ball.
- Repeat: Cover the entire ball, placing the roses close together so no foam shows through.
4. Crepe Paper Peony Sphere
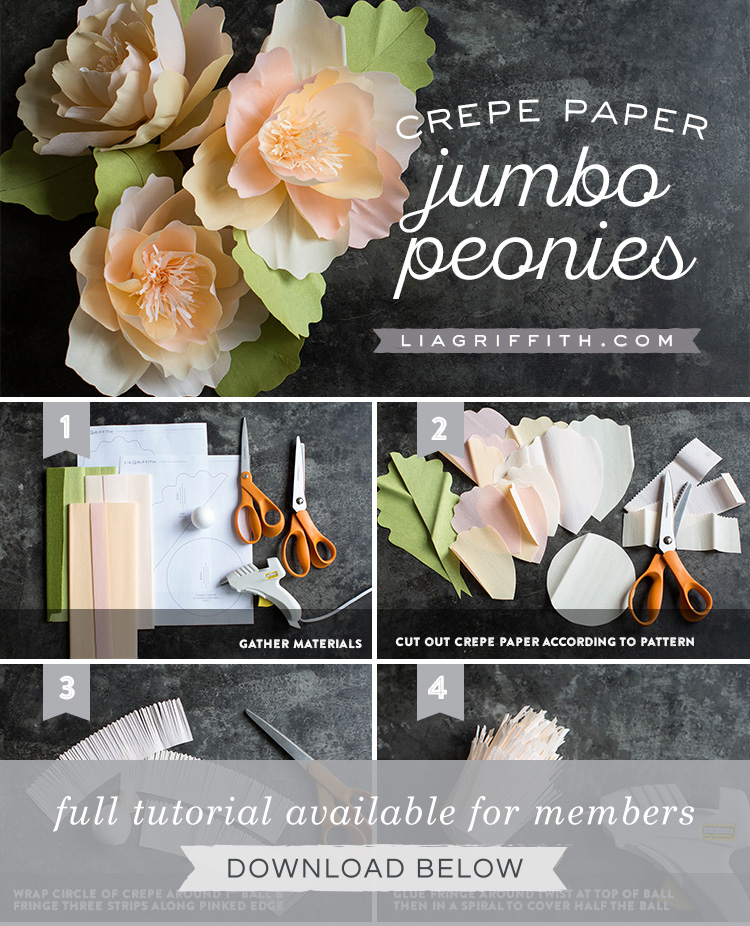
Crepe paper has a unique stretch (grain) that allows you to create curved, realistic petals. Peony balls look exceptionally high-end and luxurious.
Materials Needed:
- ✿Heavy-weight crepe paper (Italian crepe is best)
- ✿Scissors
- ✿Styrofoam ball
- ✿Floral pins or hot glue
Step-by-Step Instructions:
- Cut Petal Strips: Cut strips of crepe paper against the grain. Cut these into various petal sizes (small for the center, large for the outer layers).
- Shape the Petals: Use your thumbs to gently stretch the center of each petal, creating a cupped or bowl shape.
- Curl the Edges: Use a pencil or the edge of your scissors to slightly curl the top edges of the petals.
- Assemble Individual Peonies: Glue 5-7 petals together in a staggered circular pattern to form a single peony.
- Cover the Ball: Glue the completed peonies onto the Styrofoam ball. Fill any gaps with smaller bud petals.
5. Punched Cardstock Hydrangea Ball
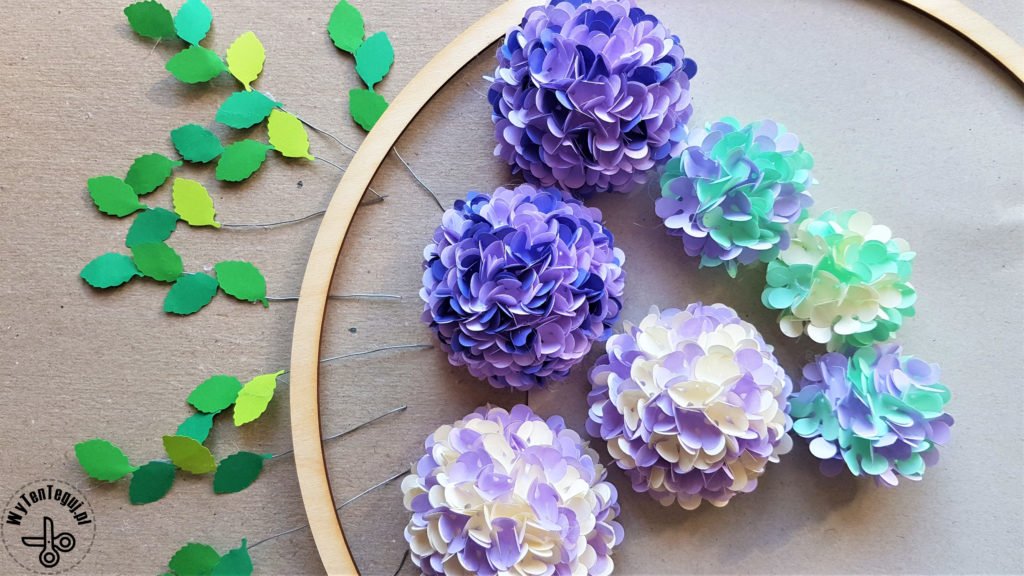
This project is perfect for those who own a hydrangea-shaped paper punch. It is time-consuming but produces a stunning, textured result.
Materials Needed:
- ✿Hydrangea paper punch
- ✿Assorted shades of blue, purple, or pink cardstock
- ✿Styrofoam ball (painted the same color as the paper)
- ✿Pearl-head pins
Step-by-Step Instructions:
- Punch the Flowers: Punch hundreds of small hydrangea shapes from your cardstock.
- Shape the Petals: Place the paper flower on a foam mat and press the center with a stylus or the back of a pen to make the petals pop upward.
- Layering: Stack two paper flowers on top of each other, staggering the petals.
- Pin to Ball: Push a pearl-head pin through the center of the stacked flowers and directly into the Styrofoam ball.
- Density: Repeat this process, overlapping the flowers slightly until the entire ball is covered in a lush, pom-pom hydrangea effect.
6. Scalloped Circle Honeycomb Ball
This tutorial uses a geometric approach to create a flower-like sphere that resembles a honeycomb or a dahlia.
Materials Needed:
- ✿2-inch scalloped circle punch
- ✿Double-sided patterned paper
- ✿Hot glue
- ✿Styrofoam ball
Step-by-Step Instructions:
- Punch Circles: Punch approximately 100-150 scalloped circles.
- Fold the Petals: Fold each circle in half, and then in half again, creating a small cone or quarter-circle.
- Apply Glue: Apply a dab of hot glue to the pointed tip of the folded circle.
- Attach: Press the tip into the Styrofoam ball.
- Pattern: Continue gluing the folded circles in a tight, concentric pattern. The scalloped edges will create a ruffled, floral texture that looks incredibly intricate.
7. Rustic Coffee Filter Rose Ball
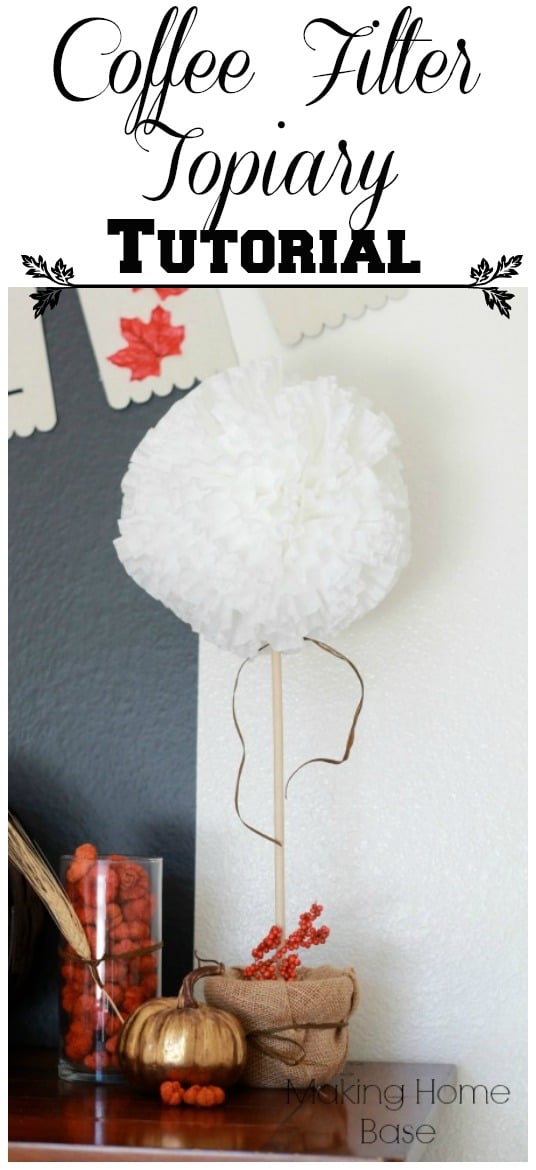
Upcycling at its finest! Coffee filters are incredibly absorbent, making them perfect for custom dyeing to match any decor.
Materials Needed:
- ✿White coffee filters
- ✿Food coloring or watercolors
- ✿Styrofoam ball
- ✿Hot glue
Step-by-Step Instructions:
- Dye the Filters: Dip the edges of stacked coffee filters into a mixture of water and food coloring. Let them dry completely.
- Cut and Fold: Fold a filter into quarters and cut a scalloped edge along the top.
- Create the Core: Roll one filter tightly to form the center of the rose.
- Layer: Wrap 2-3 more filters loosely around the core, gluing at the base.
- Ruffle: Use your fingers to crinkle and ruffle the edges of the filters to create a shabby chic rose look.
- Mounting: Glue the base of each rose to the Styrofoam sphere until full.
8. Elegant Origami Lily Sphere
The origami lily is a more advanced fold but results in a sophisticated, sharp-edged floral ball that looks like a piece of modern art.
Materials Needed:
- ✿12-20 sheets of square origami paper
- ✿Glue or needle and thread
- ✿Beads (optional for the center)
Step-by-Step Instructions:
- Fold the Lily: Follow a standard origami lily (waterlily) pattern. This involves a series of squash folds and petal folds to create a four-pointed bloom.
- Curl the Petals: Use a pen to curl the four petals of each lily outward.
- Assemble the Cluster: Glue the base of the lilies together. Because of their shape, they naturally want to form a sphere.
- Reinforce: If the ball is large, glue the lilies onto a central Styrofoam core for stability.
- Detailing: Glue a small bead or a contrasting paper stamen into the center of each lily for added depth.
Pro-Tips for Professional Results
To make your DIY paper flower balls look like they were bought from a high-end boutique, keep these tips in mind:
- ✿Vary the Sizes: If you are creating a cloud of flower balls for a party, vary the diameters of the Styrofoam bases (e.g., use 4-inch, 6-inch, and 8-inch balls).
- ✿Gradient Colors: Use different shades of the same color (ombre) to give the flowers depth. For example, use dark pink at the bottom of the ball and fade to light pink at the top.
- ✿Lighting: If hanging these for an event, consider tucking a small battery-operated LED fairy light string inside the tissue paper or crepe paper versions for a soft glow.
- ✿Scenting: You can lightly spray the finished paper flowers with a floral-scented room spray or essential oil mist (from a distance) to give them a realistic fragrance.
Frequently Asked Questions
How many flowers do I need to cover a 6-inch Styrofoam ball?
This depends on the size of the flower. For 2-inch rolled roses, you will typically need between 40 and 60 flowers. For smaller hydrangea punches, you may need over 150. Always make more than you think you will need!
What is the best glue for paper flower balls?
Hot glue is the preferred method because it sets instantly. However, if you are working with children, a high-quality tacky glue is safer, though it requires longer drying times and pins to hold the flowers in place while they dry.
Can I hang these outdoors?
Paper flower balls are very susceptible to humidity and wind. They are best suited for indoor use. If you must use them outdoors, ensure it is a dry day and hang them in a sheltered area like a porch.
How do I clean dust off paper flowers?
Do not use water. Use a canned air duster (the kind used for keyboards) on a low setting or a soft-bristled makeup brush to gently whisk away dust.
Conclusion
Creating DIY paper flower balls is a rewarding craft that blends patience with creativity.
From the structural elegance of the Origami Lily to the soft, ethereal layers of a Tissue Paper Pom-Pom, there is a style to suit every skill level and decor theme.
By following these eight tutorials, you can transform simple sheets of paper into stunning, three-dimensional floral art. Start with a small project, master the folding or rolling technique, and soon you will be able to create an entire garden of everlasting blooms for your home.
Leave a Reply