Framed heart decorations are a timeless way to infuse warmth and romance into your home for Valentine’s Day, offering a sophisticated alternative to disposable party store decor.
By utilizing upcycled materials like vintage maps, fabric scraps, and even natural elements, you can create high-end gallery wall pieces that celebrate love in a personalized, sustainable way. These projects range from minimalist modern designs to rustic farmhouse aesthetics, ensuring there is a framed heart concept to suit every interior style.
1. The Vintage Map “Where We Met” Framed Heart
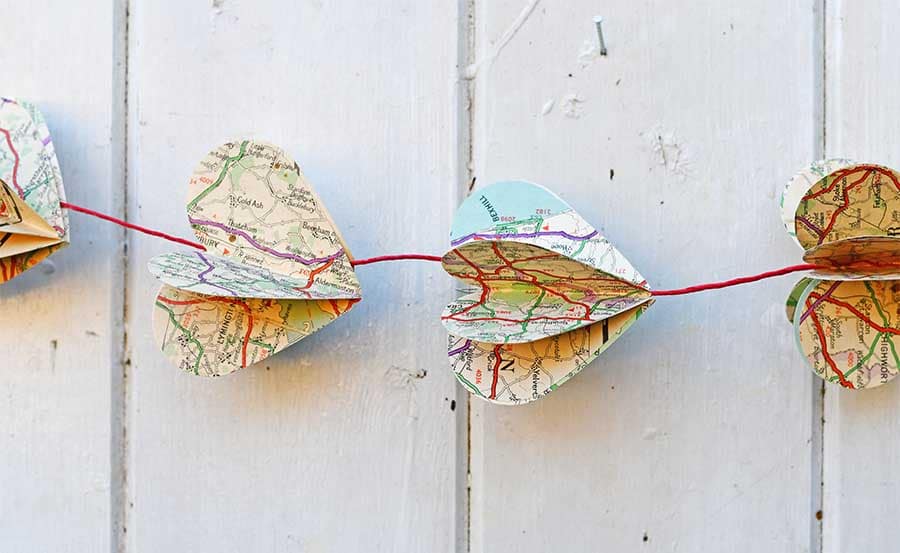
One of the most sentimental ways to celebrate Valentine’s Day is by highlighting the geography of your relationship. Using vintage maps—either physical ones found at thrift stores or printed digital versions—adds a layer of storytelling to your decor.
This project is high-authority because it combines cartography with custom craft, resulting in a piece that often stays on the wall long after February 14th.
Materials Needed
- ● Vintage maps (local, national, or international)
- ● Cardstock or heavy watercolor paper
- ● Heart-shaped stencil or cookie cutter
- ● Acid-free adhesive or foam squares for a 3D effect
- ● Deep-set shadow box frame
Step-by-Step Instructions
To begin, identify the specific locations that hold meaning: where you met, where you married, or where you bought your first home. Trace a heart shape over these locations on the map. Carefully cut the hearts out using precision scissors.
To give the piece a professional lift, apply a small foam adhesive square to the back of each map heart before mounting it onto a piece of high-quality white cardstock. Frame the piece in a shadow box to protect the delicate edges and provide depth.
2. Dimensional 3D Cardstock Butterfly Hearts
If you prefer a modern, vibrant look, the dimensional cardstock heart is a showstopper. This technique uses a butterfly fold—where multiple hearts are layered and folded down the center—to create a fluttering, kinetic effect that changes as you walk past the frame.
It’s an excellent way to play with color theory, using various shades of pink, red, or even gold leaf.
Design Variations
| Style | Color Palette | Paper Type |
|---|---|---|
| Monochromatic | Shades of Crimson | Matte Cardstock |
| Modern Glam | Blush and Gold | Metallic Shimmer Paper |
| Bohemian | Terracotta and Cream | Textured Handmade Paper |
Execution Tips
The key to this project is symmetry. Use a paper punch to ensure every heart is identical. Fold each heart exactly in half.
Apply a thin line of archival glue only along the spine of the fold and press it onto your backing board. By only gluing the center, the wings of the heart stand up, creating a beautiful 3D texture that catches the light.
3. Upcycled Textile and Lace Heart Collage

For those who love the Cottagecore or farmhouse aesthetic, upcycling textiles is the way to go. This project breathes new life into old lace doilies, denim scraps, or even a piece of a wedding dress.
It’s a tactile, high-texture project that feels heirloom-quality.
How to Layer Textures
Start with a neutral background like linen or burlap stretched over the frame’s backing board. Cut your primary heart shape out of a sturdy fabric like felt or denim. Overlay this with a slightly smaller heart made of delicate lace or tulle.
Use a needle and embroidery floss to add a blanket stitch around the edges. This hand-stitched detail elevates the piece from a simple craft to a work of textile art.
4. Pressed Botanical Heart in Floating Frame

Nothing says romance quite like flowers, but fresh bouquets eventually fade. A pressed botanical heart allows you to preserve the beauty of nature indefinitely.
Using a double-glass floating frame makes the heart appear as if it is suspended in mid-air, a look frequently seen in high-end botanical galleries.
Botanical Selection
- ● Red Rose Petals: Classic and bold.
- ● Bleeding Hearts: Naturally shaped for the theme.
- ● Fern Fronds: Used to create the outline of a heart.
- ● Baby’s Breath: Perfect for filling in the center of a heart shape.
Preservation Process
Ensure your flowers are completely dry before framing to prevent mold. Arrange the petals or small blooms into a heart shape on one pane of glass. Use a tiny dot of clear-drying floral adhesive to keep them in place.
Carefully place the second pane of glass on top and lock the frame. This minimalist approach is perfect for a sleek, modern mantle display.
5. Scrabble Tile and Miniature Heart Mosaic
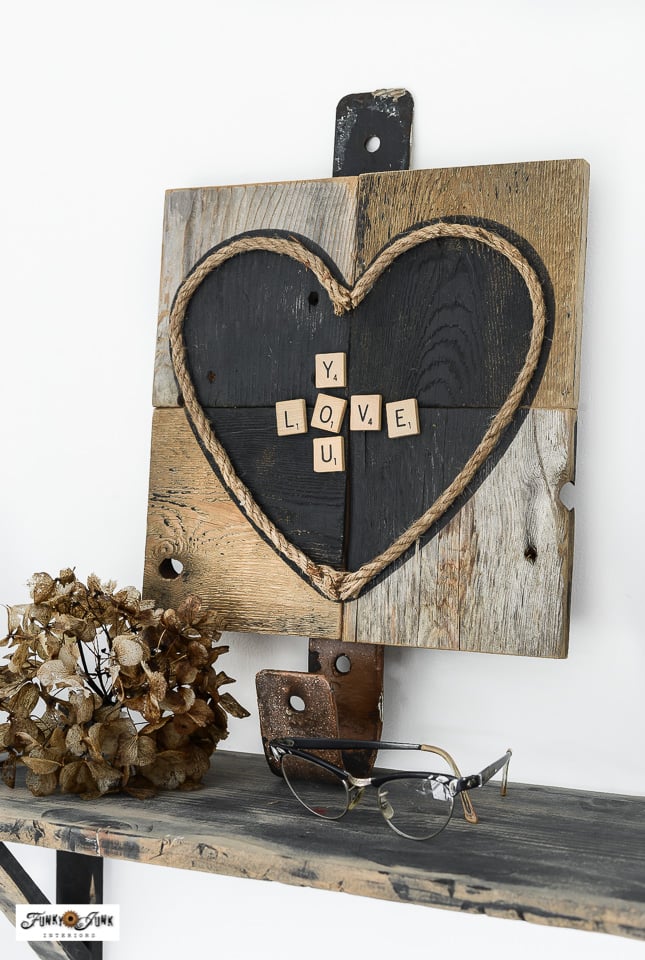
Combining typography with imagery is a powerful way to personalize decor. By using wooden Scrabble tiles to spell out names or LOVE alongside a central heart, you create a piece that is both playful and sophisticated.
This is a favorite for those who enjoy shabby chic or eclectic home styles.
Assembly Guide
Choose a frame with at least a half-inch of depth. Center a single, ornate heart (made of wood, resin, or thick glitter cardstock) in the middle of the frame. Below or around the heart, arrange the Scrabble tiles.
Use a ruler to ensure the tiles are perfectly level. A hot glue gun is best for this project to ensure the heavy wooden tiles stay secured to the backing board.
6. Ombre Paint Chip Gradient Heart
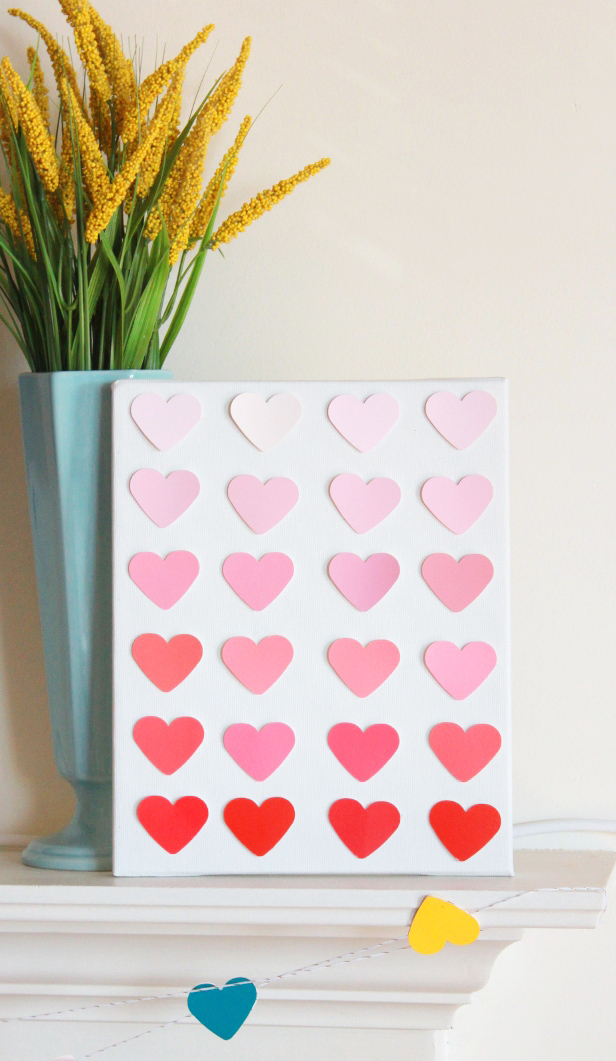
This is perhaps the most cost-effective yet visually striking project on the list. By visiting your local hardware store and collecting paint sample chips in varying shades of one color, you can create a professional-looking ombre gradient.
This project mimics the pixel art style and looks incredible in a large-scale frame.
Creating the Gradient
- ● Collect Chips: Gather 10-15 paint chips ranging from deep burgundy to the palest blush.
- ● Punch Hearts: Use a 1-inch heart lever punch to cut multiple hearts from each shade.
- ● Grid Layout: Arrange the hearts in a grid on a large white poster board. Start with the darkest shade at the bottom and gradually transition to the lightest at the top.
- ● Spacing: Use a spacer (like a piece of scrap cardboard) to ensure the distance between each heart is exactly the same. This precision is what gives the project a high-authority boutique look.
7. Rustic Twig and Burlap Heart Frame
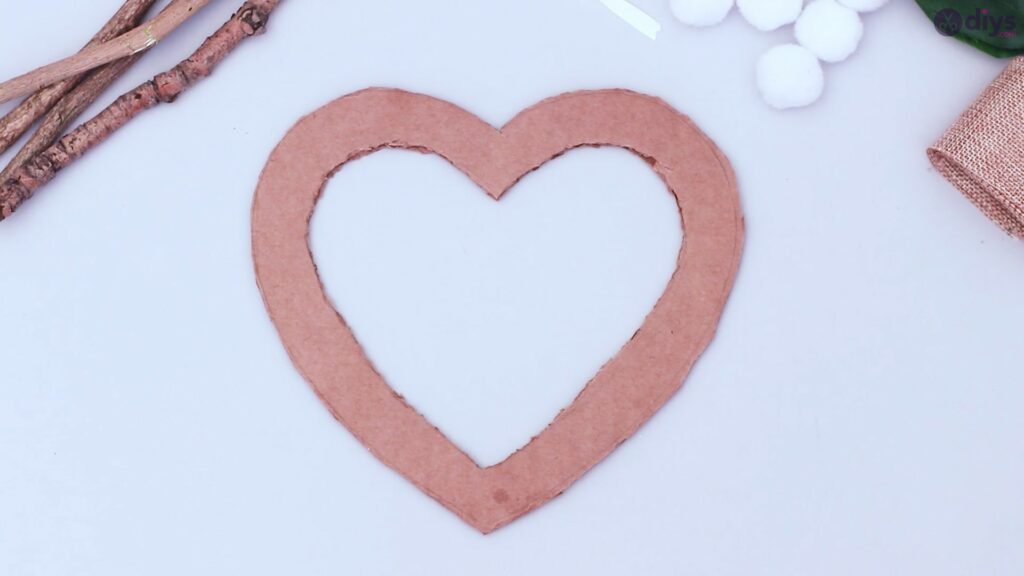
For a more masculine or rustic take on Valentine’s Day, look to the outdoors. A heart constructed from weathered twigs or driftwood mounted against a burlap background offers a rugged, organic beauty.
This project is particularly effective in large, reclaimed wood frames.
Construction Method
Find small, pliable twigs. Soak them in warm water for an hour to make them easier to bend. Shape them into two halves of a heart and secure the top and bottom joints with fine copper wire or twine.
Once dried and set in shape, hot glue the twig heart onto a piece of burlap. The contrast between the rough wood and the soft texture of the burlap creates a visually interesting piece that fits perfectly in a cabin or farmhouse setting.
Essential Supplies for Framed Heart Projects
To achieve professional results, you need the right tools. Below is a table of recommended supplies based on the project type.
| Tool/Supply | Best For… | Why It’s Essential |
|---|---|---|
| Precision Scissors | Map & Fabric Hearts | Ensures clean, non-frayed edges. |
| Foam Adhesive Squares | 3D & Paper Hearts | Adds lift and professional shadows. |
| Acid-Free Glue | All Projects | Prevents yellowing of paper over time. |
| Shadow Box Frame | 3D & Textile Hearts | Provides the necessary depth for layered items. |
| Heart Lever Punch | Paint Chip Hearts | Ensures every heart is identical in size. |
Frequently Asked Questions (FAQ)
1. What is the best frame size for these projects?
For a single focal point, an 8×10 or 11×14 frame works best. If you are creating a grid of many small hearts (like the paint chip project), a square 12×12 or 16×16 frame offers a more contemporary look.
2. How do I prevent my fabric hearts from fraying?
Before cutting your fabric, you can apply a thin layer of fabric stiffener or even a light mist of hairspray to the back. Using pinking shears or very sharp fabric scissors is also crucial for a clean edge.
3. Can I make these projects temporary?
Yes! Instead of gluing items directly to the frame’s permanent backing, use a piece of cardstock that fits the frame. When Valentine’s Day is over, you can simply swap the cardstock for a different seasonal art piece while keeping the frame.
4. Where can I find vintage maps for the first project?
Check local thrift stores, antique malls, or even old atlases at used bookstores. If you can’t find physical copies, many libraries offer high-resolution digital archives that you can print on matte paper at home.
Conclusion
Creating your own framed heart decorations is an rewarding way to celebrate Valentine’s Day with style and intentionality. Whether you choose the sentimental route with vintage maps or the modern aesthetic of an ombre paint chip grid, these DIY projects allow you to customize your holiday decor to match your personal taste.
By focusing on high-quality materials—like acid-free adhesives and deep shadow boxes—you ensure that your handmade art remains a beautiful part of your home for years to come. Grab your scissors and some cardstock, and start crafting a piece that truly speaks from the heart.
Leave a Reply