Hey there, fellow craft enthusiasts! If you’re anything like me, you adore fresh flowers but sometimes wish their beauty could last a little longer – or perhaps you’re looking for a budget-friendly way to add everlasting charm to your home decor, special events, or handmade gifts.
Well, you’ve come to the right place! Today, we’re diving deep into the wonderful world of DIY fabric flower bouquets. These aren’t just any fabric flowers; we’re talking about gorgeous, durable, and surprisingly easy-to-make blooms that will trick even the keenest eye.
I’ve spent countless hours experimenting with different fabrics, techniques, and tools, and I’m thrilled to share my top 7 easy fabric flower bouquet ideas that will transform your crafting game. Forget expensive silk flowers from the store; let’s make our own masterpieces!
Creating fabric flowers is an incredibly rewarding craft. It allows you to repurpose old clothes, scraps, or thrifted textiles, giving them a new lease on life.
Plus, unlike their fresh counterparts, fabric flowers are hypoallergenic, won’t wilt, and require absolutely no watering! They’re perfect for wedding bouquets, home centerpieces, hair accessories, gift toppers, or just brightening up a corner of your home.
We’ll cover various styles, from classic roses to fluffy peonies, ensuring there’s a project for every skill level and aesthetic. So, grab your fabric scraps, your trusty hot glue gun, and let’s get crafting!
1. The Classic Rolled Rosette
This is often the first fabric flower technique crafters learn, and for good reason – it’s incredibly simple, versatile, and yields beautiful results.
Rolled rosettes have a tight, spiral center that mimics the intricate layers of a real rosebud. They’re fantastic for filling out bouquets, adding texture, or as standalone embellishments.
Materials You’ll Need:
- Fabric strips: About 1.5 to 2 inches wide and 15-30 inches long. Cotton, satin, chiffon, or even old t-shirt fabric works wonderfully. The longer the strip, the fuller your rose will be.
- Hot glue gun and glue sticks: My absolute go-to for speed and strong hold.
- Scissors: Sharp fabric scissors are a must!
- Optional: Felt circle for backing, floral wire and tape for stems.
Step-by-Step Tutorial:
- ✧ Prepare your strip: If using a fabric that frays (like cotton), you can either gently fray the edges for a shabby chic look or quickly run a lighter flame along synthetic fabrics (carefully!) to seal the edges. For cotton, I sometimes leave them raw for a more rustic feel.
- ✧ Start the center: Take one end of your fabric strip and fold it over diagonally, then roll it tightly a few times to create a small, firm center bud. Secure the base with a tiny dot of hot glue.
- ✧ Begin rolling and folding: As you continue to roll the fabric strip around the center bud, periodically fold the strip down and away from you (about 1/2 to 1 inch down) at a slight angle before rolling again. Each fold creates a new “petal.”
- ✧ Secure with glue: After each fold and roll, place a small dot of hot glue at the base of the flower to secure that section. This keeps your rose from unraveling and helps shape it.
- ✧ Continue until desired size: Keep rolling, folding, and gluing until your rose reaches the desired size.
- ✧ Finish the base: Once you’re happy with the size, trim any excess fabric from the strip, leaving about an inch. Fold this excess under the base of the rose and secure it with a generous amount of hot glue to create a flat back.
- ✧ Add a backing (optional): For extra stability, especially if adding a stem, glue a small felt circle to the base.
Crafter’s Hack: For a softer, more romantic look with cotton or linen, tear your fabric strips instead of cutting them. This creates beautifully frayed edges that add character.
Crafter’s Hack: If your fabric is too thin, double the strip before rolling for a fuller rose!
2. The Gathered Petal Bloom
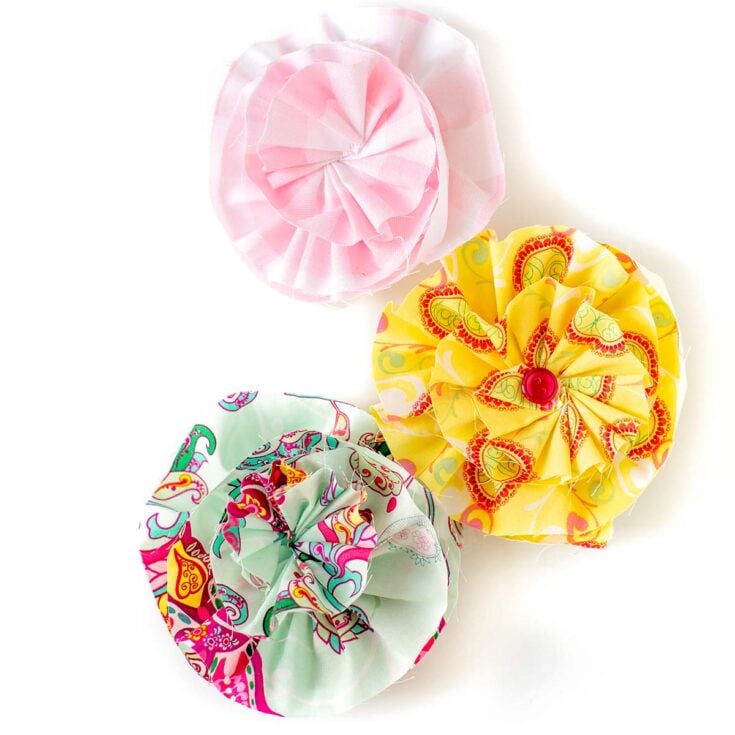
This style is fantastic for creating a softer, more open flower, reminiscent of poppies, camellias, or simple daisies.
It’s incredibly forgiving and allows for a lot of creativity with petal shapes and layering.
Materials You’ll Need:
- Fabric scraps: Medium-weight cotton, silk, or even old bedsheets work well.
- Scissors: For cutting petals.
- Needle and thread: Matching or contrasting thread.
- Hot glue gun and glue sticks: For assembly.
- Optional: Buttons, beads, or felt circle for the center; floral wire for stems.
Step-by-Step Tutorial:
- ✧ Cut your petals: Start by cutting multiple circles or slightly oval shapes from your fabric. You’ll need varying sizes for a natural look – perhaps 3-4 large, 3-4 medium, and 3-4 small. Don’t worry about perfection; slight irregularities add charm.
- ✧ Prepare the petals: Take one petal. Using your needle and thread, sew a running stitch (a simple in-and-out stitch) along the bottom edge (the edge that will be closest to the center of the flower).
- ✧ Gather the petal: Gently pull the thread to gather the fabric, creating a slight ruffle or curve in the petal. Tie off the thread securely. Repeat for all your petals.
- ✧ Assemble the layers: Start with your largest petals. Arrange them in a circle on a flat surface, overlapping slightly, to form the outermost layer. Secure them together at their gathered bases with small dots of hot glue.
- ✧ Add subsequent layers: Continue adding layers with progressively smaller petals, gluing each layer into the center of the previous one. Stagger the petals so they fill the gaps of the layer beneath.
- ✧ Create the center: Once all petals are glued, add a decorative center. This could be a contrasting fabric circle, a button, a cluster of beads, or even a tight spiral of fabric (like a mini rolled rosette). Secure with hot glue.
- ✧ Finish the back (optional): Glue a small felt circle to the back for stability and a neat finish.
Crafter’s Hack: To make your petals hold their shape better, especially with lighter fabrics, you can lightly starch them and iron them before cutting.
Crafter’s Hack: Or, for a quick and easy ruffle, simply cut a long strip of fabric, gather one edge with a running stitch, and then coil it into a flower shape, gluing as you go!
3. The No-Sew Layered Felt Flower
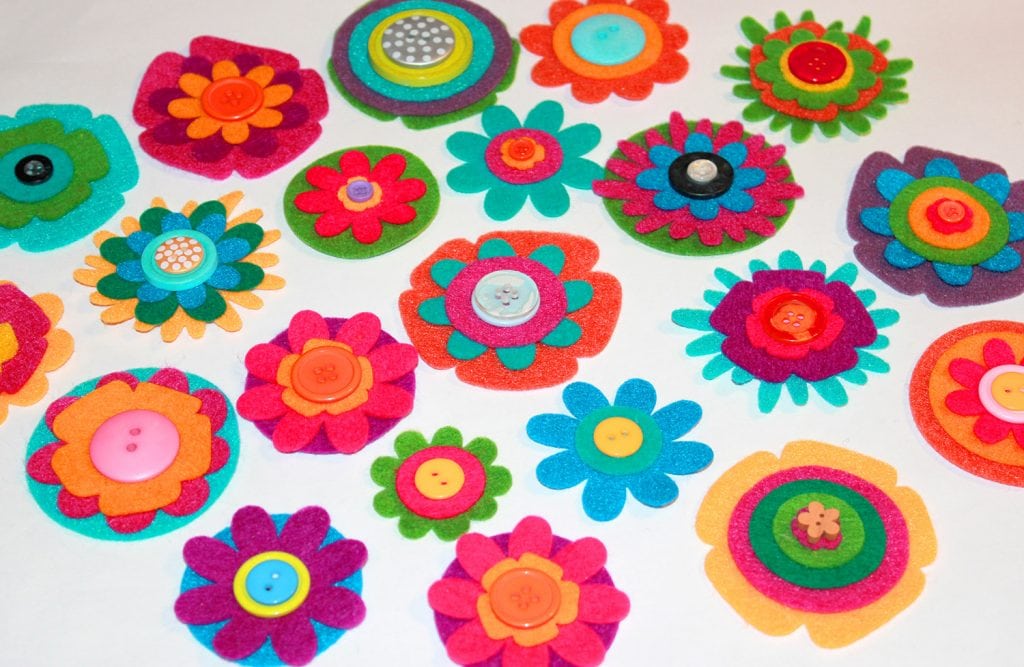
Felt is a crafter’s best friend – it doesn’t fray, it’s easy to cut, and it comes in a rainbow of colors.
These no-sew flowers are perfect for beginners or when you need to whip up a bouquet in a flash. They offer a lovely textural quality.
Materials You’ll Need:
- Felt sheets: Various colors and thicknesses.
- Scissors: Sharp scissors are important for clean cuts.
- Hot glue gun and glue sticks: Essential for assembly.
- Optional: Buttons, beads, or small felt balls for the center; floral wire and tape.
Step-by-Step Tutorial:
- ✧ Cut your shapes: Decide on your petal shape (circles, teardrops, leaves, or even abstract blobs). Cut multiple pieces of felt in varying sizes. For a standard flower, you might need 5-7 large petals, 5-7 medium, and 3-5 small. You’ll also need a small felt circle for the base.
- ✧ Create volume (optional): For a more dimensional petal, take each petal and pinch the bottom center. Add a tiny dot of hot glue to the pinch and press to create a slight cup shape. This adds a lovely curve.
- ✧ Assemble the base: Take your largest petals and arrange them in a circle on your chosen felt base circle, overlapping slightly. Secure each petal at its pinched base to the felt circle with hot glue.
- ✧ Layer up: Continue adding layers with progressively smaller petals, gluing them into the center of the previous layer. Stagger them to create a full, lush look.
- ✧ Add the center: For the flower’s center, you can roll a small strip of felt tightly and glue it, use a contrasting felt circle, a button, or even a few small felt balls glued together.
- ✧ Secure the back: Ensure all layers are firmly glued to the base felt circle. If you skipped the initial base circle, add one now for stability.
Crafter’s Hack: To create fringed centers, cut a small strip of felt, make cuts along one side (don’t cut all the way through!), then roll it up and glue the base. This makes a fantastic, fluffy center for your felt flowers.
4. The Elegant Folded Ribbon Rose
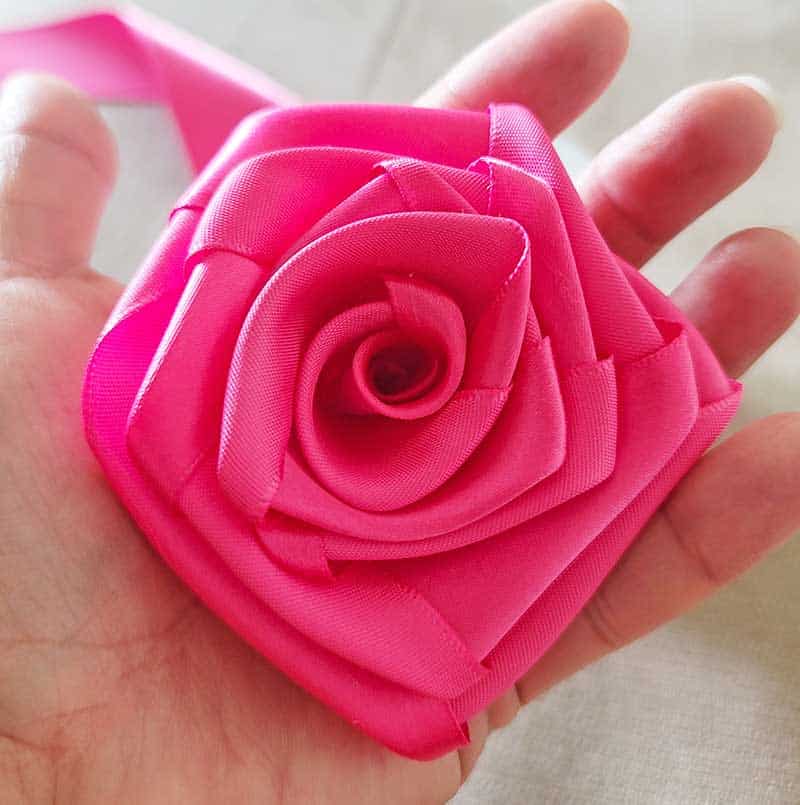
If you’re looking for something a bit more refined and luxurious, folded ribbon roses are absolutely stunning.
They’re often seen in bridal bouquets or elegant home decor. Satin ribbon works best for that classic, silky sheen.
Materials You’ll Need:
- Satin ribbon: 1 to 1.5 inches wide, at least 1-2 yards per rose (depending on desired fullness). Wired ribbon can also work for a more structured look.
- Needle and thread: Matching thread is ideal.
- Hot glue gun and glue sticks: For securing.
- Scissors:
- Optional: Felt circle for backing, floral wire.
Step-by-Step Tutorial:
- ✧ Prepare the ribbon: Start by folding one end of your ribbon over diagonally to form a small triangle. This will be the very center of your rose.
- ✧ Form the center bud: Roll this triangular end tightly a few times to create a small, firm bud. Secure the base with a few stitches or a small dot of hot glue.
- ✧ Begin folding petals: Now, take the working end of your ribbon and fold it down at a right angle, away from you, creating a small “petal” shape.
- ✧ Wrap and secure: Wrap the ribbon around your center bud, securing the base of the fold with a few stitches or a tiny dot of hot glue.
- ✧ Continue folding and wrapping: Repeat steps 3 and 4, continually folding the ribbon down at a right angle, wrapping it around the growing rose, and securing the base. Each fold creates a new petal. Vary the tightness of your folds slightly for a more natural look.
- ✧ Build the layers: Continue until your rose reaches the desired size and fullness. The more folds and wraps, the larger and more layered your rose will be.
- ✧ Finish the rose: Once complete, trim any excess ribbon, leaving about an inch. Fold this excess under the base of the rose and secure it tightly with hot glue and/or stitches to create a flat, stable back.
- ✧ Add backing (optional): Glue a small felt circle to the back for a neat finish and to help secure any floral wire if adding a stem.
Crafter’s Hack: When working with satin ribbon, a lighter can be your best friend (use with extreme caution!). Quickly run the flame along the cut edges to prevent fraying. This is especially useful if you’re not planning to fold all edges under.
5. The Shabby Chic Ruffled Flower
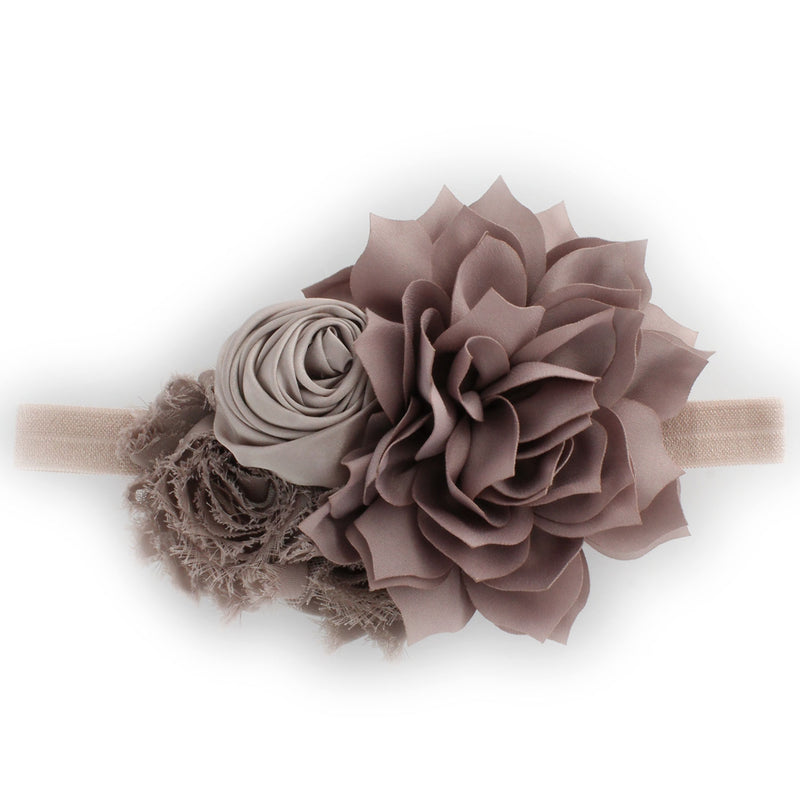
For those who love a rustic, vintage, or farmhouse aesthetic, the shabby chic ruffled flower is perfect.
It embraces frayed edges and a relaxed, organic feel, often made from cotton, linen, or even burlap.
Materials You’ll Need:
- Fabric strips: Cotton, linen, old bedsheets, muslin, or even burlap. Strips should be 1-2 inches wide and varying lengths (15-30 inches). Embrace torn edges!
- Hot glue gun and glue sticks:
- Scissors:
- Optional: Buttons, lace scraps, pearl beads for the center; felt circle for backing.
Step-by-Step Tutorial:
- ✧ Prepare your fabric strips: For that authentic shabby chic look, tear your fabric strips rather than cutting them. This creates beautifully frayed edges. You’ll want several strips for each flower, ranging in length.
- ✧ Create the base ruffle: Take one long strip of fabric. Apply a line of hot glue along one edge of a small felt circle (about 1.5-2 inches in diameter). Start pressing and pleating/ruffling the fabric strip onto the glue line, working your way around the felt circle to create the outermost layer of ruffles.
- ✧ Build inner layers: Continue adding strips of fabric in concentric circles, gluing and ruffling them closer to the center. Each layer should be slightly smaller than the last. Don’t worry about perfection; uneven ruffles add to the charm.
- ✧ Add volume (optional): For extra fullness, you can fold and gather individual shorter strips of fabric and glue them into the layers.
- ✧ Create the center: Once you’ve built up enough ruffles, finish the center. This could be a contrasting fabric circle, a vintage button, a cluster of pearl beads, or even a small piece of lace folded into a rosette. Secure firmly with hot glue.
- ✧ Secure the back: Ensure all fabric is well-adhered to the felt circle base.
Crafter’s Hack: To enhance the shabby chic look, after your flower is assembled, you can gently distress it further. Lightly rub sandpaper over some areas, or even spritz with a bit of watered-down tea or coffee for an aged tint (test on a scrap first!).
6. The Pinch & Gather Bloom
This technique is incredibly simple but creates a surprisingly full and dimensional flower, almost like a miniature peony or hydrangea.
It’s all about strategic pinching and gluing.
Materials You’ll Need:
- Fabric scraps: Medium-weight cotton, linen, or even thin denim. You’ll need several small squares (e.g., 2×2 inches or 3×3 inches).
- Hot glue gun and glue sticks:
- Scissors:
- Optional: Button or bead for the center; felt circle for backing.
Step-by-Step Tutorial:
- ✧ Cut your squares: Cut numerous fabric squares. The size of the square will determine the size of your “petal” and the overall flower. You’ll need quite a few, perhaps 15-25 for a medium-sized flower.
- ✧ Prepare the base: Cut a small felt circle, about 1-1.5 inches in diameter. This will be your foundation.
- ✧ Pinch the petals: Take one fabric square. Pinch it directly in the center, bringing all four corners together at the bottom. This creates a little “pouch” or “pyramid” shape.
- ✧ Glue to base: Apply a dot of hot glue to the pinched bottom of the fabric square. Press it firmly onto the outer edge of your felt circle base.
- ✧ Build the first layer: Continue pinching squares and gluing them side-by-side around the entire circumference of the felt circle. Overlap them slightly to avoid gaps and create a full first layer.
- ✧ Add subsequent layers: Once the first layer is complete, start a second layer, gluing the pinched squares into the spaces between the petals of the first layer, working your way inward towards the center of the felt circle.
- ✧ Continue layering: Keep adding layers of pinched squares, making sure to fill any gaps, until you reach the very center of the felt circle.
- ✧ Finish the center (optional): For a neat finish, you can glue a small button, a cluster of beads, or a tiny rolled fabric circle into the very center.
Crafter’s Hack: For a variegated look, use squares of fabric in slightly different shades of the same color. This adds depth and makes the flower look even more realistic.
Crafter’s Hack: Using two different sized squares (e.g., 2×2 for outer layers, 1.5×1.5 for inner) can also create a nice gradient of fullness.
7. The Lush Fabric Peony or Hydrangea
This is a showstopper! Creating a full, lush peony or hydrangea-style flower requires a bit more fabric and layering, but the result is absolutely breathtaking and worth the effort.
It’s all about building volume with soft, rounded petals.
Materials You’ll Need:
- Soft, lightweight fabric: Chiffon, silk, satin, or very soft cotton for a delicate look. You’ll need a good amount of fabric.
- Scissors:
- Needle and thread: Matching thread.
- Hot glue gun and glue sticks:
- Optional: Stamens, beads, or a small button for the center; floral wire and tape.
Step-by-Step Tutorial:
- ✧ Cut multiple petal sizes: Cut many circles or rounded petal shapes from your fabric. You’ll need a range of sizes, from very large (3-4 inches diameter) to very small (1 inch diameter). Think about 5-7 large, 7-10 medium, 10-15 small, and 5-7 tiny. Don’t strive for perfect circles – organic shapes look more natural.
- ✧ Prepare the petals (optional but recommended): For a more realistic look, you can gently singe the edges of synthetic fabrics (like chiffon or satin) with a candle flame (very carefully and quickly!) to create a slightly curled, sealed edge. For cotton, you can gently fray the edges or leave them raw.
- ✧ Gather the petals: Take each petal. Fold it in half, then in half again (into a quarter circle). Apply a tiny dot of hot glue to the very tip of the folded corner and press it down to secure, creating a slightly cupped shape. You can also simply run a gathering stitch along the bottom edge of each petal.
- ✧ Create the base layer: Start with your largest prepared petals. Arrange them in a circle, overlapping slightly, on a small felt circle base (about 1.5-2 inches diameter). Glue them down at their gathered/folded bases.
- ✧ Build the layers: Continue adding layers of petals, working your way inwards and using progressively smaller sizes. Stagger each layer so the petals fill the gaps of the layer beneath. The key to a lush look is generous overlapping and using many petals.
- ✧ Add volume: As you get to the inner layers, you can make the petals stand up a bit more by applying glue higher up on their base, or by using more tightly gathered petals.
- ✧ Create the center: For the very center, use your smallest petals, gathering them tightly and gluing them close together to form a dense core. You can also add fabric stamens, pearl beads, or a small button here for extra detail.
- ✧ Secure the back: Ensure all layers are well-adhered to the felt base.
Crafter’s Hack: For an even fuller, more dimensional peony, you can layer 2-3 petal shapes on top of each other before folding and gathering them. This makes each “petal unit” thicker and more substantial.
Crafter’s Hack: Using a mix of slightly different shades of fabric in the same color family will also add incredible depth.
General Tips for Fabric Flower Bouquets
- Stems are Key: To create a bouquet, you’ll need stems. Floral wire (18-22 gauge) is perfect. Simply hot glue the wire to the back of your finished flower (securing it with a felt circle helps), then wrap the wire with floral tape for a realistic finish.
- Mix and Match: Don’t be afraid to combine different flower styles and sizes within one bouquet for a natural, varied look. Add some fabric leaves (cut from green felt or fabric) for extra realism.
- Embrace Imperfection: Handmade items have character! Don’t stress if every petal isn’t identical. Slight variations make your bouquet unique and charming.
- Fabric Choices Matter:
- Cotton/Linen: Great for shabby chic, rustic, or natural looks. Can fray easily but can be embraced.
- Felt: No-fray, easy to cut, great for beginner projects and structured flowers.
- Satin/Chiffon/Silk: Elegant, delicate, often used for formal bouquets. Can be slippery to work with.
- Old T-shirts/Knit Fabrics: Stretchy, soft, great for rolled rosettes and informal styles.
- Budget-Friendly Hacks:
- Thrift Store Finds: Old clothing, scarves, tablecloths, or even bedsheets from thrift stores are treasure troves for fabric scraps.
- Repurpose: Use old jeans, t-shirts, or worn-out garments.
- Sample Swatches: Ask fabric stores for discontinued sample swatches – often free!
- Arranging Your Bouquet: Once you have your stemmed flowers, arrange them just as you would fresh flowers. Start with your larger blooms, then fill in with smaller ones and leaves. Secure the stems with floral tape or a pretty ribbon wrap.
FAQ Section
Q1: How do I make my fabric flowers look more realistic?
A1: A few tricks! Vary your petal shapes and sizes, gently curl or singe the edges (for synthetic fabrics), use different shades of fabric within the same color family, and don’t forget to add realistic centers like stamens or small beads. Also, adding green fabric leaves always helps!
Q2: What’s the best way to attach stems to my fabric flowers?
A2: For most fabric flowers, hot gluing a length of floral wire (18-22 gauge works well) to the back of the flower is effective. Reinforce the glue joint by covering it with a small felt circle. Once the glue is dry, wrap the wire with green floral tape to create a natural-looking stem.
Q3: Can I wash fabric flowers?
A3: Generally, no. Most fabric flowers are held together with hot glue, which can degrade or dissolve with water. Spot cleaning with a damp cloth is usually the safest bet. For dust, a gentle blast of cool air from a hairdryer on a low setting can work wonders.
Q4: What kind of fabric is easiest for beginners?
A4: Felt is hands-down the easiest for beginners because it doesn’t fray and is simple to cut. Cotton is also a good choice as it’s readily available and easy to manipulate, though it will fray if not sealed or handled.
Q5: How can I make my fabric flowers more durable?
A5: Using a strong hot glue is crucial. For fabrics prone to fraying, you can use a fabric sealant (like Fray Check) on the edges before assembly. For extra stability, especially if the flower will be handled a lot (like a bridal bouquet), you can reinforce glue joints with a few hand stitches.
Conclusion
And there you have it – seven fantastic and easy ways to create stunning DIY fabric flower bouquets!
From the timeless elegance of rolled rosettes to the rustic charm of shabby chic ruffles, each technique offers a unique way to bring everlasting beauty into your world. I truly hope this guide inspires you to dive into your fabric stash and start crafting your own blooms.
Remember, the beauty of DIY lies in the process and the personal touch you add. Don’t be afraid to experiment with different fabrics, colors, and embellishments. Your creativity is the only limit!
So go ahead, make something beautiful that will last a lifetime, and enjoy the endless compliments on your handmade masterpieces. Happy crafting, my friends!
Leave a Reply