Transforming your living space doesn’t always require a major renovation. Often, the most impactful changes come from the smallest details.
DIY flower pots are the perfect intersection of sustainability, creativity, and home styling. By upcycling everyday items or personalizing basic terracotta, you can create high-end-looking garden accents that reflect your personal aesthetic for a fraction of the retail cost.
Whether you are an urban gardener with a small balcony or a homeowner looking to brighten up a windowsill, these 12 stylish DIY flower pot projects offer a range of techniques.
From industrial concrete casting to bohemian macramé, these projects will elevate your plant game.
1. Hand-Painted Geometric Terracotta
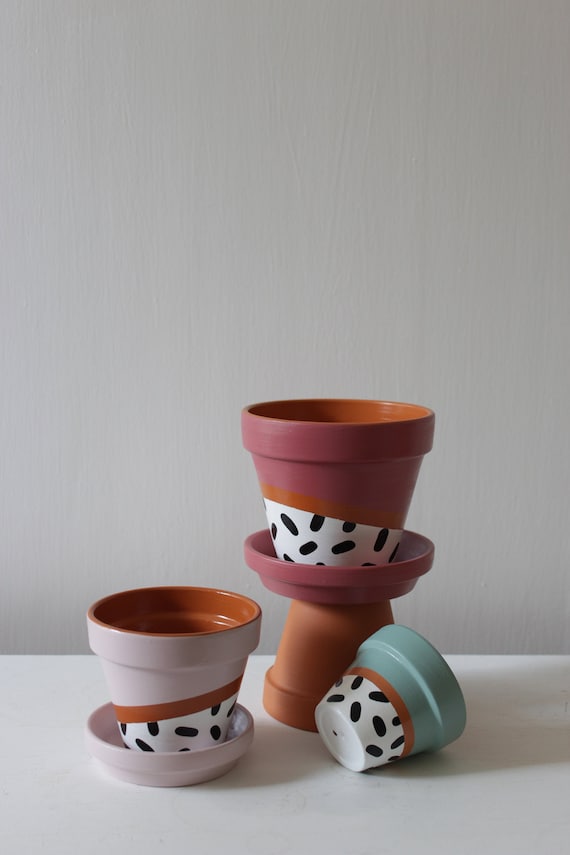
Terracotta pots are the blank canvas of the gardening world. They are breathable and affordable, but their standard orange hue can feel dated.
A geometric paint job instantly modernizes them.
Materials Needed:
- •Standard terracotta pots
- •Painter’s tape (frog tape works best for crisp lines)
- •Acrylic multi-surface paint or chalk paint
- •Foam brushes
- •Matte or glossy sealant spray
Step-by-Step Instructions:
- Clean the Pot: Wipe the pot with a damp cloth to remove any dust or debris. Let it dry completely.
- Tape Your Design: Apply painter’s tape in triangles, stripes, or chevron patterns. Ensure the edges are pressed down firmly to prevent paint bleed.
- Apply Paint: Use a foam brush to apply thin layers of paint. Two coats are usually sufficient for full opacity.
- Peel and Reveal: Remove the tape while the paint is still slightly tacky to get the cleanest lines.
- Seal: Once the paint is dry (about 2 hours), spray with a clear waterproof sealant to protect the design from moisture.
2. Bohemian Macramé Hanging Planters
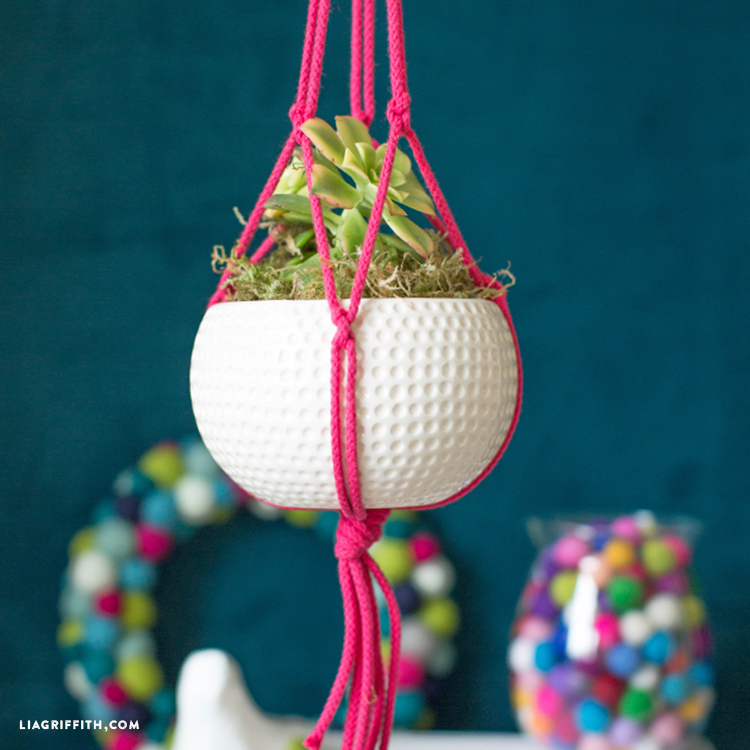
Vertical gardening is a great way to save floor space. Creating your own macramé hanger allows you to customize the length and color to match your room’s palette.
Materials Needed:
- •30-40 feet of cotton macramé cord (3mm or 4mm)
- •A wooden or metal ring
- •Scissors
Step-by-Step Instructions:
- The Base: Loop four long strands of cord through the ring, giving you eight working ends.
- The Top Knots: Create a series of Square Knots for the first 6 inches to create a decorative handle.
- The Basket: Separate the cords into pairs and tie simple overhand knots about 12 inches down. Then, take one cord from two adjacent pairs and tie them together another 4 inches down to create a diamond mesh.
- The Bottom: Gather all cords and tie a large, secure Gathering Knot at the bottom.
- Insert Pot: Place your pot inside the mesh and trim the remaining cord to create a tassel.
3. Upcycled Industrial Tin Cans

Sustainability is a core pillar of modern DIY. Transforming large tomato or coffee cans into planters gives your home an industrial-chic or farmhouse vibe.
Materials Needed:
- •Empty, cleaned tin cans
- •A hammer and a large nail (for drainage)
- •Spray paint (metallic or matte black)
- •Sanding block
Step-by-Step Instructions:
- Prep for Drainage: Flip the can over and use the hammer and nail to punch 3-4 holes in the bottom. This is vital for plant health.
- Smooth Edges: Use a sanding block to smooth down any sharp edges inside the rim of the can.
- Paint: Apply a coat of metal-bonding spray paint. Copper or brass finishes look particularly high-end.
- Weathering (Optional): If you want a rustic look, lightly sand the edges of the painted can to let some of the original metal peek through.
4. Modern Concrete Minimalist Pots
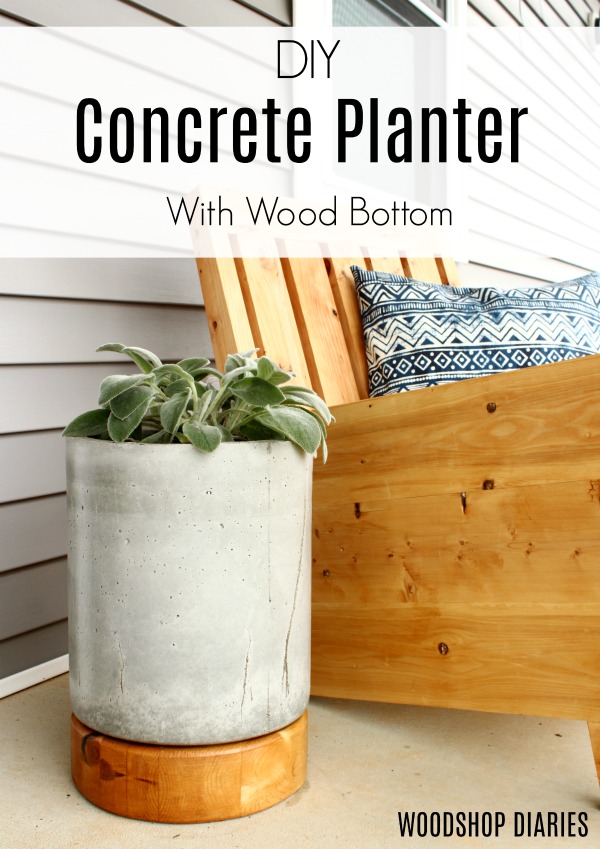
Concrete pots are staples in high-end decor boutiques, often retailing for $40 or more. You can make them at home using plastic containers from your recycling bin as molds.
Materials Needed:
- •Quick-set concrete mix
- •Water
- •Two plastic containers (one slightly larger than the other)
- •Cooking oil or non-stick spray
- •Heavy stones or weights
Step-by-Step Instructions:
- Prepare Molds: Coat the inside of the larger container and the outside of the smaller container with cooking oil.
- Mix Concrete: Follow the package instructions to mix the concrete to a thick peanut butter consistency.
- Pour: Fill the larger container about halfway with concrete.
- Insert Inner Mold: Press the smaller container into the center of the concrete. Place weights inside the smaller container so it doesn’t float up.
- Cure: Let it sit for 24–48 hours. Carefully remove the plastic molds and sand any rough edges.
5. Fabric-Wrapped Decorative Pots
If you have leftover fabric scraps from a sewing project, this is the perfect way to use them. Fabric wrapping adds a soft, tactile element to your plant shelf.
Materials Needed:
- •Mod Podge (Matte or Gloss)
- •Fabric scraps (cotton works best)
- •Paintbrush
- •Basic plastic or terracotta pot
Step-by-Step Instructions:
- Measure Fabric: Cut a piece of fabric that is long enough to wrap around the pot with an extra inch for overlap.
- Apply Adhesive: Coat the pot in a generous layer of Mod Podge.
- Wrap: Carefully smooth the fabric onto the pot, working out any air bubbles as you go.
- Tuck the Edges: Fold the excess fabric over the top rim and under the bottom base, securing with more Mod Podge.
- Top Coat: Apply a final layer of Mod Podge over the fabric to seal it against water splashes.
6. Chalkboard Herb Planters
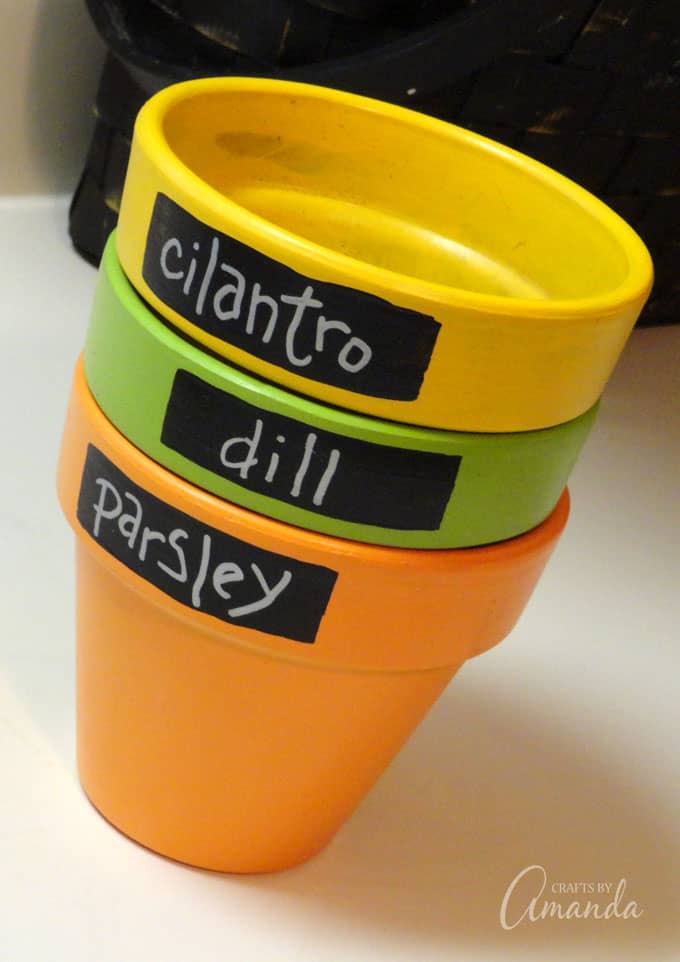
Perfect for the kitchen, these pots allow you to label your herbs (basil, mint, cilantro) and change them out as your garden grows.
Materials Needed:
- •Terracotta pots
- •Chalkboard paint
- •Chalk or chalk markers
Step-by-Step Instructions:
- Paint: Apply two coats of chalkboard paint to the entire exterior of the pot.
- Season the Surface: Once dry, rub the side of a piece of chalk over the entire painted surface and then wipe it off. This seasons the paint so your first writing doesn’t leave a permanent ghost image.
- Label: Write the name of your herb in your best calligraphy.
7. Mosaic Broken China Pots
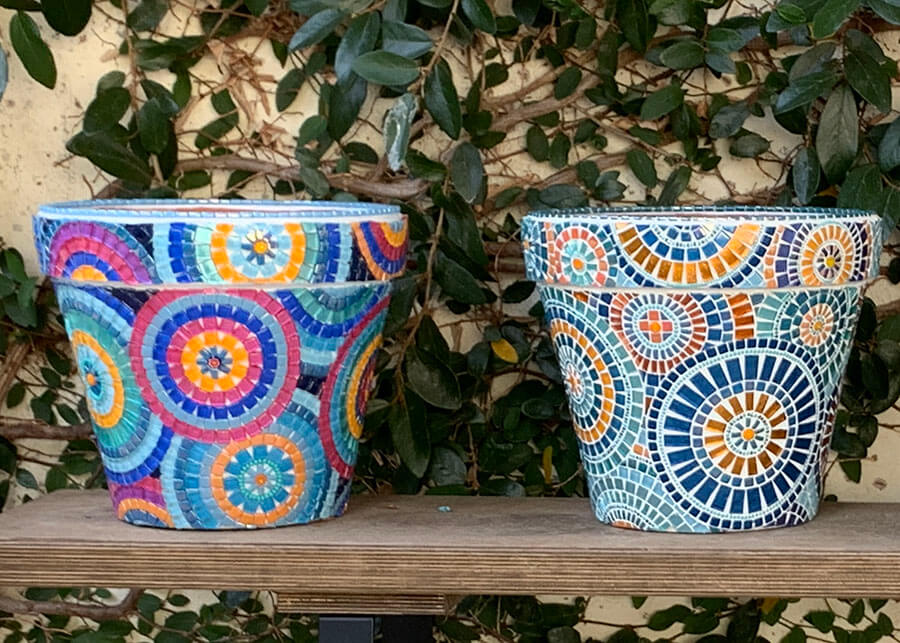
Don’t throw away that chipped plate or broken ceramic mug. Use the pieces to create a Mediterranean-style mosaic planter.
Materials Needed:
- •Broken ceramic/china pieces
- •Strong adhesive (E6000 or similar)
- •Pre-mixed tile grout
- •Sponge
Step-by-Step Instructions:
- Layout: Arrange your ceramic pieces on a flat surface to plan your pattern.
- Glue: Stick each piece onto the pot using the adhesive. Leave small gaps between pieces for the grout.
- Grout: Once the glue is dry, spread grout over the entire surface, filling the gaps.
- Clean: After 15 minutes, use a damp sponge to wipe the excess grout off the faces of the ceramic pieces.
8. Nautical Rope-Wrapped Planters
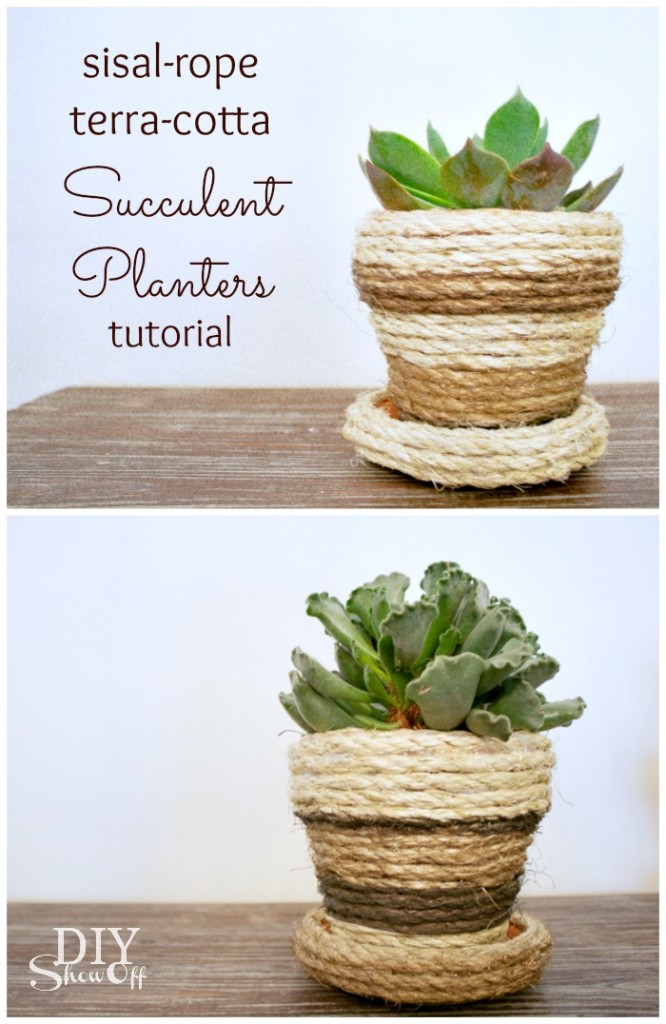
This project adds a coastal, organic feel to your decor. It’s excellent for hiding unattractive plastic nursery pots.
Materials Needed:
- •Jute or sisal rope
- •Hot glue gun
- •A cylindrical pot
Step-by-Step Instructions:
- The Start: Start at the bottom of the pot. Glue the end of the rope securely.
- Coil: Wrap the rope tightly around the pot, applying a thin line of hot glue every few inches.
- Finish: Once you reach the top rim, cut the rope at an angle and glue it down firmly to create a seamless finish.
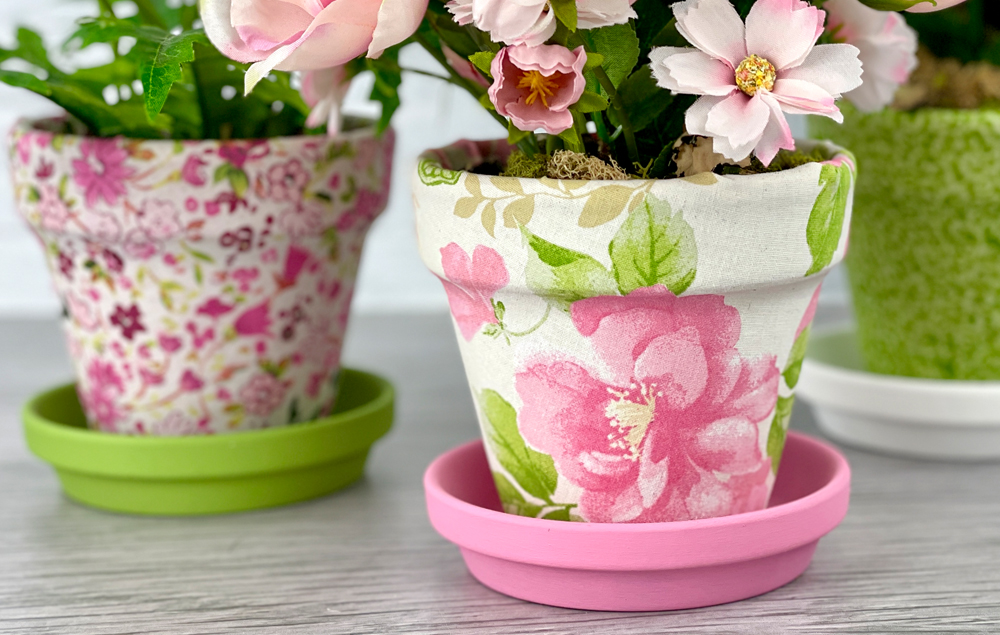
9. Decoupage Botanical Pots
Decoupage allows you to transfer intricate illustrations—like vintage botanical prints or floral napkins—onto your pots without needing any drawing skills.
Materials Needed:
- •Decorative paper napkins or thin paper
- •Mod Podge
- •White acrylic paint (as a base)
Step-by-Step Instructions:
- Base Coat: Paint your pot white. This ensures the colors of the napkin pop.
- Prep Napkin: If using napkins, peel away the back layers so you only have the thin, printed top layer.
- Apply: Brush Mod Podge on the pot, lay the napkin down gently, and brush another layer of Mod Podge over the top.
- Smooth: Use a soft brush to smooth out wrinkles carefully, as the wet napkin is fragile.
10. Mid-Century Modern Wooden Stand Pots
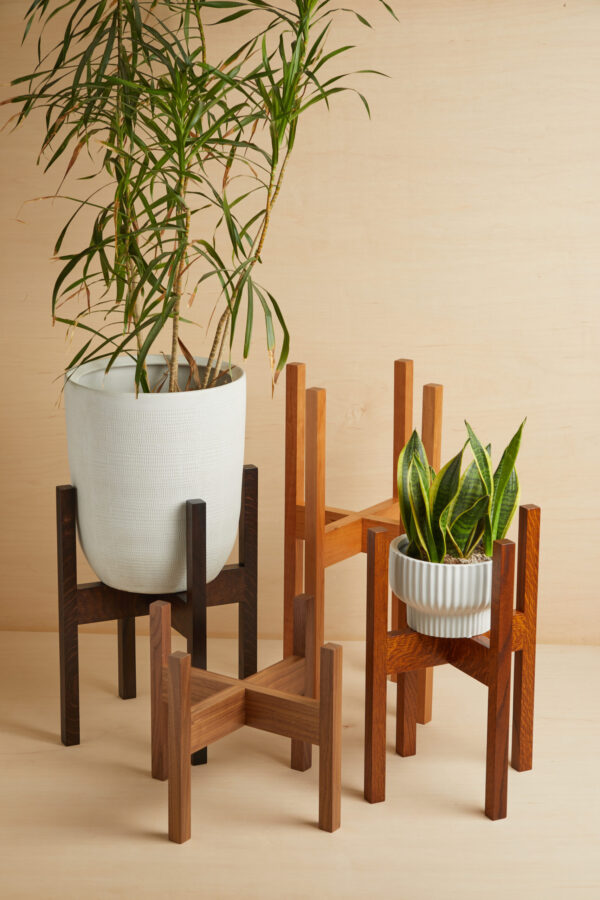
Elevating your plants off the ground adds visual interest and height to your room layout. This project focuses on building the stand rather than just the pot.
Materials Needed:
- •Wooden dowels or square timber
- •Wood glue
- •Small screws
- •Stain or paint
Step-by-Step Instructions:
- The H Frame: Create two H shapes out of wood that fit the diameter of your pot.
- Join: Notch the center of each H so they lock together to form a cross.
- Legs: Attach four vertical legs to the ends of the cross using wood glue and screws.
- Finish: Sand the wood smooth and apply a walnut or oak stain for that classic 1950s look.
11. Dip-Dyed Ombre Pots
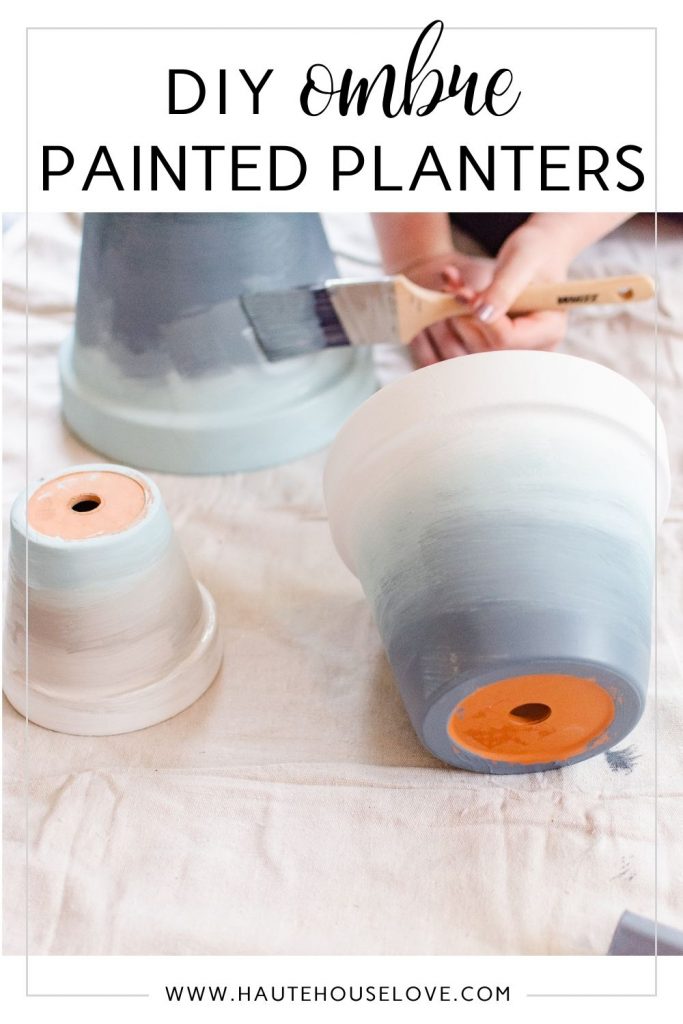
The ombre effect is a sophisticated way to introduce color gradients into your home. It works best with light, airy colors like seafoam green or sunset orange.
Materials Needed:
- •Large bucket of water
- •Acrylic paint
- •White terracotta or ceramic pot
Step-by-Step Instructions:
- Prepare the Bath: Mix a large amount of acrylic paint into a bucket of water until you have a saturated liquid.
- The First Dip: Dip the pot 3/4 of the way in and hold for 10 seconds.
- Layering: Lift it out slightly, then dip the bottom 1/4 back in for another 30 seconds to create a darker shade at the base.
- Dry: Let the water drip off and dry upside down.
12. Self-Watering Wine Bottle Planters
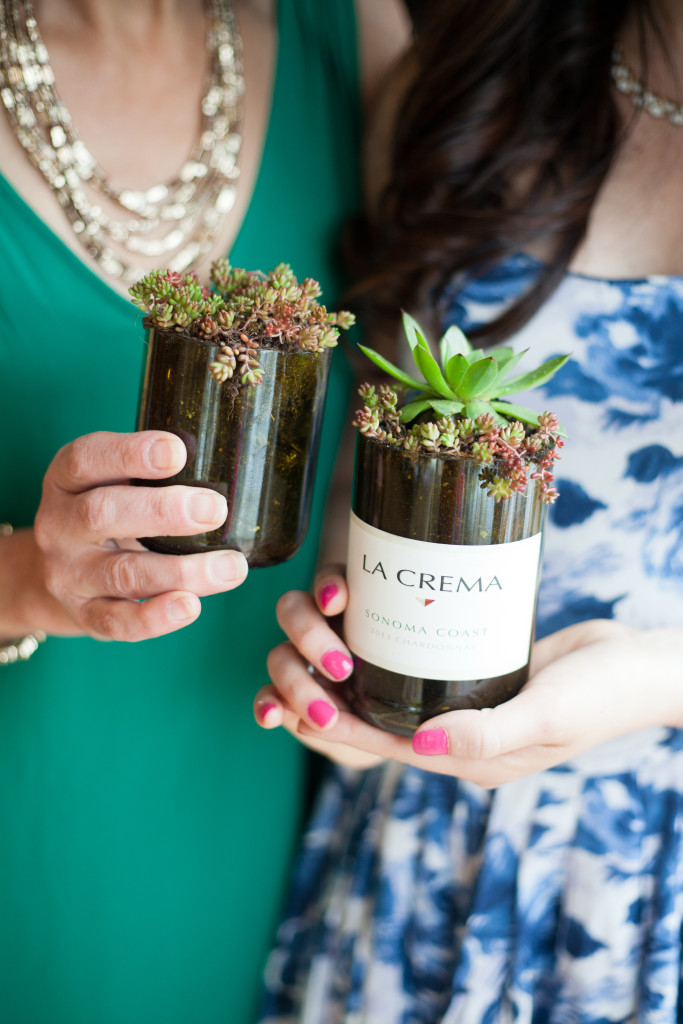
This project is as functional as it is beautiful. It uses capillary action to keep your plants hydrated, making it perfect for those who travel.
Materials Needed:
- •Glass wine bottle
- •Glass cutter tool
- •Sandpaper
- •Small piece of mesh or screen
Step-by-Step Instructions:
- Cut the Bottle: Use a glass cutter to score the bottle about 5 inches from the top. Use the hot/cold water method to snap the glass cleanly.
- Sand: Smooth the sharp edges of both pieces of glass.
- Assemble: Invert the top (neck) of the bottle and place it inside the bottom half.
- Plant: Place a small piece of mesh in the neck to hold the soil, add your plant, and fill the bottom reservoir with water.
Comparison of DIY Projects
| Project Style | Difficulty Level | Time Required | Best For |
|---|---|---|---|
| Hand-Painted | Easy | 1 Hour | Beginners / Kids |
| Concrete Minimalist | Intermediate | 48 Hours | Modern Decor |
| Macramé Hanging | Intermediate | 2 Hours | Small Spaces |
| Mosaic Broken China | Advanced | 5 Hours | Gift Ideas |
| Wine Bottle | Advanced | 2 Hours | Herb Gardens |
Frequently Asked Questions
Do I need to seal my DIY pots?
Yes, especially if you are using terracotta. Terracotta is porous, meaning water can seep through the clay and cause your paint or fabric to bubble or peel. Always use a waterproof sealant on both the inside and outside of the pot.
How do I ensure proper drainage in upcycled containers?
Never plant directly into a container without a hole. If you are using tin cans or plastic, use a hammer and nail or a drill to create at least three holes. If you can’t make a hole (e.g., in glass), use the container as a cachepot—keep the plant in its plastic nursery pot and simply set it inside the decorative one.
What is the best paint for flower pots?
Multi-surface acrylic paint or chalk paint are the best options. They adhere well to various surfaces and offer great color saturation. For a more durable finish on outdoor pots, look for Patio Paint specifically designed for exterior use.
Conclusion
Personalizing your plant collection through DIY flower pot projects is a rewarding way to express your style while practicing sustainability.
From the rustic charm of rope-wrapped containers to the sleek, architectural lines of concrete planters, there is a project suited for every skill level and interior design theme.
By following these tutorials, you’ll not only save money but also create a cohesive, curated look that makes your indoor jungle truly unique.
Grab your supplies and start crafting—your plants will thank you for their stylish new homes!
Leave a Reply