Tired of a cluttered kitchen countertop? These 12 practical DIY storage solutions transform limited space into organized bliss using everyday items and upcycling hacks. From vertical risers to hidden bins, each idea is budget-friendly, customizable, and easy to build in under an hour.
Perfect for small kitchens or busy home cooks, they’ll keep essentials accessible while freeing up room for meal prep.
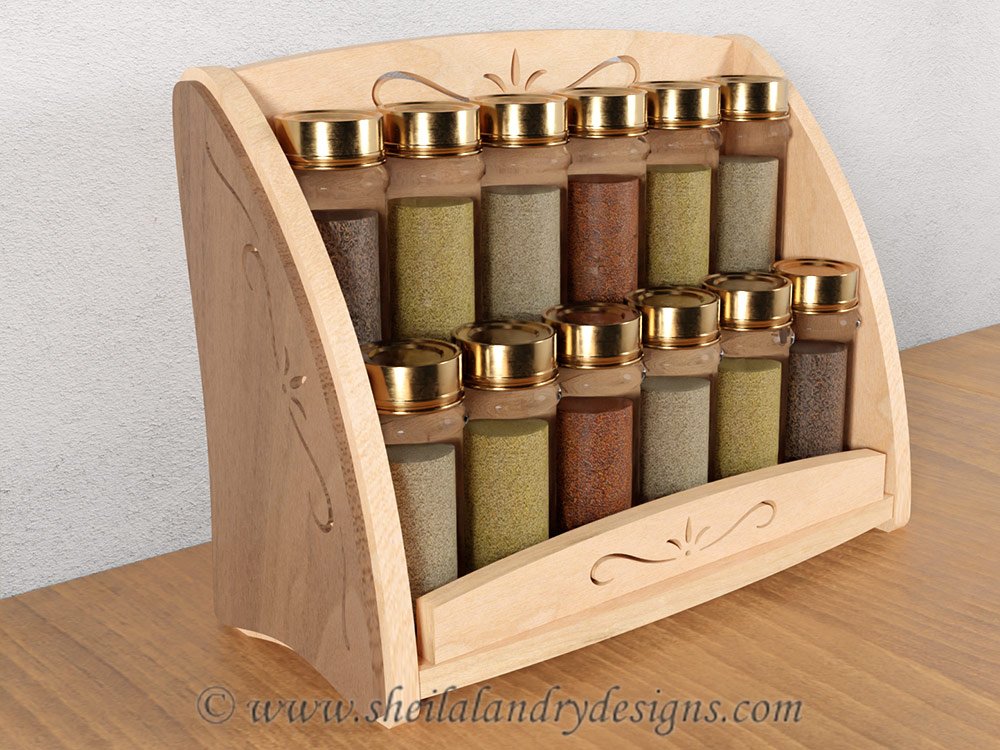
1. DIY Tiered Spice Rack from Wooden Crates
Stack old wooden crates or fruit boxes into a multi-level spice organizer to lift jars off the counter.
Materials Needed:
- 🌿 2-3 small wooden crates (free from grocery stores or $5 each)
- 🌿 Wood glue or screws
- 🌿 Sandpaper
- 🌿 Non-slip shelf liner
Step-by-Step Build:
- Sand crates smooth and wipe clean.
- Stack and glue/screw them at slight angles for stability.
- Line shelves with gripper material to prevent sliding.
- Mount on wall or prop against backsplash.
This upcycled rack holds 20+ spices vertically, saving 70% counter space. Customize with paint for a pop of color.
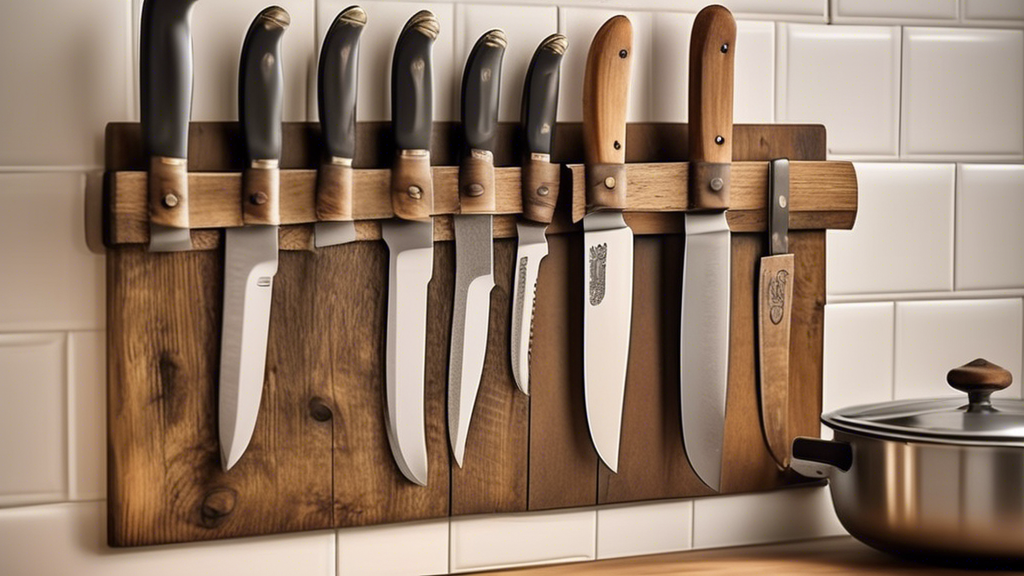
2. Magnetic Knife Strip with Hidden Jar Holders
Mount a magnetic strip for knives and attach baby food jars underneath for herbs or utensils.
Materials Needed:
- 🔪 Magnetic knife bar ($10)
- 🔪 4-6 small glass jars with lids
- 🔪 Strong magnets and epoxy glue
- 🔪 Command strips for renter-friendly install
Step-by-Step Build:
- Glue magnets to jar lids.
- Attach jars upside-down under the strip.
- Stick the bar to the wall above the counter.
Knives stay sharp and off the counter; jars store garlic or toothpicks discreetly. Total cost: under $15.
3. Upcycled Mason Jar Lid Rack
Screw lids to a wooden board for under-counter jar storage, keeping pantry staples handy.

Materials Needed:
- 🫙 1×12-inch wooden board
- 🫙 8-10 mason jar lids
- 🫙 Screws and drill
- 🫙 Stain or paint
Step-by-Step Build:
- Cut board to counter width.
- Screw lids upside-down in rows.
- Stain and hang below cabinets with brackets.
Twist jars on/off for flour, sugar, or utensils. It’s invisible from the counter, reclaiming prime real estate.
4. Lazy Susan Turntable from Thrifted Trays
Revive old cake stands or trays into a rotating organizer for oils and vinegars.
Materials Needed:
- 🌀 Lazy Susan hardware ($5)
- 🌀 2 thrifted trays or plates
- 🌀 Hot glue
Step-by-Step Build:
- Glue hardware between trays.
- Add rubber feet for stability.
- Place on counter corner.
Spin to access items without shuffling—ideal for corner counters. Holds 12+ bottles.
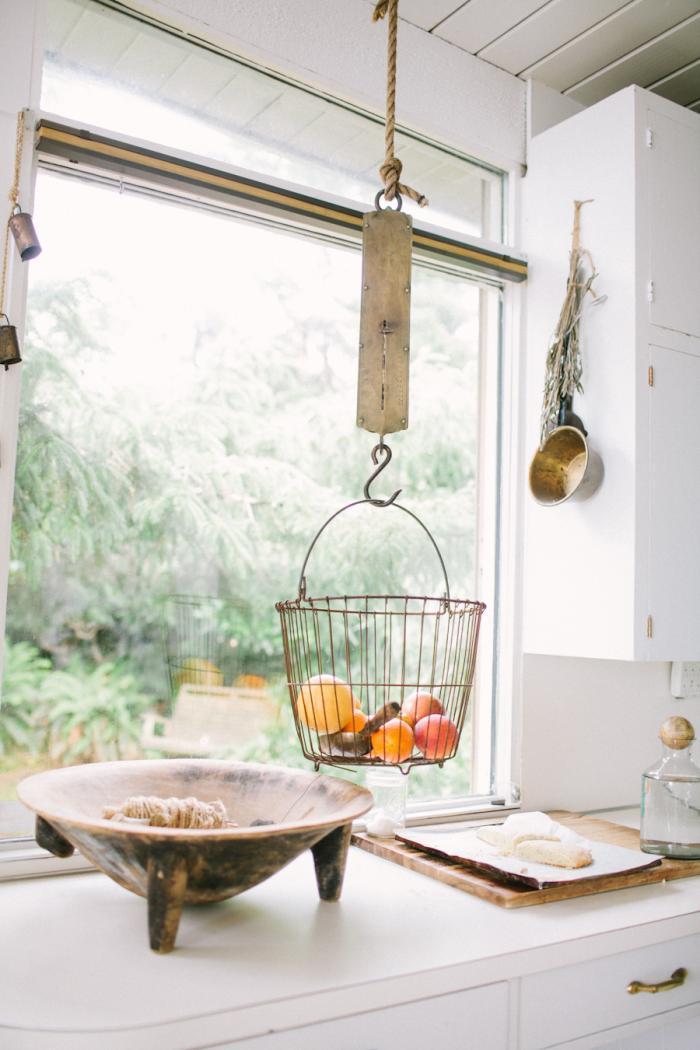
5. Hanging Fruit Basket from Wire Baskets
Suspend wire baskets from cabinet knobs or a tension rod for produce storage.
Materials Needed:
- 🍌 2-3 metal wire baskets ($3 each)
- 🍌 S-hooks or rope
- 🍌 Tension rod (optional)
Step-by-Step Build:
- Link baskets with S-hooks.
- Hang from cabinet doors or rod across sink.
- Line with fabric for delicacy.
Bananas and onions stay fresh off the counter; air circulation prevents spoilage. Renter-approved.
6. Pegboard Wall Organizer
Install a slim pegboard above the counter for pots, utensils, and towels.
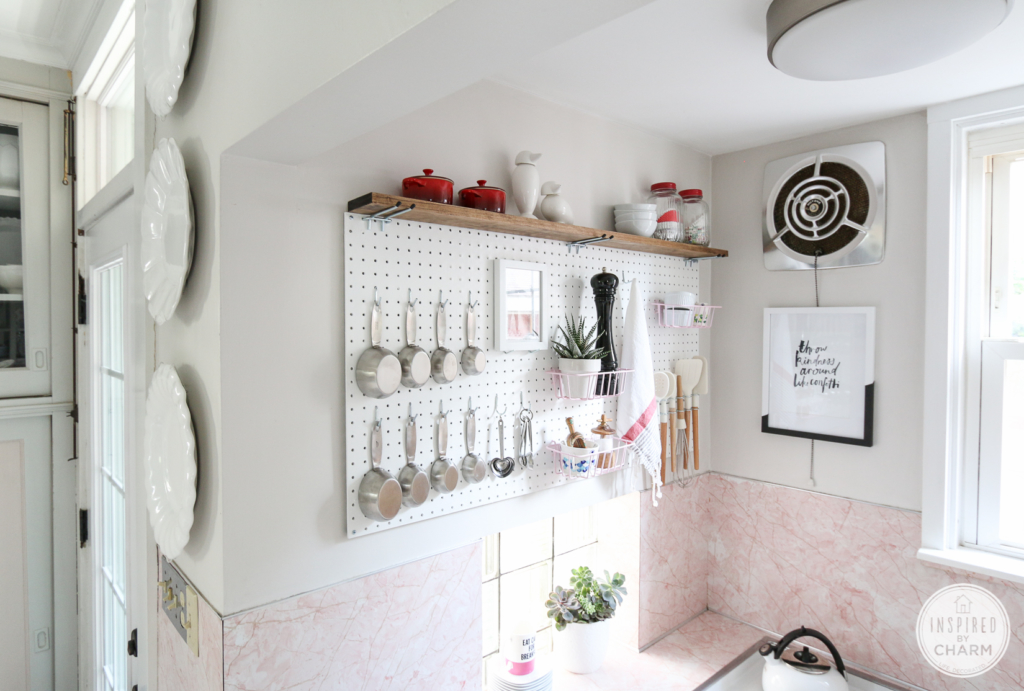
Materials Needed:
- 📋 Pegboard sheet (24×48 inches, $10)
- 📋 Pegs and hooks
- 📋 Frame lumber and paint
Step-by-Step Build:
- Frame and paint pegboard to match cabinets.
- Mount 6 inches above counter.
- Add hooks for hanging gear.
Customizable grid holds 20+ items vertically. Expands storage without countertop footprint.
7. Drawer Dividers from Cardboard Tubes
Slice toilet paper rolls into dividers for countertop utensil trays.
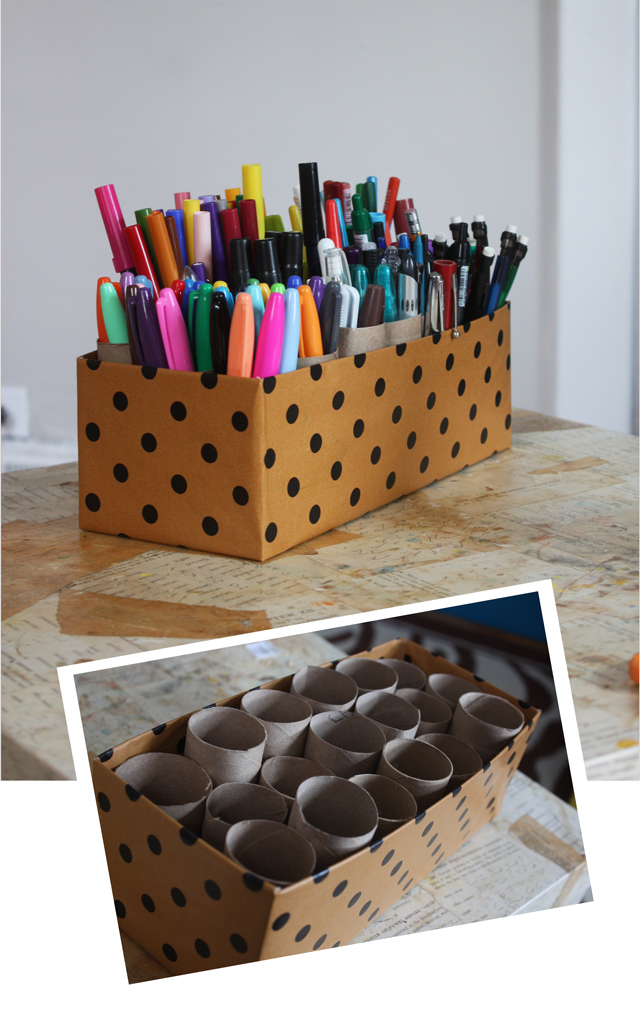
Materials Needed:
- 📦 10-15 cardboard tubes
- 📦 Scissors and duct tape
- 📦 Shallow tray or box
Step-by-Step Build:
- Cut tubes to tray height.
- Tape together in sections.
- Insert into tray for spoons, spatulas.
Zero-cost upcycle sorts chaos into neat zones. Covers a 12×18-inch area perfectly.
8. Under-Sink Tension Rod Lid Holder
Thread pot lids onto a tension rod installed vertically beside the sink.
Materials Needed:
- 🔩 Adjustable tension rod ($8)
- 🔩 Adhesive hooks (optional)
Step-by-Step Build:
- Extend rod to fit cabinet side or wall.
- Slide lids on like a filing system.
- Secure top/bottom if needed.
Frees drawer space; lids grab instantly. Fits 8-10 standard sizes.
9. Wine Rack Bottle Organizer
Repurpose a wooden wine rack for upright oil and vinegar bottles.
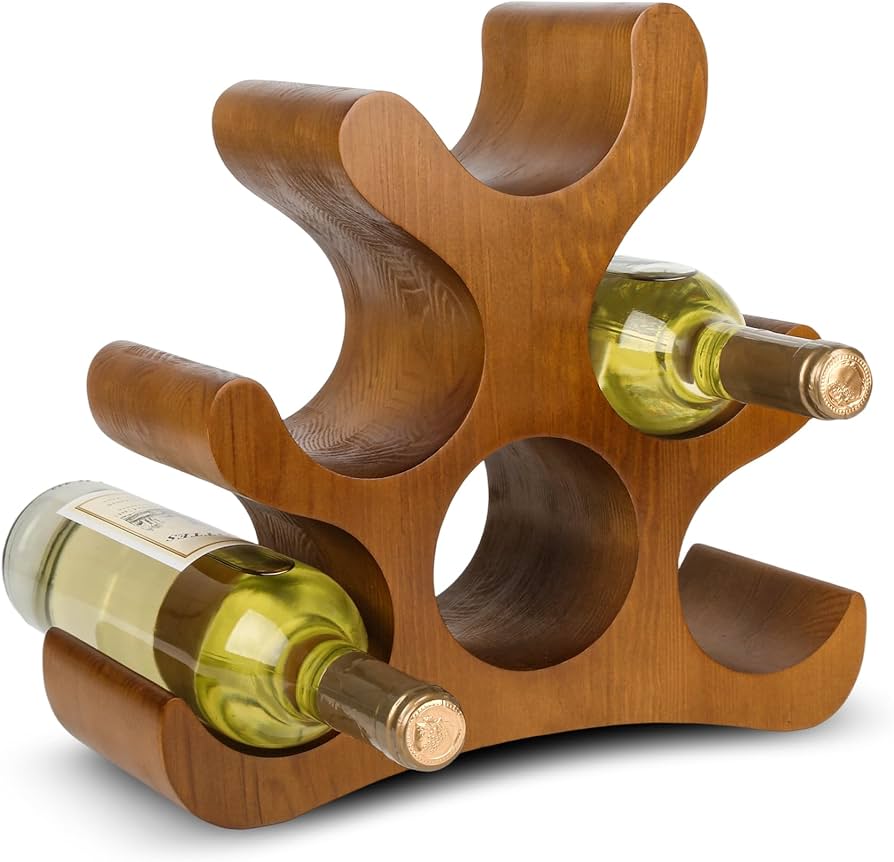
Materials Needed:
- 🍷 Wooden wine rack ($15 or thrift)
- 🍷 Sandpaper and paint
Step-by-Step Build:
- Sand and repaint to match kitchen.
- Place on counter end.
- Add labels for easy ID.
Holds 6-12 bottles stably; prevents tipping. Doubles as a rustic decor piece.
10. Stackable Bamboo Cutlery Trays
Layer bamboo drawer organizers into a countertop caddy for daily tools.

Materials Needed:
- 🎋 3-4 bamboo trays ($20 set)
- 🎋 Velcro strips
Step-by-Step Build:
- Stack and secure with Velcro.
- Label sections.
- Position near stove.
Tiered design accesses forks from top, knives below. Eco-friendly and portable.
11. Canvas Hanging Baskets for Bulk Items
Sew or hook canvas bags to cabinet sides for pasta, rice, or snacks.
Materials Needed:
- 👜 Canvas drop cloths or old tote bags
- 👜 Wooden dowels and screws
- 👜 Staple gun
Step-by-Step Build:
- Cut canvas into pockets.
- Staple to dowel frame.
- Screw above counter.
Soft storage for 5-10 lbs per basket; collapsible when empty. No counter intrusion.
12. Rolling Cart from Castered Shelves
Build a mobile metal shelf unit for appliances like toasters or blenders.
Materials Needed:
- 🚗 Wire shelving unit ($25)
- 🚗 Casters
- 🚗 Bungee cords for securing
Step-by-Step Build:
- Attach casters to base.
- Add shelves for appliances.
- Roll to counter edge as needed.
Tucks away when idle; adds 4 sq ft of storage. Great for apartments.
These hacks use 80% upcycled materials, slashing costs while boosting functionality.
Tailor to your kitchen’s style—rustic crates for farmhouse vibes or sleek bamboo for modern.
FAQ
How can I make these ideas renter-friendly?
Use command strips, tension rods, or over-door hooks instead of screws. Most builds detach cleanly.
What if my counter is tiny?
Prioritize vertical options like #2, #5, or #6—they hug walls without sprawling.
Can I customize colors?
Yes! Chalk paint, stain, or vinyl wraps match any decor. Test on scraps first.
Are these sturdy for heavy items?
For pots over 5 lbs, reinforce with brackets. Lighter items like spices work on all.
How do I maintain these organizers?
Wipe with damp cloth weekly; rotate stock in produce holders to avoid rot.
Conclusion
Implementing these 12 smart kitchen countertop storage ideas will declutter your space, streamline cooking, and add personal flair through DIY creativity.
Start with 2-3 that fit your needs—like the tiered rack for spice hoarders or rolling cart for appliance lovers—and expand from there.
You’ll reclaim hours weekly while enjoying a more efficient, stylish kitchen. Grab your tools and transform today—your counters (and sanity) will thank you!
Leave a Reply