Hand sewing is an accessible, therapeutic, and highly practical skill that allows you to create beautiful home decor and personal accessories without the need for an expensive or bulky sewing machine.
For beginners, hand sewing offers a level of control and precision that is perfect for small-scale projects, upcycling fabric scraps, and mastering the fundamental mechanics of textile construction.
Whether you are looking to repair a favorite garment or create unique, handmade gifts, these 12 easy hand-sewing projects provide the perfect foundation for your crafting journey.
Essential Tools for the Beginner Hand-Sewer
Before diving into the projects, it is important to have a well-organized sewing kit. Unlike machine sewing, hand sewing requires very little overhead.
| Tool | Purpose | Tip for Beginners |
|---|---|---|
| Hand Sewing Needles | Piercing fabric and carrying thread. | Use a “Sharps” needle for general sewing. |
| All-purpose Thread | Holding fabric layers together. | Polyester thread is durable and works for most fabrics. |
| Fabric Scissors | Cutting fabric cleanly without fraying. | Never use your fabric scissors on paper! |
| Pins or Clips | Holding fabric in place before sewing. | Magnetic pin cushions prevent spills. |
| Thimble | Protecting your finger when pushing the needle. | Find one that fits your middle finger snugly. |
| Fabric Marker | Drawing patterns or guidelines. | Use a water-soluble pen or tailor’s chalk. |
1. Minimalist Felt Coasters
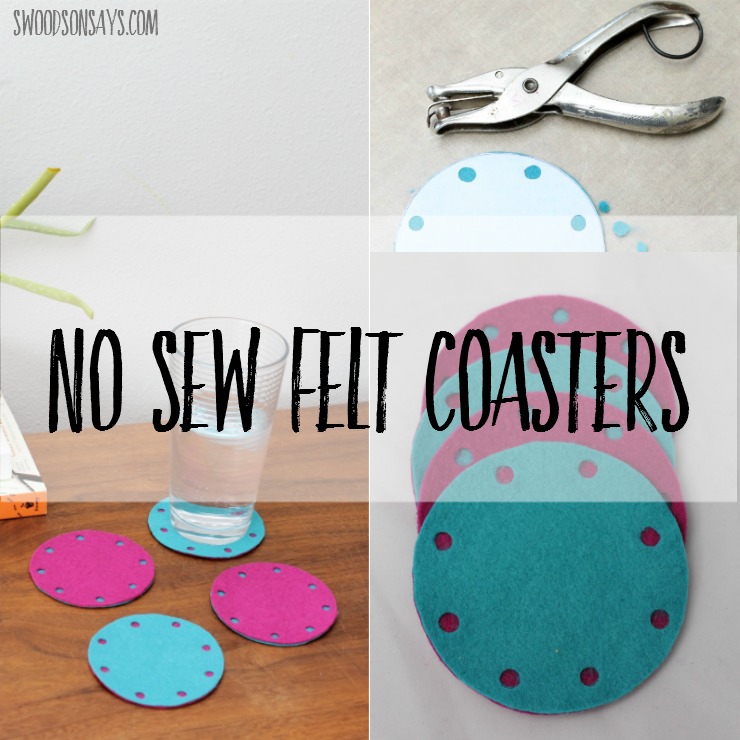
Felt is the ideal fabric for beginners because it does not fray, meaning you do not have to worry about finishing edges. These coasters are both functional and a great way to practice the blanket stitch.
Materials Needed:
- ♥ Wool or synthetic felt sheets
- ♥ Embroidery floss
- ♥ Fabric scissors
Instructions:
- 1 Cut two 4×4 inch squares or circles of felt for each coaster. You can use two different colors for a “sandwich” effect.
- 2 Layer the two pieces together.
- 3 Thread your needle with embroidery floss and tie a knot at the end.
- 4 Begin sewing around the edge using a blanket stitch. This stitch creates a decorative border that locks the two layers together.
- 5 Tie off the thread on the inside of the felt to hide the knot.
2. Dried Lavender Sachets

Lavender sachets are perfect for keeping drawers smelling fresh and make excellent “thinking of you” gifts. This project focuses on the running stitch and the backstitch.
Materials Needed:
- ♥ Cotton fabric scraps (two 5×5 inch squares)
- ♥ Dried lavender buds
- ♥ Funnel (optional)
Instructions:
- 1 Place your fabric squares “right sides” (the pretty sides) together.
- 2 Sew around three sides using a tight backstitch, leaving a 1/4 inch seam allowance.
- 3 On the fourth side, sew only halfway, leaving a small opening.
- 4 Turn the pouch right-side out through the opening. Use a pencil to poke out the corners.
- 5 Fill the pouch with dried lavender.
- 6 Fold the raw edges of the opening inward and close it using a ladder stitch (invisible stitch) for a professional finish.
3. Fabric Scrap Bookmarks
Stop folding the corners of your books! These fabric bookmarks are a great way to use up long, thin strips of fabric left over from other projects.
Materials Needed:
- ♥ Fabric scraps
- ♥ Heavyweight interfacing or cardstock (for stiffness)
- ♥ Needle and thread
Instructions:
- 1 Cut two pieces of fabric (2.5 x 7 inches) and one piece of interfacing (2 x 6.5 inches).
- 2 Iron the interfacing to the wrong side of one fabric piece.
- 3 Place the fabric pieces right sides together and sew around the perimeter, leaving a 2-inch gap on one long side.
- 4 Clip the corners, turn right-side out, and press with an iron.
- 5 Top-stitch around the entire edge using a running stitch to close the gap and add a decorative touch.
4. Classic Hand-Sewn Scrunchies
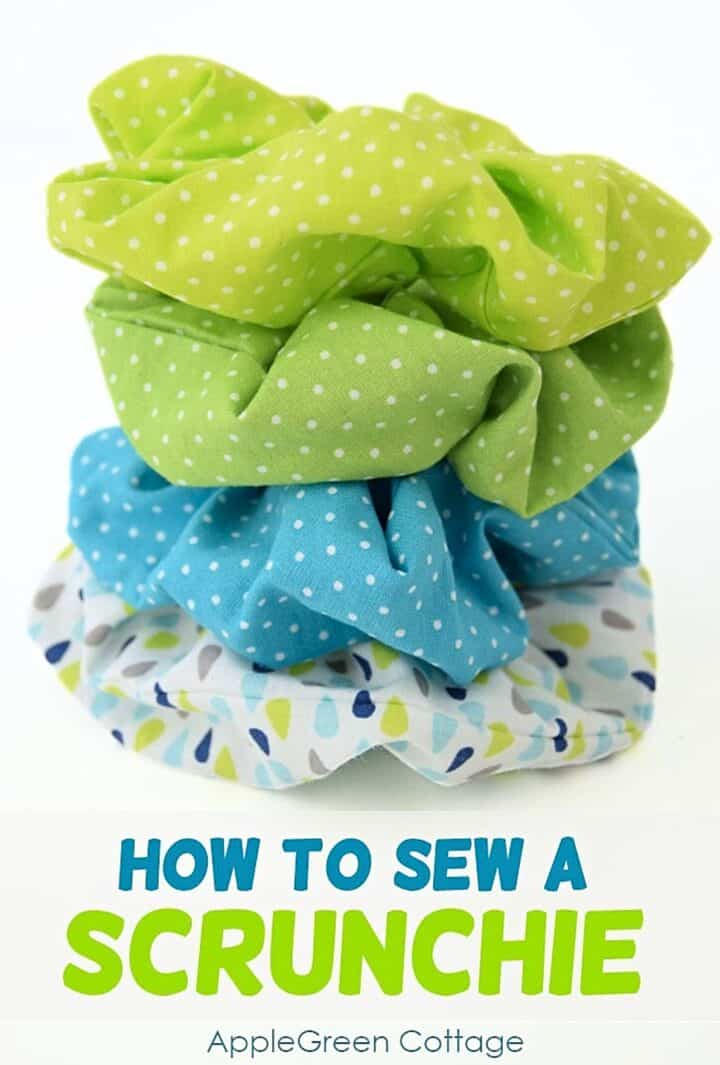
Scrunchies are back in style and are surprisingly easy to make by hand. This project teaches you how to create a fabric tube and work with elastic.
Materials Needed:
- ♥ A strip of fabric (3 x 18 inches)
- ♥ 6-8 inches of thin elastic
- ♥ Safety pin
Instructions:
- 1 Fold the fabric strip in half lengthwise, right sides together.
- 2 Sew a backstitch along the long edge to create a long tube.
- 3 Turn the tube right-side out.
- 4 Attach a safety pin to one end of the elastic and thread it through the tube.
- 5 Tie the two ends of the elastic in a secure knot.
- 6 Tuck one raw end of the fabric tube into the other and sew them together using a whipstitch.
5. Felt Animal Keychains
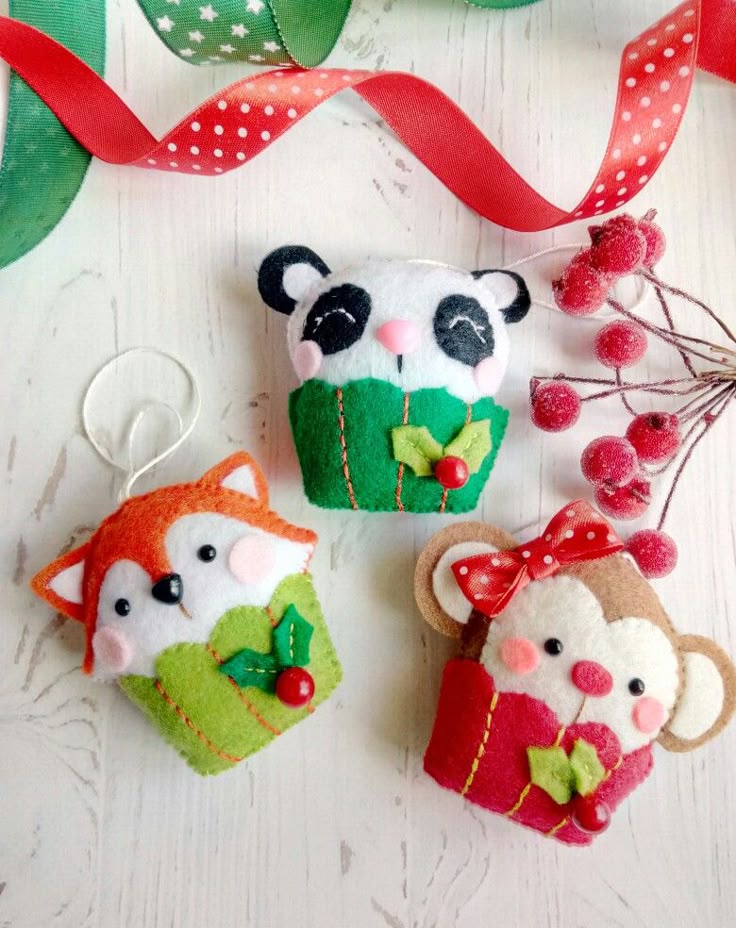
These whimsical keychains are a great way to practice precision cutting and decorative embroidery.
Materials Needed:
- ♥ Felt scraps
- ♥ Keyring hardware
- ♥ Small amount of polyester stuffing (poly-fill)
Instructions:
- 1 Draw a simple shape (like a heart, star, or cat head) on paper to use as a template.
- 2 Cut two pieces of felt using your template.
- 3 Sew on any facial features or decorations (like button eyes) to the front piece first.
- 4 Place the back piece behind the front and sew around the edges using a blanket stitch.
- 5 Before closing the shape, stuff it lightly with poly-fill.
- 6 Insert a small loop of ribbon or felt at the top to hold the keyring, then finish sewing.
6. Leather or Felt Cord Organizers
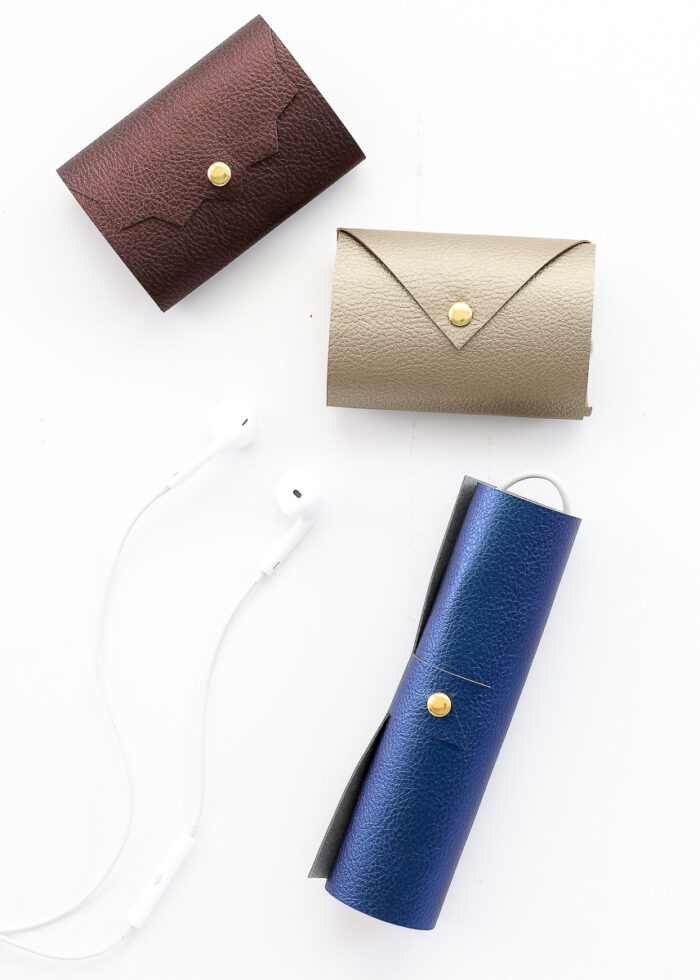
Tangled charging cables are a thing of the past with these simple organizers. While traditionally made of leather, thick felt works just as well for beginners.
Materials Needed:
- ♥ A small scrap of leather or heavy felt (2 x 3 inches)
- ♥ One large button
- ♥ Embroidery thread
Instructions:
- 1 Cut your material into a small rectangle with rounded corners.
- 2 On one end, sew a sturdy button.
- 3 On the opposite end, cut a small slit (buttonhole) just large enough for the button to pass through.
- 4 If using felt, use a buttonhole stitch around the slit to prevent it from stretching over time.
- 5 Wrap your cord, fold the organizer around it, and button it up.
7. Simple Eye Mask for Sleep

Create a spa-like experience at home with a custom-fit eye mask. Choosing a soft fabric like silk or flannel is key here.
Materials Needed:
- ♥ Soft fabric (flannel, silk, or cotton)
- ♥ A piece of batting or fleece (for padding)
- ♥ Elastic (about 12-14 inches)
Instructions:
- 1 Trace a template of an eye mask (you can find these online or trace an existing one).
- 2 Cut two pieces of fabric and one piece of batting.
- 3 Layer them: Batting on the bottom, then the two fabric pieces on top (right sides together).
- 4 Sandwich the ends of the elastic between the fabric layers at the “temple” areas, pointing inward.
- 5 Sew around the edge, leaving a gap at the top.
- 6 Turn right-side out, press, and ladder-stitch the opening closed.
8. Classic Tomato-Style Pincushion
Every sewer needs a pincushion. Making your own is a rite of passage!
Materials Needed:
- ♥ Two circles of fabric (approx. 5 inches diameter)
- ♥ Stuffing
- ♥ Strong thread or embroidery floss
Instructions:
- 1 Sew the two circles right sides together, leaving a small opening.
- 2 Turn right-side out and stuff firmly with poly-fill or wool scraps.
- 3 Sew the opening shut.
- 4 Take a long piece of embroidery floss and wrap it around the cushion, pulling tight to create “sections” like a pumpkin or tomato. Tie off in the center.
9. Button Art and Embellishment
Sometimes the best sewing project is not making something from scratch, but elevating something that already exists.
Materials Needed:
- ♥ A plain pillowcase or tote bag
- ♥ Assorted buttons
- ♥ Needle and thread
Instructions:
- 1 Sketch a simple design (like a tree or an initial) on your fabric.
- 2 Practice the “cross” or “parallel” method of sewing buttons along the lines of your design.
- 3 Ensure you are securing the knots on the back of the fabric so the buttons do not dangle.
10. Rice-Filled Hand Warmers

These are wonderful for winter. They can be popped in the microwave for 30 seconds to provide reusable warmth.
Materials Needed:
- ♥ 100% Cotton fabric (do not use synthetic fabrics, as they may melt in the microwave)
- ♥ Uncooked rice
Instructions:
- 1 Cut two 4×4 inch squares of cotton.
- 2 Sew three and a half sides with a very tight backstitch (you do not want rice leaking!).
- 3 Turn right-side out and fill with rice using a funnel.
- 4 Sew the final gap closed with a double-reinforced ladder stitch.
11. Reusable Cotton Rounds
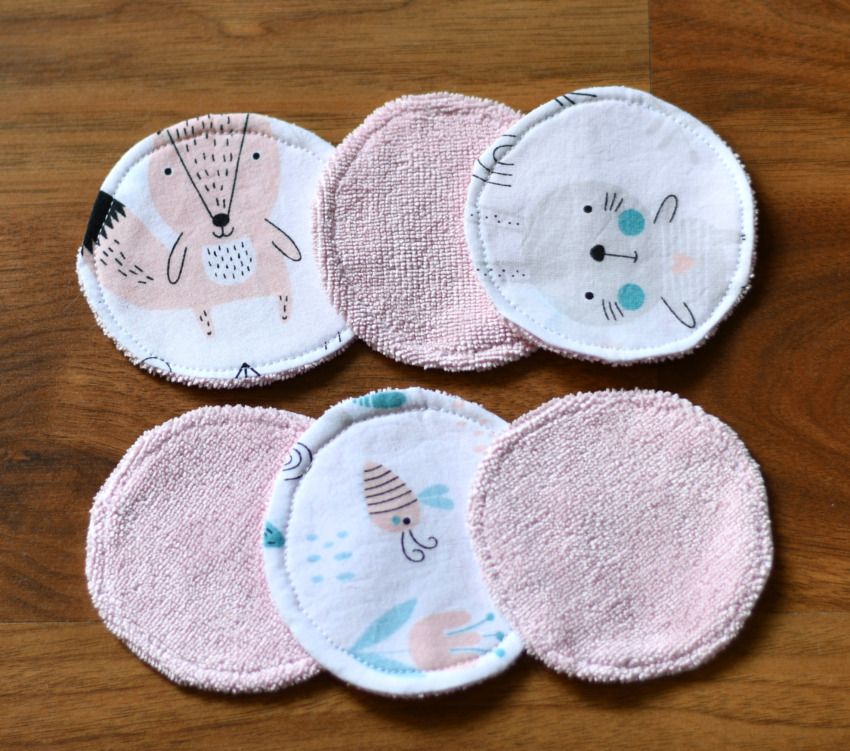
Reduce waste in your beauty routine by sewing your own makeup remover pads.
Materials Needed:
- ♥ Scraps of soft flannel or terry cloth (old towels work great!)
- ♥ Thread
Instructions:
- 1 Cut 3-inch circles out of your fabric.
- 2 Layer two circles together.
- 3 Since these will be washed frequently, use a very tight whipstitch or blanket stitch around the entire edge to prevent fraying.
- 4 Make a set of seven—one for every day of the week!
12. Mini Drawstring Pouch

This project is slightly more advanced but very rewarding. It is perfect for holding jewelry or dice.
Materials Needed:
- ♥ Two rectangles of fabric (5 x 7 inches)
- ♥ Ribbon or twine
Instructions:
- 1 Fold the top 1 inch of each rectangle down (wrong sides together) and sew a straight line across to create a “channel” for the string.
- 2 Place the two rectangles right sides together.
- 3 Sew around the sides and bottom, being careful not to sew the channels shut.
- 4 Turn right-side out.
- 5 Thread your ribbon through the channels using a safety pin. Tie the ends of the ribbon together.
Mastering the Basic Stitches
To succeed in these projects, you only need to master three primary stitches:
- ♥ Running Stitch: The simplest stitch. Weave the needle in and out of the fabric at regular intervals. Best for seams that do not take much strain.
- ♥ Backstitch: The strongest hand stitch. For every stitch forward, you bring the needle back to the end of the previous stitch. This mimics a machine stitch.
- ♥ Ladder Stitch: Used to close openings from the outside. It creates an invisible seam, perfect for pillows and stuffed items.
Frequently Asked Questions
What is the best fabric for a complete beginner?
Felt is the gold standard for beginners. It is sturdy, easy to needle, and does not fray at the edges. Once you are comfortable with felt, move on to woven cotton (like quilting cotton).
Do I need a thimble?
While not strictly necessary for thin fabrics, a thimble is highly recommended when sewing through multiple layers or thicker materials like denim or leather. It prevents the back of the needle from bruising your fingertip.
How long should my thread be?
A common mistake is using a thread that is too long. Aim for a length about the distance from your fingertips to your elbow (roughly 18–24 inches). Longer threads are prone to tangling and knotting.
Can I wash hand-sewn items?
Yes, but be gentle. Hand-sewn seams are generally not as tight as machine seams. Hand-washing or using a delicate cycle in a mesh laundry bag will help your projects last longer.
Conclusion
Hand sewing is more than just a utility; it is a creative outlet that allows you to slow down and create something tangible.
By starting with these 12 simple projects, you will build the “muscle memory” needed for more complex tailoring and embroidery in the future. Remember that imperfection is part of the charm of handmade goods.
Grab a needle, some thread, and a few fabric scraps, and begin your journey into the rewarding world of hand sewing today.
Leave a Reply