Penguin crafts are the perfect remedy for a slow, uninspired afternoon. These flightless birds are naturally charming, making them a favorite subject for DIY enthusiasts of all ages.
Whether you are looking to upcycle household waste like egg cartons and plastic bottles or you want to create sophisticated home decor using felt and stone, penguin-themed projects offer a versatile range of textures and techniques.
By focusing on simple geometric shapes—circles for bellies and triangles for beaks—you can transform everyday materials into a colony of tuxedo-clad friends that brighten up any room.
Before diving into the specific projects, it is helpful to have a crafting kit ready. Most of these tutorials utilize common household items, emphasizing the beauty of upcycling and sustainable crafting.
Essential Crafting Supplies for Penguin Projects
| Material | Common Use | Substitutes |
|---|---|---|
| Acrylic Paint | Base colors (Black, White, Orange) | Tempera paint or permanent markers |
| Cardstock/Felt | Wings, beaks, and feet | Construction paper or old fabric scraps |
| Googly Eyes | Adding personality and character | Buttons or dots of black paint |
| Hot Glue/Tacky Glue | Securing heavy materials | School glue (requires longer drying time) |
| Recyclables | Bodies (Bottles, rolls, cartons) | Cardboard tubes or clean jars |
1. Upcycled Egg Carton Penguins
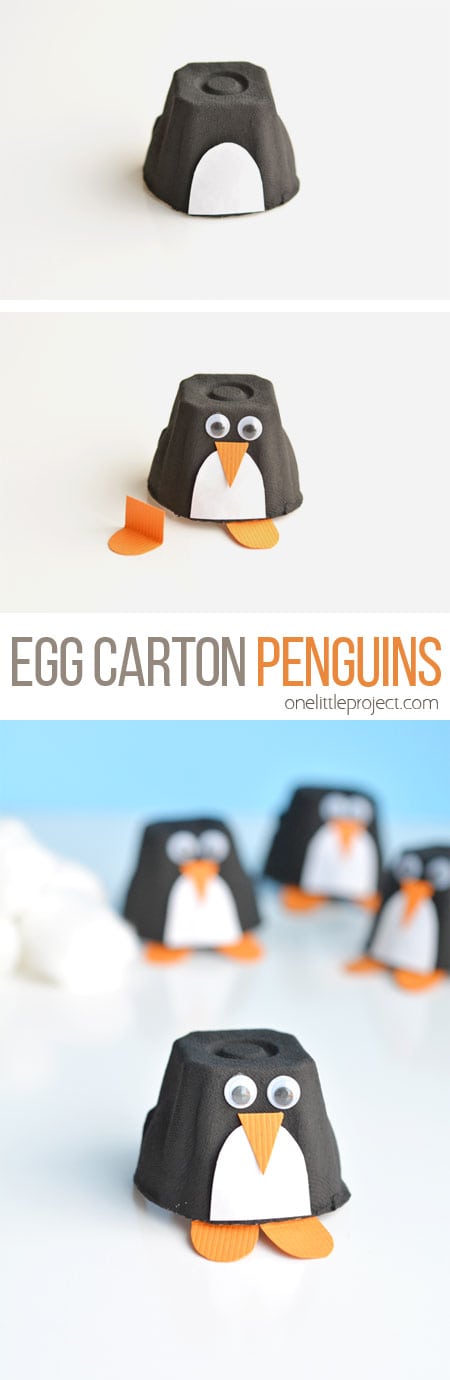
Egg cartons are one of the most versatile materials in the upcycling world. Their natural humps provide a sturdy, rounded base that perfectly mimics the stout body of a penguin.
This project is excellent for teaching children about 3D shapes while creating a durable little figurine.
Materials Needed:
- • Cardboard egg carton
- • Black and white acrylic paint
- • Orange construction paper
- • Small googly eyes
Step-by-Step Instructions:
- 1 Prep the Base: Cut out an individual cup from the egg carton. Trim the edges so it sits flat on a table.
- 2 Paint: Apply a solid coat of black paint to the entire exterior. Once dry, paint a white U shape on the front to represent the belly.
- 3 Features: Cut a tiny triangle from orange paper for the beak and two small heart shapes for the feet.
- 4 Assemble: Glue the beak and eyes to the upper half of the white section. Glue the feet to the bottom inside rim so they peek out.
2. Toilet Paper Roll Penguins
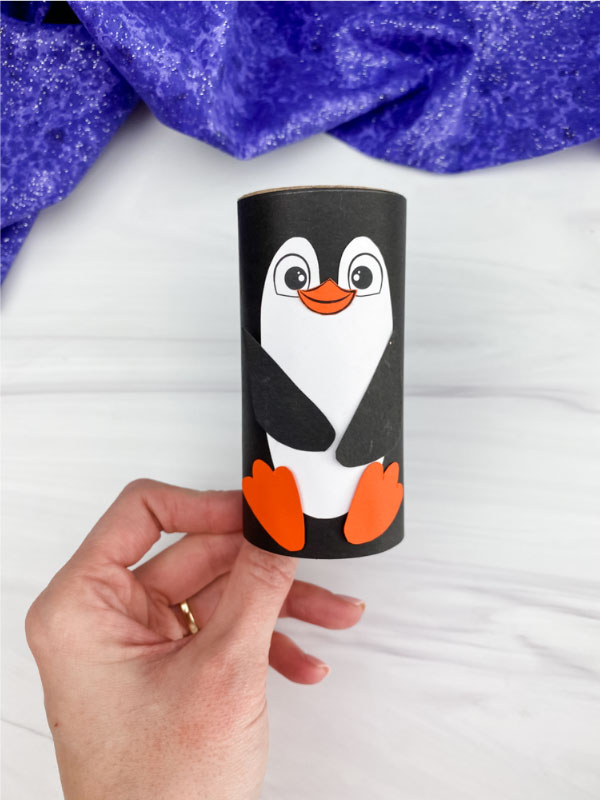
The toilet paper roll penguin is a classic for a reason. It is virtually free to make and offers a large canvas for decoration.
You can customize these by adding scarves made of ribbon or earmuffs made of pipe cleaners and pom-poms.
Materials Needed:
- • Empty toilet paper rolls
- • Black construction paper (or black paint)
- • Cotton balls (optional for texture)
- • Scrap ribbon
Step-by-Step Instructions:
- 1 Cover the Roll: Either paint the roll black or wrap it in black construction paper, tucking the excess into the ends.
- 2 The Belly: Cut an oval out of white paper and glue it to the center of the roll. For a 3D effect, you can glue flattened cotton balls onto the white oval.
- 3 The Wings: Cut two elongated oval shapes from black paper. Glue them to the sides, slightly angled forward.
- 4 Accessories: Tie a small piece of ribbon around the neck area to give your penguin a cozy winter look.
3. Painted Pebble Penguins

If you enjoy rock painting, these penguin pebbles make for fantastic paperweights or garden decor.
The key here is finding the right shape—look for smooth, oval stones with a flat base so they can stand upright or lay flat attractively.
Materials Needed:
- • Smooth river stones
- • Acrylic paint pens (Posca pens work best)
- • Clear varnish or sealant
Step-by-Step Instructions:
- 1 Base Coat: Wash the stone to remove dirt. Paint the entire stone black.
- 2 The Tuxedo: Use a white paint pen to draw a large 8 shape or a wide oval on the front.
- 3 Details: Add two black dots for eyes within the white area, and a bright orange triangle for the beak.
- 4 Seal: Once the paint is completely dry, apply a clear coat of varnish. This gives the penguin a professional, glossy finish and protects the paint from chipping.
4. Popsicle Stick Penguin Ornaments
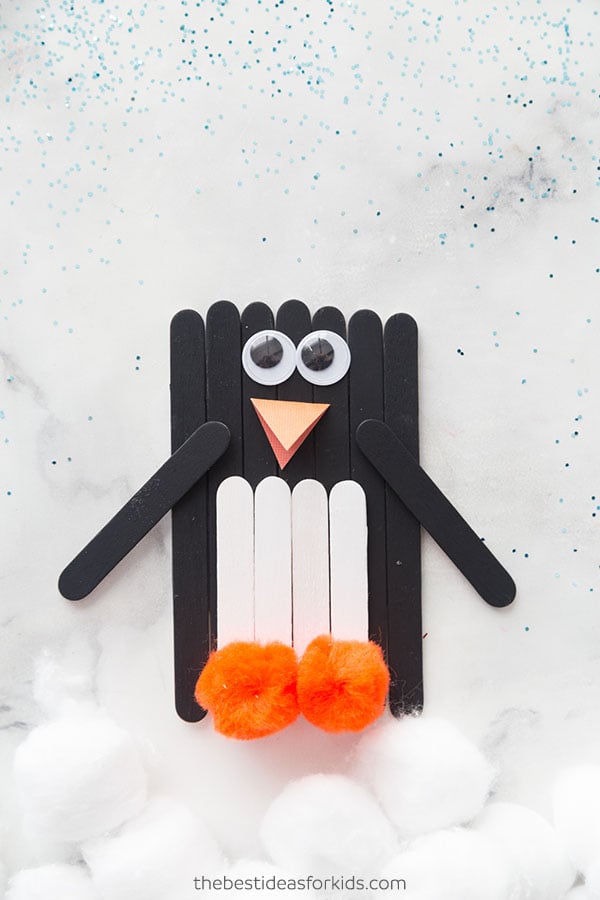
Popsicle sticks (or craft sticks) allow for a more geometric, folk-art style of crafting. These are flat, making them perfect to use as bookmarks or holiday ornaments.
Materials Needed:
- • 3-5 Jumbo craft sticks
- • Black and white paint
- • Yellow felt
- • Twine for hanging
Step-by-Step Instructions:
- 1 Create the Body: Glue three craft sticks together side-by-side by gluing a smaller piece of stick horizontally across the back.
- 2 Paint Design: Paint the outer sticks black and the center stick white (or paint a white arch across all three).
- 3 The Face: Glue eyes and a felt beak at the top.
- 4 Finishing Touch: Glue a loop of twine to the back if you wish to hang it up.
5. Felt Penguin Hand Puppets
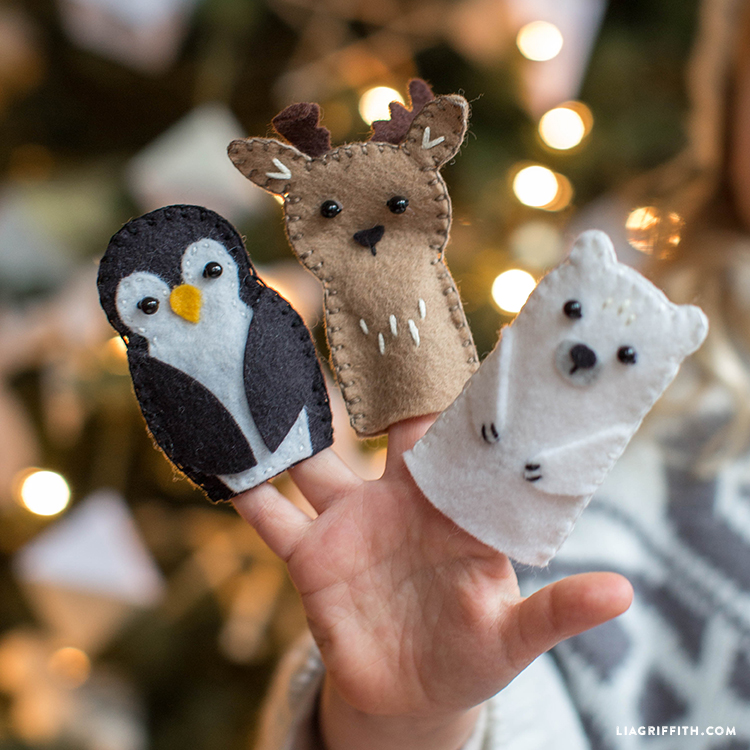
For those who enjoy sewing or working with soft textures, felt is an ideal medium. This project moves beyond static decor into the realm of interactive play.
Materials Needed:
- • Black, white, and orange felt sheets
- • Embroidery floss or fabric glue
- • Puppet template (bell shape)
Step-by-Step Instructions:
- 1 Cut the Pattern: Cut two large bell shapes from black felt. Cut one smaller white oval for the belly.
- 2 Attach the Belly: Sew or glue the white oval onto one of the black pieces.
- 3 Join the Body: Place the two black pieces together. Stitch around the perimeter, leaving the bottom open for your hand.
- 4 Add Character: Glue on felt wings to the sides and a small orange triangle for the beak.
6. Cotton Ball Penguin Collage
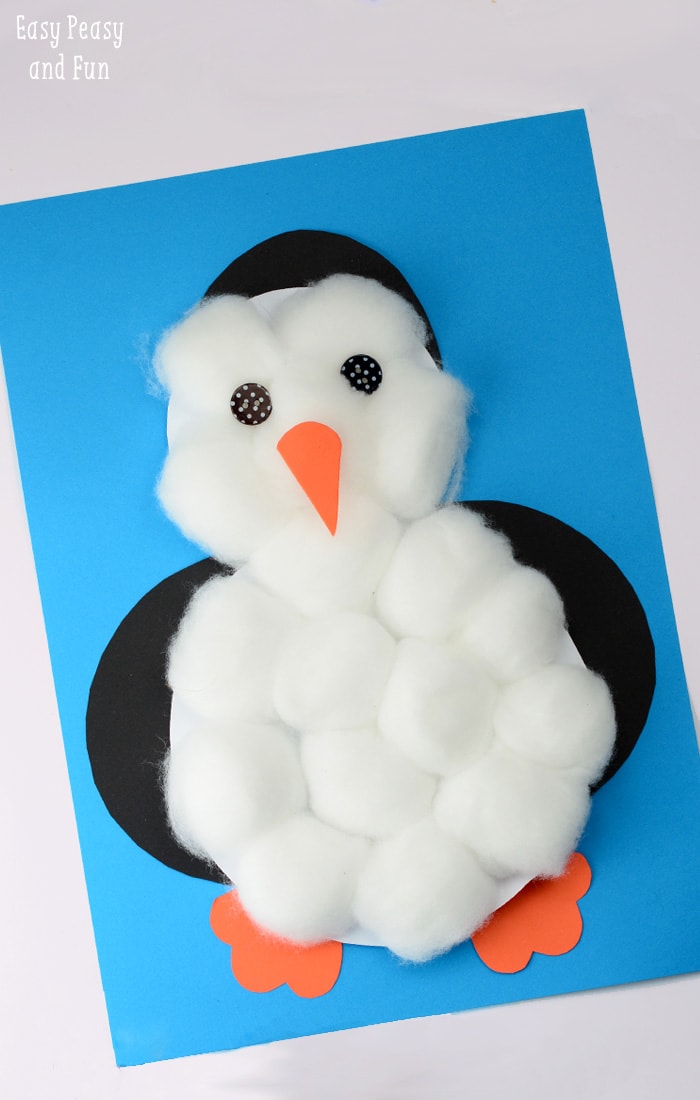
This is a sensory-rich craft that is particularly satisfying because of the contrast between the soft cotton and the slick paper.
It’s a great low-stress project for a quiet afternoon.
Materials Needed:
- • Blue cardstock (for the background)
- • Bag of cotton balls
- • Black markers
- • Glue
Step-by-Step Instructions:
- 1 Outline: Draw a large penguin silhouette on the blue cardstock.
- 2 Fill the Belly: Apply glue inside the belly area and press cotton balls down until it is fluffy and white.
- 3 The Frame: Color the rest of the penguin’s body (head and wings) with a thick black marker or black paint.
- 4 Environment: Use leftover cotton balls at the bottom of the page to create snow or icebergs.
7. Pinecone Penguins
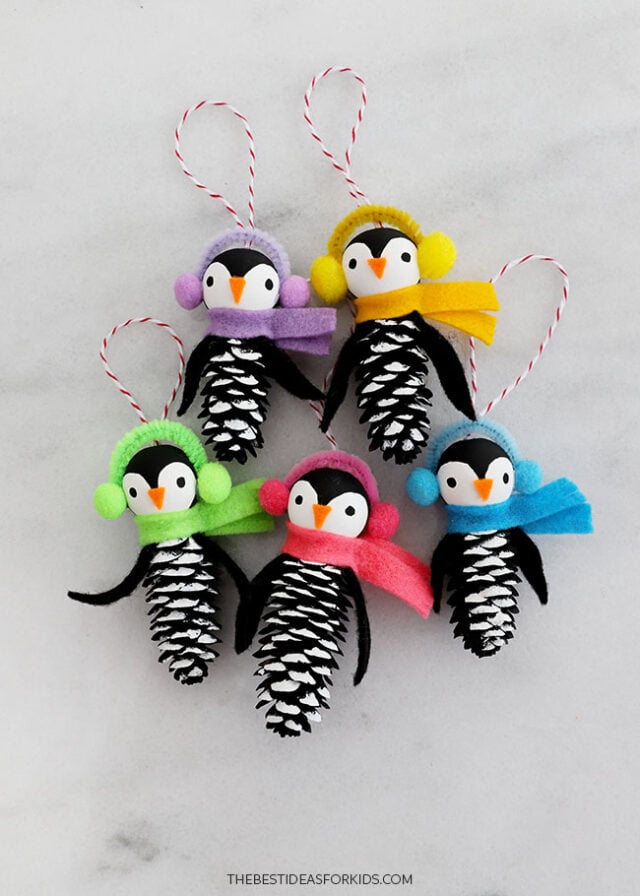
Integrating natural elements into your crafts adds a rustic, high-end feel. Pinecones have a scale-like texture that mimics ruffled feathers beautifully.
Materials Needed:
- • Large pinecones
- • White felt or cotton batting
- • Black wooden bead (for the head)
- • Hot glue
Step-by-Step Instructions:
- 1 Clean the Pinecone: Ensure the pinecone is dry and free of debris.
- 2 The Feathers: Stuff small tufts of white felt or cotton between the scales on the front side of the pinecone to create a snowy white chest.
- 3 The Head: Glue a large black bead or a small black pom-pom to the top of the pinecone.
- 4 Accents: Add tiny orange felt feet to the bottom scales so the penguin stands steady.
8. Plastic Bottle Penguin Planters
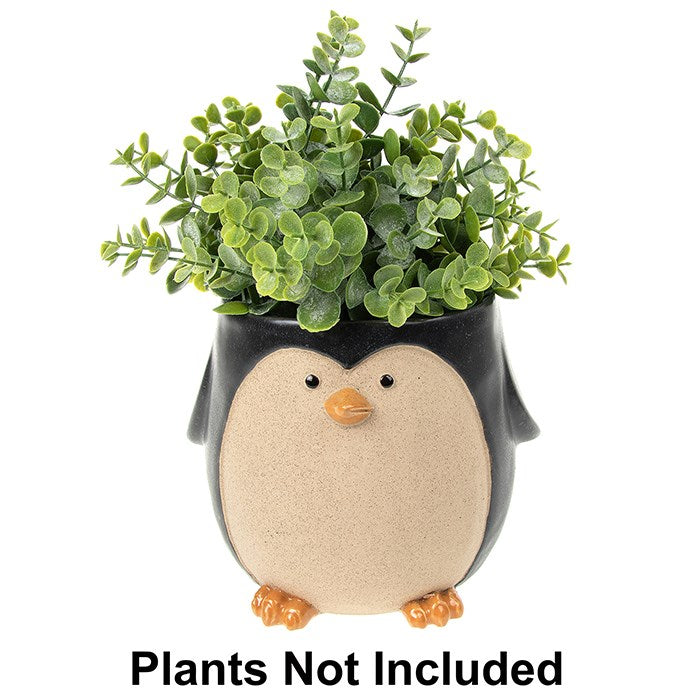
This is a functional upcycling project. By using the bottom half of a 2-liter soda bottle, you create a waterproof container perfect for small succulents or herbs.
Materials Needed:
- • 2-liter plastic bottle
- • Cutter or heavy-duty scissors
- • Glossy spray paint (Black and White)
- • Potting soil and a small plant
Step-by-Step Instructions:
- 1 Cut: Cut the bottle about 5 inches from the bottom. If you’re feeling creative, cut two little ear humps into the rim.
- 2 Paint: Spray the entire exterior black. Once dry, use a brush to paint a large white tuxedo front.
- 3 Face: Draw on the eyes and beak with permanent markers.
- 4 Plant: Poke small drainage holes in the bottom, add soil, and transplant your succulent.
9. Paper Plate Movable Penguins
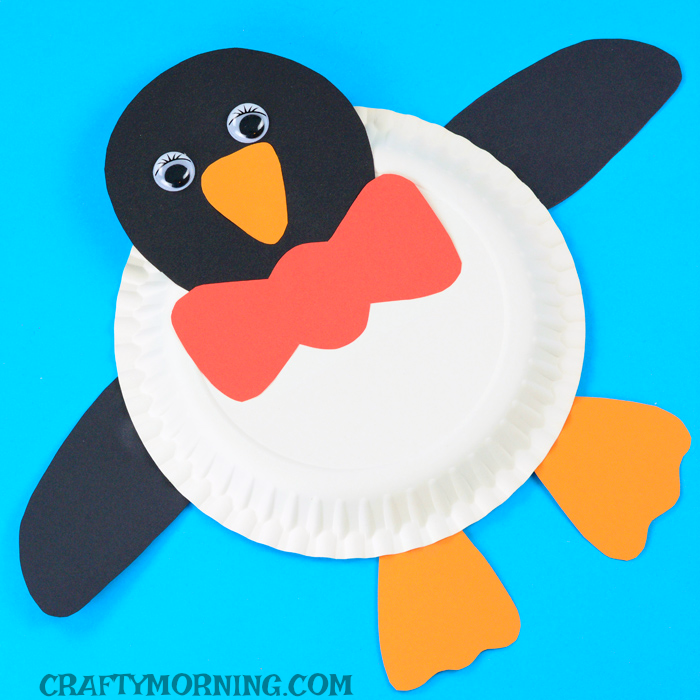
Paper plates are a staple of DIY crafting because they are inexpensive and easy to manipulate.
This version uses the natural curve of the plate to create a rocking motion.
Materials Needed:
- • Standard paper plate
- • Black paint
- • Stapler
- • Orange cardstock
Step-by-Step Instructions:
- 1 Fold: Fold the paper plate in half to create a semi-circle.
- 2 Paint: Paint the outside of the folded plate black, leaving a white circle in the middle for the belly.
- 3 Wings: Cut two triangles from the edges of another plate, paint them black, and staple them to the sides.
- 4 Rocking Action: Because the bottom is curved, you can tap the penguin and watch it waddle back and forth on your desk.
10. Origami Penguin Bookmarks
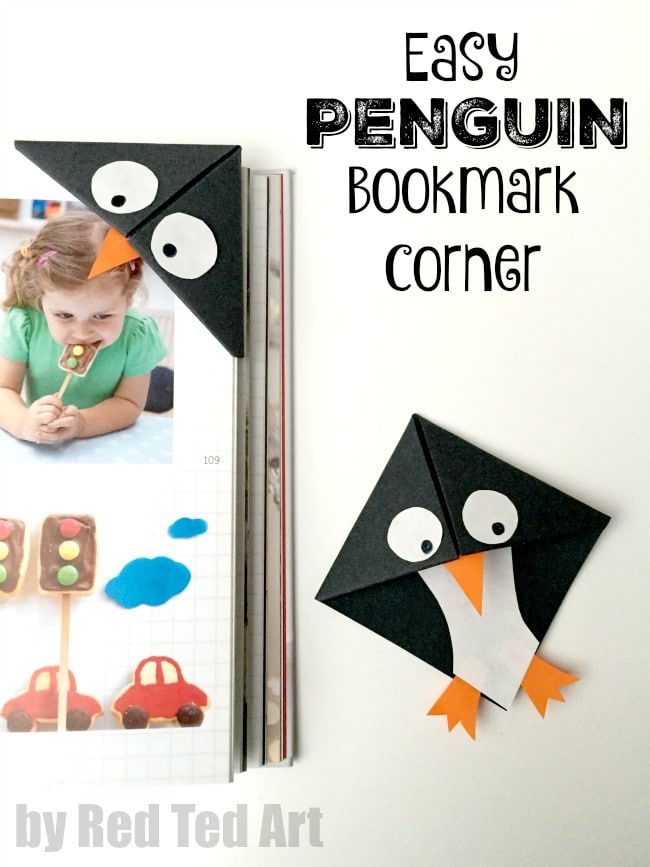
For those who prefer a no-mess craft, origami is the answer. These corner bookmarks are practical and make great gifts for fellow bookworms.
Materials Needed:
- • Square piece of black origami paper (white on the reverse side)
- • Orange marker
Step-by-Step Instructions:
- 1 The Base: Fold the square diagonally to create a triangle.
- 2 The Pocket: Fold the bottom corners up to the top peak, then unfold. Fold the top layer of the peak down to the bottom edge to create a pocket.
- 3 The Tuck: Tuck the side corners into the pocket you just created.
- 4 The Reveal: Fold a small portion of the top head down to reveal the white underside of the paper. Draw a beak and eyes on this white section.
Frequently Asked Questions
What is the best glue for penguin crafts?
For paper-based crafts (like the toilet paper roll or egg carton), a standard white school glue or a glue stick is sufficient. However, for heavier upcycling projects involving plastic bottles or pinecones, a low-temperature hot glue gun or tacky glue provides a much stronger, more immediate bond.
Can I make these crafts waterproof?
If you are making the painted pebbles or the plastic bottle planters, you should use acrylic paint and finish with a clear acrylic sealer (spray or brush-on). This prevents moisture from peeling the paint and allows you to place your creations outdoors or near plants.
How can I make these crafts more eco-friendly?
Focus on the upcycling aspect. Instead of buying new felt, use old t-shirts or mismatched socks. Instead of plastic googly eyes, use buttons from old clothing or simply draw the eyes with a biodegradable marker.
Conclusion
Penguin crafts are an exceptional way to spend a boring afternoon because they combine simplicity with high-impact results.
From the rustic charm of a pinecone penguin to the functional utility of a soda bottle planter, these projects prove that you don’t need expensive supplies to create something beautiful.
By using materials you already have around the house, you’re not just making art—you’re practicing sustainability. So, clear off your crafting table, grab some black and white paint, and start building your own Antarctic colony today!
Leave a Reply