Leaf art is one of the most sustainable and cost-effective ways to bring the organic beauty of the outdoors into your home.
By utilizing fallen foliage, you can create high-end gallery-style decor, functional household items, and intricate gifts with minimal financial investment.
Whether you are using vibrant autumn maples or structural evergreen ferns, leaf art celebrates the unique textures and silhouettes found in nature.
The Foundation: How to Preserve Leaves for Crafting
Before diving into specific projects, you must ensure your organic materials are properly prepared.
Fresh leaves contain moisture that leads to rot, curling, and mold if not handled correctly.
Pressing Leaves
The most common method is the heavy-book technique. Place your leaves between two sheets of parchment paper and tuck them inside a heavy encyclopedia or phone book.
Wait 7–10 days until the moisture is completely gone and the leaf is flat and brittle.
Glycerin Bath
If you want your leaves to remain supple and flexible rather than brittle, use a glycerin bath.
Mix one part vegetable glycerin with two parts lukewarm water. Submerge the leaves for 3–5 days. They will absorb the glycerin, turning slightly darker but remaining soft to the touch.
Waxing
Dipping leaves in melted paraffin wax creates a protective coating that preserves their color for several months.
This is ideal for temporary seasonal decor like garlands.
1. Minimalist Framed Pressed Leaf Gallery

A minimalist gallery wall using pressed leaves is a timeless decor staple.
This project focuses on the botanical silhouette and works best with “hero” leaves like Monstera, Ferns, or Ginko.
Materials Needed:
- Pressed, dried leaves
- Floating glass frames
- Acid-free adhesive dots
- Tweezers
Step-by-Step Instructions:
- 1Selection: Choose leaves with interesting shapes. Ensure they are completely flat from the pressing process.
- 2Cleaning: Gently wipe the glass of your floating frame to remove fingerprints.
- 3Placement: Use tweezers to place the leaf in the center of the glass. Apply a tiny adhesive dot to the back of the thickest part of the stem.
- 4Sealing: Carefully place the top layer of glass over the leaf. The pressure will hold the leaf in place, creating a “floating” effect against your wall.
2. Metallic Gilded Leaf Art
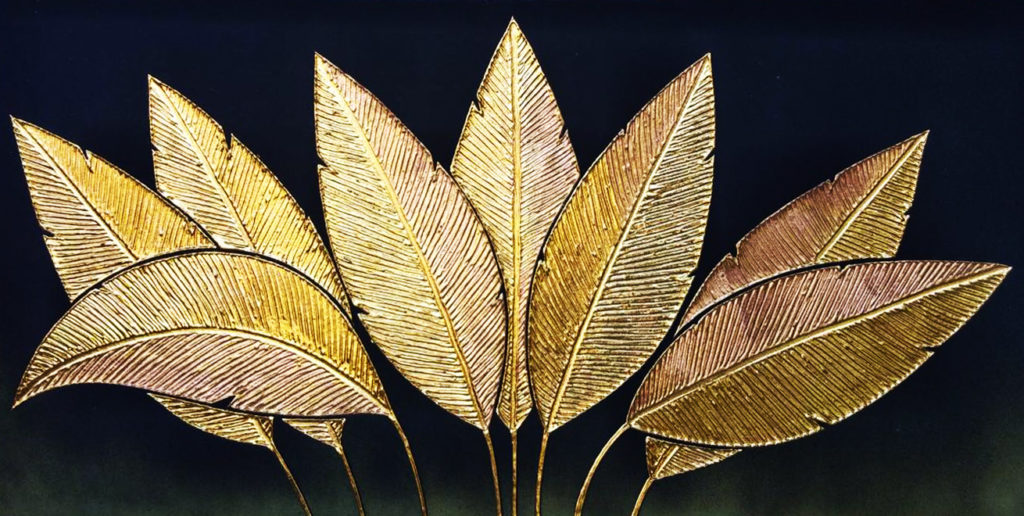
Transform ordinary brown leaves into high-end metallic accents.
This project is perfect for creating sophisticated table scatter or framed 3D art.
Materials Needed:
- Dried, sturdy leaves (Oak or Magnolia work well)
- Gold, silver, or copper leafing kits or metallic spray paint
- Soft-bristle brush
Step-by-Step Instructions:
- 1Priming: If using spray paint, lay leaves on a drop cloth and apply two thin coats.
- 2Gilding: If using gold leaf sheets, apply a thin layer of gilding size (adhesive) to the leaf. Wait for it to become tacky.
- 3Application: Gently lay the gold leaf sheet over the leaf and use a dry, soft brush to buff away the excess.
- 4Display: Place these in a shadow box or use them as elegant place cards for a dinner party.
3. Delicate Leaf Skeleton Art
Skeletonizing a leaf removes the “flesh” (chlorophyll and pulp), leaving behind the intricate vascular structure.
It looks like delicate lace and is a true conversation starter.
Materials Needed:
- Fresh leaves (Waxy leaves like Magnolia or Ivy work best)
- Washing soda (Sodium Carbonate)
- Water
- Soft toothbrush
Step-by-Step Instructions:
- 1Simmer: Boil 2 cups of water with 1/2 cup of washing soda. Add the leaves and simmer for 30–90 minutes.
- 2Rinse: Gently remove a leaf and rinse in cool water.
- 3Brush: Use a toothbrush to very gently tap and brush away the softened green pulp. The “skeleton” will remain.
- 4Bleach (Optional): Soak in a 1:10 bleach/water solution for 20 minutes to make them bright white.
4. Hapa Zome (Hammered Leaf Prints)
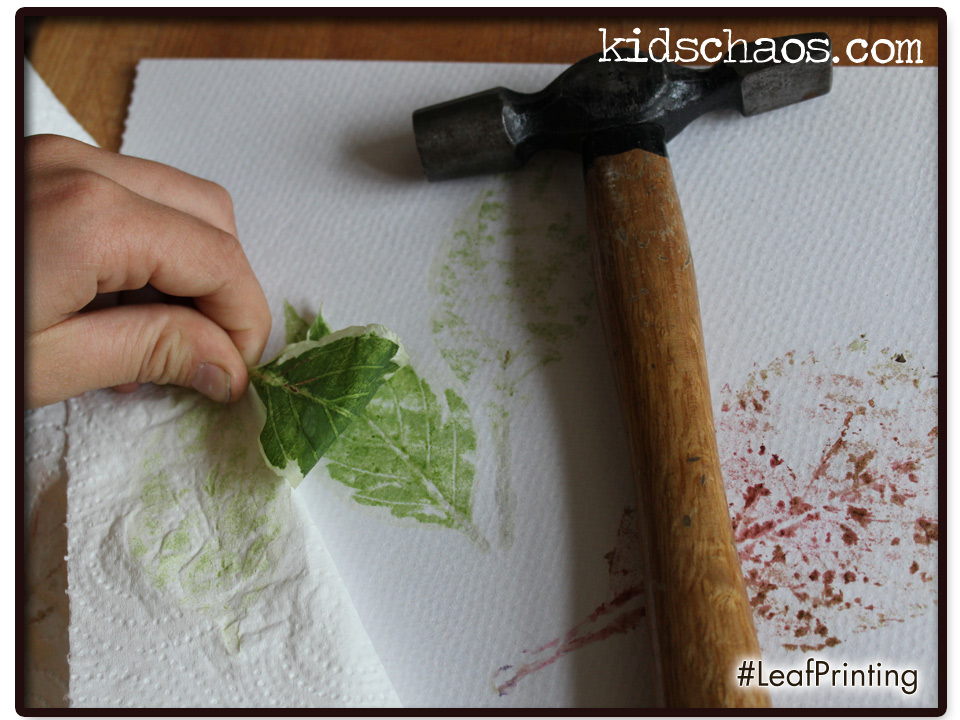
Hapa Zome is a Japanese technique of hammering fresh flowers and leaves onto fabric or paper to release their natural pigments.
Materials Needed:
- Fresh, juicy leaves (Bright greens and autumn reds)
- Watercolor paper or cotton fabric
- Rubber mallet or hammer
- Masking tape
Step-by-Step Instructions:
- 1Layout: Place your leaves face down on the paper or fabric.
- 2Secure: Tape the edges of the leaves so they don’t shift. Cover with a piece of parchment paper.
- 3Hammer: Firmly tap the entire surface of the leaf with the mallet. You will see the pigment bleeding through the parchment.
- 4Reveal: Peel back the tape and discard the crushed leaf matter to reveal a perfect botanical print.
5. DIY Clay Leaf Impression Trays
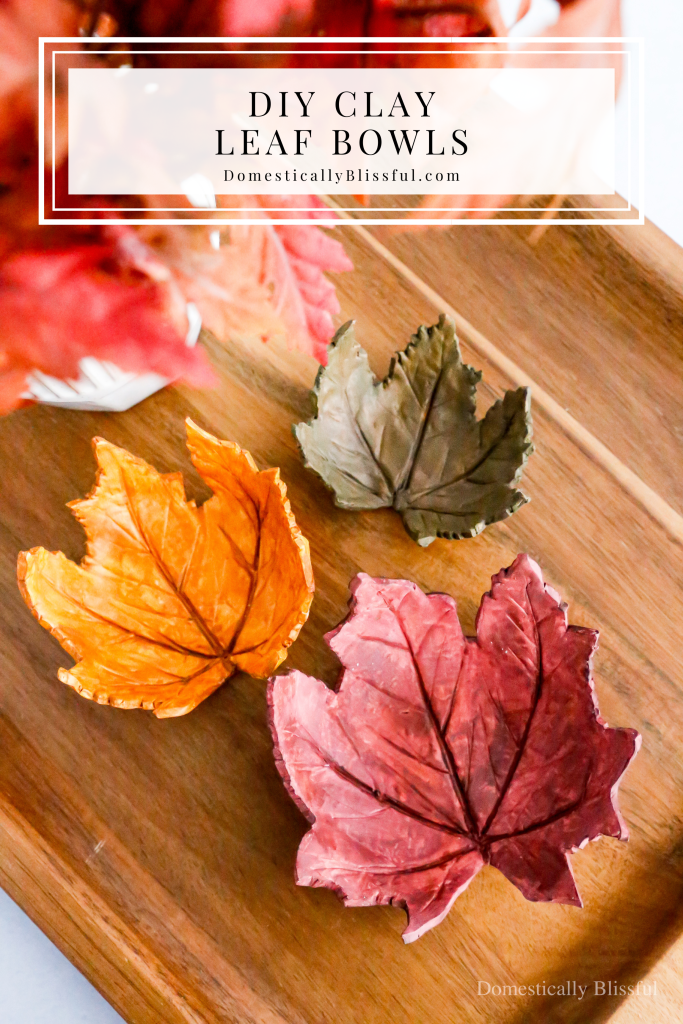
Use the natural veins of a leaf to create textured ceramic-style jewelry dishes.
Materials Needed:
- Air-dry clay
- Large, heavily veined leaves (Rhubarb or Hosta)
- Rolling pin
- X-Acto knife
Step-by-Step Instructions:
- 1Roll: Roll out a slab of air-dry clay to 1/4 inch thickness.
- 2Press: Place the leaf vein-side down onto the clay. Roll over it firmly with the rolling pin.
- 3Cut: Use the X-Acto knife to cut around the perimeter of the leaf.
- 4Shape: Lift the clay leaf and place it inside a shallow bowl to dry. This will give it a curved, functional shape.
- 5Finish: Once dry (24–48 hours), sand the edges and seal with a gloss varnish.
6. Leaf Stencil Canvas Art

Instead of using the leaf itself as the art, use it as a natural stencil to create “negative space” masterpieces.
Materials Needed:
- Stretched canvas
- Fresh leaves
- Spray paint or acrylic paint with a sponge
- Removable spray adhesive
Step-by-Step Instructions:
- 1Adhere: Lightly spray the back of your leaves with removable adhesive and press them onto the canvas in a pleasing composition.
- 2Paint: Spray over the entire canvas with your chosen color. Alternatively, sponge acrylic paint around the edges of the leaves.
- 3Peel: While the paint is still slightly tacky, peel the leaves away to reveal the clean, white canvas underneath.
7. Botanical Resin Coasters
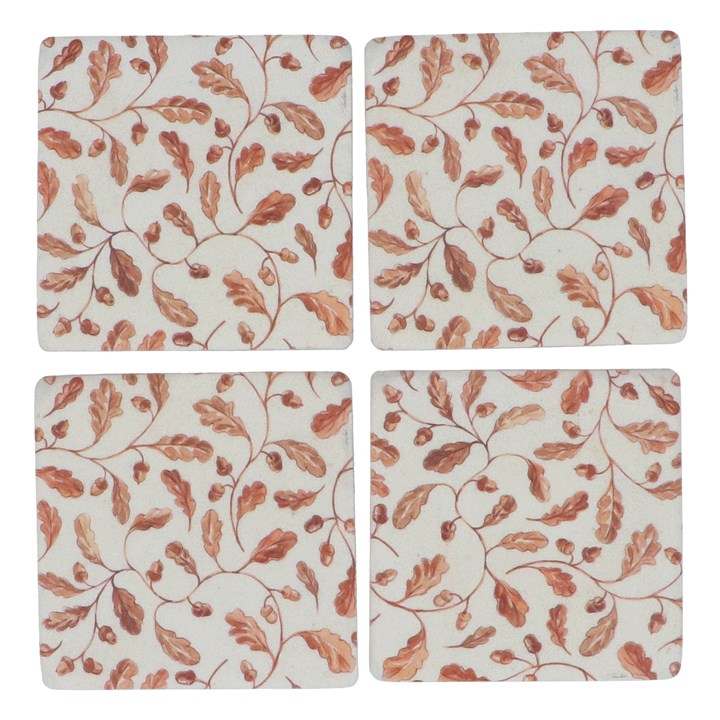
Preserve the fleeting beauty of autumn forever in clear epoxy resin.
Materials Needed:
- Silicone coaster molds
- Clear epoxy resin
- Dried/Pressed leaves (must be 100% dry)
- Heat gun
Step-by-Step Instructions:
- 1Mix: Prepare your resin according to the manufacturer’s instructions.
- 2Pour: Pour a thin base layer of resin into the mold.
- 3Embed: Place the leaf into the resin. Use a toothpick to pop any bubbles trapped under the leaf.
- 4Top Coat: Pour the remaining resin to fill the mold.
- 5Degas: Use a heat gun to quickly pass over the surface to remove air bubbles. Let cure for 24 hours.
8. Hand-Embroidered Dried Leaves
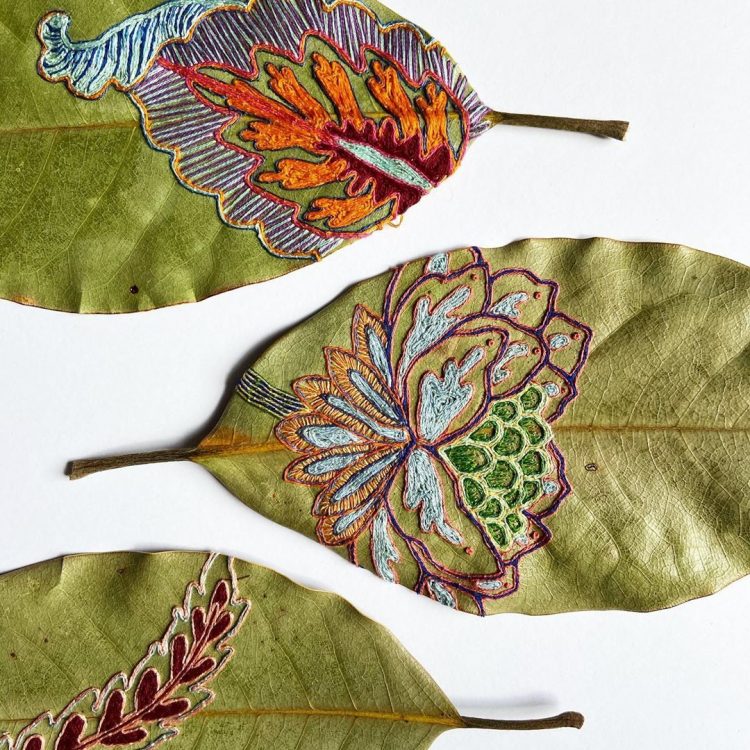
This is a delicate, meditative craft that combines fiber arts with nature.
It works best on thick, leathery leaves.
Materials Needed:
- Preserved Magnolia or Laurel leaves (Glycerin-treated is best)
- Embroidery floss
- Fine needle
- Thimble
Step-by-Step Instructions:
- 1Design: Lightly sketch a simple geometric pattern on the leaf with a pencil.
- 2Pre-pierce: Use the needle to carefully poke holes along your design. This prevents the leaf from cracking during stitching.
- 3Stitch: Use a simple backstitch or running stitch to follow your pattern.
- 4Mount: These look stunning when mounted on cardstock and framed in a shadow box.
9. Nature Mandala Wall Hanging
Create a large-scale circular installation using leaves of various sizes, colors, and textures.
Materials Needed:
- A large circular plywood backing or cardboard
- A variety of pressed leaves
- Tacky glue
- Clear sealant spray
Step-by-Step Instructions:
- 1Center Point: Mark the exact center of your board.
- 2Layering: Start from the center and glue leaves in a radial pattern, moving outward in concentric circles.
- 3Symmetry: Use different species of leaves for each “ring” of the mandala to create contrast.
- 4Seal: Once the glue is dry, spray with a UV-resistant clear sealer to prevent the colors from fading.
10. Cyanotype Leaf Sun Prints
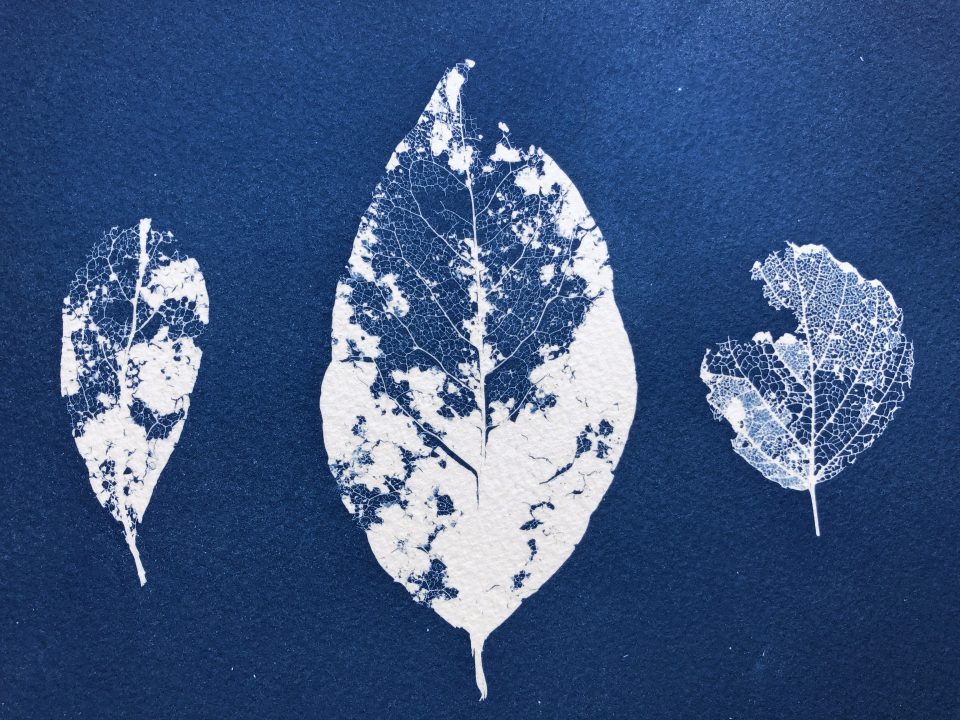
Cyanotype is a photographic printing process that produces a blueprint-like image using sunlight.
Materials Needed:
- Cyanotype treated paper (pre-sensitized)
- Pressed leaves
- A sheet of glass or acrylic
- Water
Step-by-Step Instructions:
- 1Arrange: In a room with dim light, place your leaves on the cyanotype paper.
- 2Expose: Cover with glass to keep the leaves flat and take the arrangement outside into direct sunlight for 5–15 minutes.
- 3Develop: The paper will turn a bronzy-grey. Bring it back inside, remove the leaves, and rinse the paper in cold water for 5 minutes.
- 4Transform: Watch as the paper turns a deep Prussian blue, leaving white silhouettes of the leaves behind.
Project Comparison: Difficulty & Time Investment
Frequently Asked Questions
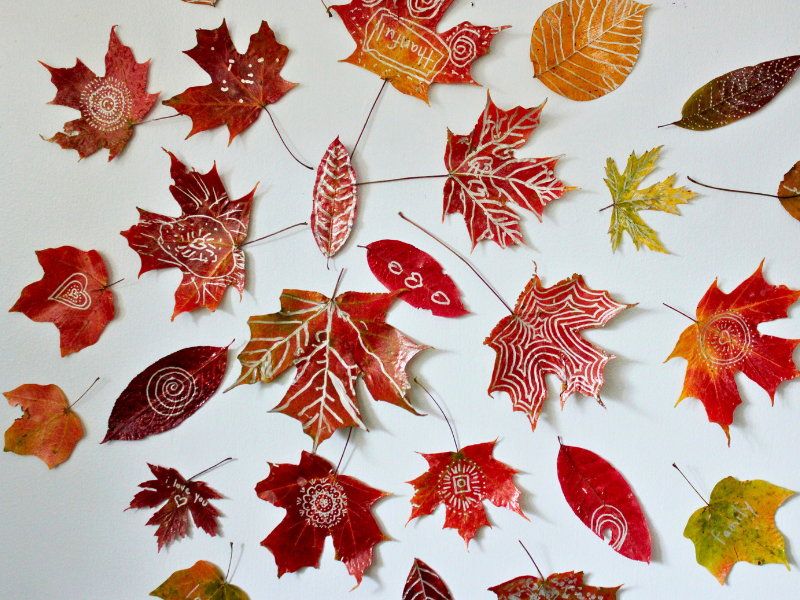
How do I keep the colors of the leaves from fading?
Natural pigments will eventually fade when exposed to UV light. To slow this process, use a UV-resistant clear acrylic spray or frame your art behind UV-protective glass. Avoid hanging leaf art in direct sunlight.
Can I use fresh leaves for resin art?
No. Fresh leaves contain moisture. If you put a fresh leaf in resin, it will eventually turn brown and rot inside the plastic. Always ensure leaves are completely dried or pressed before embedding them in resin.
What is the best glue for leaf art?
For most paper or wood-based projects, a pH-neutral “Tacky Glue” or a clear-drying acid-free craft glue is best.
For delicate applications, a spray adhesive provides even coverage without saturating the leaf.
Conclusion
DIY leaf art is a beautiful intersection of nature and creativity.
From the scientific precision of cyanotypes to the tactile satisfaction of clay impressions, these ten projects offer something for every skill level.
By upcycling fallen foliage, you not only create unique, high-authority decor for your home but also foster a deeper connection with the changing seasons.
Start small with a simple framed leaf, and soon you’ll find yourself viewing every walk in the park as a scouting mission for your next masterpiece.
Leave a Reply