
Got that drawer overflowing with old AA, AAA, or coin cell batteries? Don’t just toss them! While tossing seems easy, it contributes to e-waste, and many “dead” batteries still hold a little charge or can be repurposed in non-electrical ways. Think of that battery pile not as junk, but as free material for your next DIY adventure!
This guide explores five creative projects to give those old power sources a new purpose, blending crafting, simple electronics, and sustainable thinking. We’ll cover everything from making tiny lights to building simple motors and even finding decorative uses.
Quick Safety First: These projects primarily use common alkaline/zinc-carbon batteries (AA, AAA, C, D) and coin cells. Crucially, avoid puncturing, dismantling, or using leaking batteries. Be extra cautious with Lithium-ion (Li-ion) types – damaged ones are a fire risk and need careful recycling. When combining batteries electrically, always use the same type, brand, and roughly the same age. Let’s dive in!
Project 1: The Tiny Glow – Coin Cell LED Holder
Those little flat coin cells often seem completely dead but can usually still power a single, low-voltage LED. It’s perfect for tiny, subtle lighting effects – like the time I needed a faint glow inside a miniature model house!
Why it works: A “dead” 3V coin cell might retain 1.5-2.5V, often just enough for efficient LEDs (especially red or yellow ones).
Materials You’ll Need:
| Item | Description | Notes |
| “Dead” Coin Cell | e.g., CR2032, CR2025 | Test a few if needed. |
| LED | Standard 3mm or 5mm | Longer leg = Positive (+), Shorter = Neg (-) |
| Electrical Tape | Or small binder clip/clothespin | For securing |
| Optional: Craft Foam | For a more robust holder |
Steps to Create Your Tiny Light:
- Identify Polarity: Note the longer (+) leg and shorter (-) leg on the LED. Find the (+) and (-) sides on the coin cell (usually marked).
- Connect: Place the LED’s longer (+) leg on the battery’s (+) side and the shorter (-) leg on the battery’s (-) side.
- Secure: Press the legs firmly. If the LED glows (even faintly), use electrical tape or a small clip to hold the legs securely against the battery terminals.
- (Optional) Holder: Sandwich the battery and LED legs between small foam pieces (use conductive tape inside if desired) and secure the assembly.
Uses: Great for greeting cards, miniature lighting, small wearable tech, or simple circuit demos. Keep away from small children (choking hazard).
Project 2: Power Up! – Simple Alkaline Battery Pack
Need a bit more power for a small motor or some fairy lights? You can sometimes link similar alkaline batteries together. As a kid, I’d tape batteries end-to-end; this is just a slightly safer version!
Connection Type: We’ll focus on Series: Connecting (+) to (-) increases voltage (e.g., two 1.2V batteries ≈ 2.4V).
CRUCIAL SAFETY: Only use standard alkaline or zinc-carbon batteries (AA, AAA, C, D). They MUST be the same type, brand, and age. NEVER mix types, ages, or use Lithium-Ion/rechargeables this way – risk of leaks, heat, or worse!
Materials You’ll Need:
| Item | Description | Notes |
| 2-4 “Old” Alkaline Batteries | AA/AAA, matched set. | Crucial: Identical type/brand/age |
| Electrical Tape | For secure connections. | |
| Optional: Battery Holder | Safer & more reliable connection. | Designed for multiple cells. |
| Optional: Wires/Clips | Easier connection to device. |
Steps to Build a Series Pack:
- Inspect: Check batteries are alkaline and undamaged (no leaks).
- Align: Arrange end-to-end:
[ + Batt 1 - ] [ + Batt 2 - ] ...ensuring (+) touches (-) between batteries. - Secure: Tightly wrap electrical tape around each connection point (+ to -).
- Output: You’ll have one free (+) end and one free (-) end for your pack.
- Connect: Use the pack’s (+) and (-) ends to power a low-draw device matching the expected voltage.
Uses: Temporary power for simple DIY electronics, small motors, emergency low-power lights. Power won’t last long.
Project 3: The Mesmerizing Mini-Motor (Homopolar Motor)
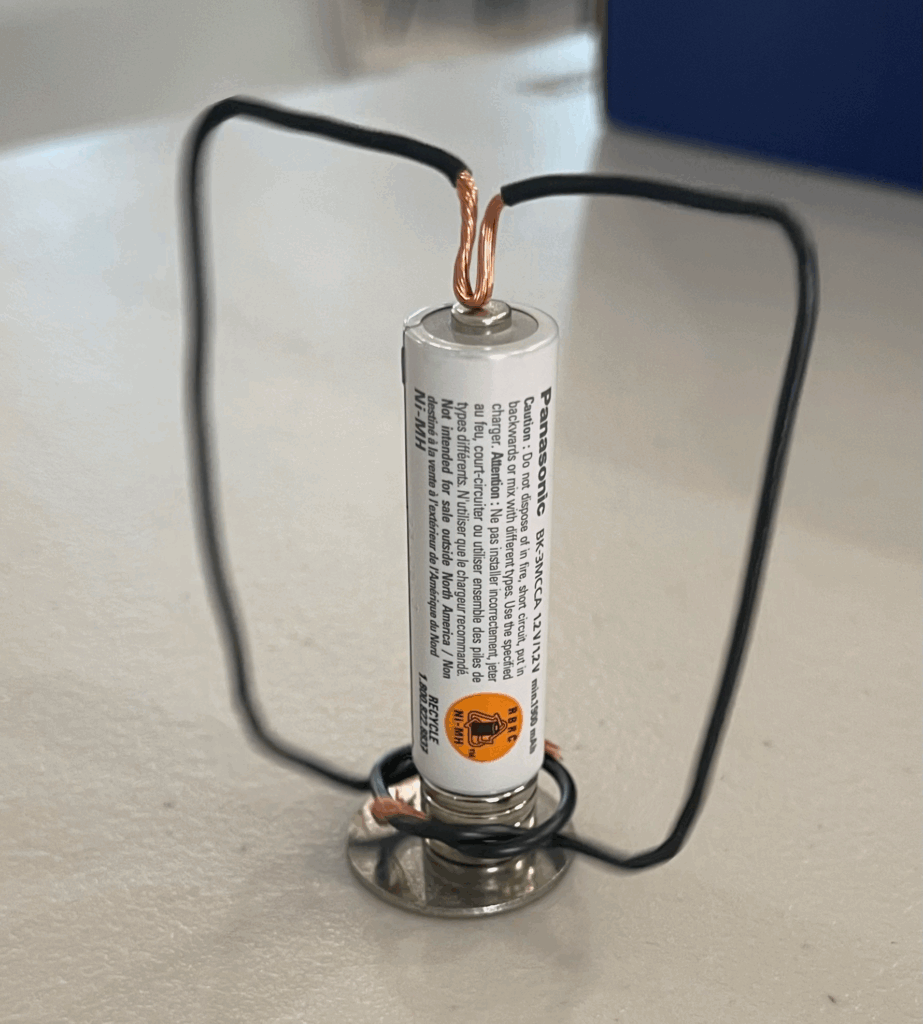
This project is pure physics fun! Create a spinning motor with just a battery, wire, and strong magnets. Seeing this at a science fair years ago felt like magic. It works best with a decent charge, but some older batteries might still manage a slow spin.
Why it works: Current flows from the battery through the wire and magnet. This moving current in the magnetic field creates a force (Lorentz force) that causes rotation.
Materials You’ll Need:
| Item | Description | Notes |
| Battery | AA or C alkaline | Needs sufficient charge. |
| Copper Wire | Bare, 18-22 gauge, ~6-10 inches | Strip ends if insulated. |
| Neodymium Magnets | Small, strong disc magnets (stackable) | Handle carefully! |
| Pliers | Optional, for wire bending. |
Steps to Build Your Motor:
- Shape Wire: Bend wire so it can balance on the battery’s top (+) nub, with “arms” reaching down to touch the magnets placed on the bottom (-) end. Symmetry helps.
- Place Magnets: Stick magnet(s) centered on the battery’s flat negative (-) bottom.
- Assemble: Stand the battery upright (magnets down). Balance the wire’s center point on the (+) nub.
- Connect & Spin: Adjust wire arms to lightly brush the magnets. If contacts are good, the wire should start spinning!
Troubleshooting: Check contacts, balance, battery strength. The battery/wire can get warm; don’t run continuously for too long.
Uses: Fantastic educational toy, mesmerizing desk gadget, demonstrates electromagnetism.
Project 4: The Energy Vampire – Building a Joule Thief
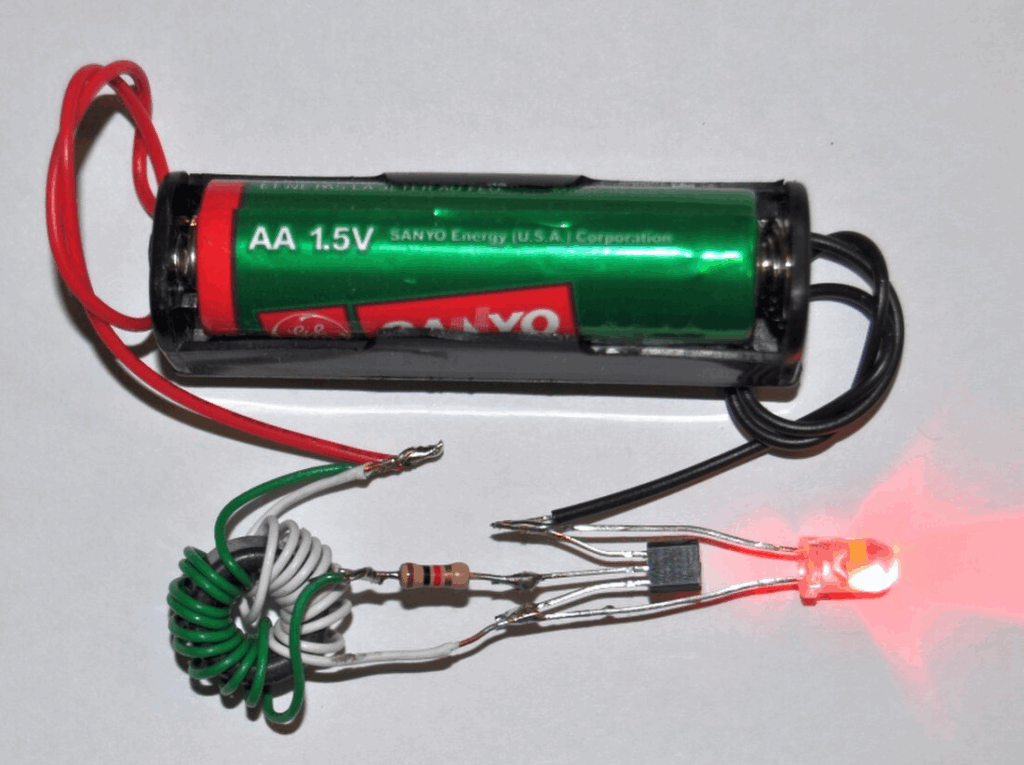
Ready for a more advanced project? The Joule Thief circuit extracts the very last energy (“Joules”) from a “dead” battery to light an LED, tackling the frustration of devices dying prematurely. This requires basic soldering skills.
Why it works: Uses a transistor and a hand-wound coil (inductor on a ferrite core) to rapidly switch current. The collapsing magnetic field in the coil boosts the low battery voltage high enough to flash an LED.
Materials You’ll Need (Soldering Required):
| Item | Description | Notes |
| “Dead” Battery | 1.5V Alkaline (AA/AAA), even down to ~0.5V | |
| Battery Holder | Single AA/AAA | |
| NPN Transistor | e.g., 2N3904, BC547 | Check pinout (EBC) |
| Resistor | 1k Ohm (Brown-Black-Red) | |
| Ferrite Toroid Core | Small magnetic donut | Salvage or buy. |
| Enameled Copper Wire | Two colors (~30 gauge), ~1 ft each | “Magnet wire”. Sand ends to remove insulation. |
| LED | Any standard LED | Polarity matters! |
| Soldering Gear | Iron, solder, etc. | |
| Optional: Perfboard | For neat mounting. |
Simplified Steps (Find detailed schematics online):
- Wind Toroid: Twist the two wires together, wind 10-15 times around the core. Keep track of starts/ends of each color.
- Prep Coil: Connect the start of wire 1 to the end of wire 2. This is one connection point. The other start (wire 1) and end (wire 2) are the other two connection points. Sand wire tips.
- Solder Circuit (Follow Schematic Carefully): Involves connecting the coil ends, resistor, transistor (Base, Collector, Emitter pins), and LED (Anode+, Cathode-) to the battery holder terminals in a specific configuration.
- Test: Insert the battery. If correct, the LED should light up (possibly flickering).
Safety/Tips: Double-check wiring/polarity before powering. Use soldering safety practices.
Uses: Ultra-long-lasting emergency lights/nightlights from “dead” batteries. Great electronics learning project.
Project 5: Beyond Electronics – Creative & Decorative Uses
Even totally flat batteries have uses! Their physical shape and weight can be valuable for crafts, especially heavier C/D cells or 9Vs. Just ensure they aren’t leaking. I’ve used old D cells wrapped in fabric as handy sewing pattern weights.
Guidelines:
- Use only sealed, non-leaking batteries (alkaline, zinc-carbon best).
- Never cut or puncture batteries.
- Wipe clean before crafting.
Creative Ideas:
- Weights: Use as paperweights, pattern weights, balloon weights. Decorate by wrapping, painting, or covering in clay.
- Sculpture/Art: Incorporate casings into found-object art, robot figures, miniature scenery.
- Counterweights: Add weight to balance mobiles or kinetic art.
- Sound Makers: Seal smaller batteries (AA/AAA) securely inside a sturdy container for a shaker.
- Teaching Aids: Use confirmed dead batteries to safely demonstrate battery installation or connections.
Final Steps: Safety Recap & Responsible Disposal
Reusing batteries is great, but remember:
- Safety First: Never puncture, use leaking batteries, or improperly mix battery types (especially avoid tampering with Li-ion).
- Recycle: When batteries are truly finished or unsafe for DIY, don’t trash them. Find a local battery recycling drop-off point (check electronics stores, recycling centers, or sites like Call2Recycle).
Conclusion: Turn Battery Waste into DIY Wins
That collection of old batteries is bursting with potential for creative reuse. Whether you’re making a simple LED glow, experimenting with motors, building a clever circuit, or using them in purely decorative crafts, you’re reducing waste and learning something new. Give these projects a try, stay safe, and see the hidden value in those “dead” batteries! What are your favorite battery reuse ideas?


Leave a Reply